從“中英文思維回譯法”看中英思維差異

1、中英文在表達意思的方式上的不同 

中英文表達的差異很重要一部分體現在思維上。例如中文說:

“不知道怎麼回事,我筆記本連不上網了”

地道的英文不是:

My laptop can’t connect to the internet for no reason.

而是:

I couldn’t access the internet from my laptop for some reason.

這個句子至少體現了以下幾處中英文思維的不同:

  • 中文用“我的電腦”做主語,英語用“我”做主語。
  • “上網”是 access the internet 而不是 connect to the internet.
  • 不知道怎麼回事是 for some reason 而不是 for no reason.
  • 中文先說“不知道怎麼回事”,英文後說 for some reason.


2、中英文思維的差異

作為跨文化交流的翻譯不僅只是兩種語言的簡單轉換,也是兩種思維方式之間的轉換。 拿英漢兩種語言來說.由於文化背景的差異等諸多因素,這兩種語言的思維方式也不盡相同,概括來說主要就是:

  • 句子重心的差異
  • 語態的差異
  • 否定視角的差異

0x1:句子重心的差異

句子重心包括兩個層面:

  • 一個是語義重心
  • 另一個是結構重心

英語和漢語的語義重點基本沒有大的區別,這兩種語言句子重心的差異主要體現在結構重心的差異上。

西方人說話喜歡直截了當、開門見山,他們在表達思想時喜歡先安排主要內容,然後再藉助各種連接手段補充其他信息,因而英語句子的結構重心通常在前,句子常常頭短尾長。

而中國人則喜歡水到渠成、漸入佳境。所以他們在表達思想時喜歡先對所述的事物進行鋪墊和渲染,然後再點出中心意思,因而漢語句子的結構重心往往靠後,句子頭長尾短。

我們來看下面的例句:

我們再來看一個例句:

這句話的結構重心為後半句“許多小船載着各種雜貨快速向客輪駛來”。通過上面的分析,這句話在翻譯時應首先將結構重心置前,先說主要內容:

0x2:語態的差異

雖然英漢兩種語言在句式上都有主動和被動之分,但表現形式和使用場合卻不盡相同。

  • 英語中被動語態的使用範圍非常廣,除了大量的及物動詞使用被動語態外,不少相當於及物動詞的短語也可以使用被動語態。
  • 相比之下,漢語中被動語態的使用就低得多了,大多數情況下漢語都使用主動形式來表達被動意義。

以“He is loved by all of us.”這句話為例,這句話在英語中司空見慣,而如果要譯成“他被我們大家喜歡着”就很彆扭,必須要使用主動語態,譯成“我們大家都喜歡他”才通順。

我們來看下面的例句:


被動語態能使句子的核心詞“an interesting discovery”更為突出。

我們再來看一個例句:

中文原句是主動語態,但由於“開挖隧道”和“派狗到雪地里”這兩個動作的發出者在中文里並沒有出現,所以在譯成英語時就只能使用被動語態了。

中文中有大量的無主句,在將這些句子譯成英文時都可以使用被動語態。

0x3:否定視角的差異

英語的否定方式非常豐富,大體可分為:

  • 顯形否定:通常是藉助否定詞或,含否定意義的句型來表達(如never、unless、hardly、rather than、in the absence of、too …. to …)
  • 隱形否定:沒有明顯的否定詞,其形式上是否定的,它的否定含義要通過上下文或語境來推定

與英語比起來,漢語的否定結構就單一多了,一般是在相應的詞語前面加上“不”、“沒有”等進行“詞的否定”。

所以,在漢譯英的過程中,對於漢語中相對單一的否定結構,英文中可以有多種不同的表達方式。

我們來看下面的例句:

可以看到,譯文採用了隱形否定的形式來表達。

我們再來看一個例句:


中文原文是肯定句,而譯文中使用了否定結構“never fail to”不僅表達了肯定的意思,還顯得更為精彩,更有力量。

3、中英文回譯法

在翻譯練習中,有一種非常有效翻譯方法叫“回譯法”,也就是對譯文進行再次翻譯后與原文進行對照,在對比中找到差異所在。 概括來說就是:

  • 從地道英語直譯成中文
  • 由直譯的中文再譯成地道的中文
  • 仔細分析記錄地道英語和地道中文的區別
  • 由地道中文再回譯成地道英文

0x1:英譯中 – 從 A 到 B

我們先徹底理解英文原文的意思,然後嘗試着翻譯成中文。如果覺得直譯很彆扭的話,那就說明這裡有值得一學的英語思維! 在這一步,我們要做到讓中文譯文符合英文原文的表述,盡量直譯,基本通順即可。 舉個例子: 一位商務人士因為電腦有問題連不上網,沒能及時回復重要郵件,等修好了,他趕緊給別人發郵件解釋,郵件開頭是這麼說的:  

這句話直譯過來就是:

我很抱歉沒能更早回復你,出於某些原因,我用筆記本電腦無法連上網。

0x2:重建中文 – 從 B 到 C

這一步,我們要引入中文思維,展開想象:

在真實的中文語境中,相同的場景中,人們會怎麼說這句話?

這一步需要你完全拋棄英文原文的影響,去想中國人真正會使用出來的中文,不能有任何的翻譯痕迹。你可以假象在同樣的場景中,你自己會如何表達。例如:

不好意思啊,這麼晚回復你,我的本子一直連不上網,不知道怎麼回事。

到這一步我們發現,經過重建的中文,已經和之前的譯文在表達順序和結構上有明顯區別了。

0x3:連接通過 – 找到 A 和 C 之間的關聯

這一步也叫“埋鈎子”,就是說,埋下一些幫助記憶的“小鈎子”,把兩種思維掛上,讓自己以後能回想起來。

我們要觀察的內容主要是三方面:

  • 多了什麼?
  • 少了什麼?
  • 改了什麼?

比如:

  • 句子結構是怎麼變的?
  • 哪些詞被捨棄了?
  • 哪些表達式被徹底替換了?
  • 為什麼有些信息乾脆就不說了?
  • 有些信息反而要被加上去?

以這句話為例,我會注意到,

  • 我們中國人通常說的“這麼晚回復你”,英文的表達思路不一定用so late,還可以用not sooner,即否定句式。
  • 連上網,這句話里用的是access這個詞,而不是我們更熟悉的connect to。
  • 句子的主語也變了,一般中文會說“我的筆記本連不上網”,主語是筆記本,但是英文原文的說法是“i coudn’t access the internet”,主要是 I,也就是我。是我沒法通過本子來連網,而不是說本子連不上網。

0x4:思維逆轉 – 把 C 譯回 A

最後一步,我們要把整個過程逆推回去,在只看到 C 的情況下,回想起 A 是怎麼說的。如果你能做到準確完成回譯,說明你已經成功地建立了通道,從中文思維跳到了英文思維。


本站聲明:網站內容來源於博客園,如有侵權,請聯繫我們,我們將及時處理

【其他文章推薦】

網頁設計最專業,超強功能平台可客製化

※自行創業缺乏曝光? 網頁設計幫您第一時間規劃公司的形象門面

※回頭車貨運收費標準

※推薦評價好的iphone維修中心

※教你寫出一流的銷售文案?

台中搬家公司教你幾個打包小技巧,輕鬆整理裝箱!

台中搬家公司費用怎麼算?

Spring 源碼學習 – 單例bean的實例化過程

本文作者:geek,一個聰明好學的同事

1. 簡介

開發中我們常用@Commpont,@Service,@Resource等註解或者配置xml去聲明一個類,使其成為spring容器中的bean,以下我將用從源碼角度看以AnnotationConfigApplicationContext為例看spring如何把帶有註解的類生成spring中bean。

2. 示例代碼

public class TestContext {
	public static void main(String[] args) {
		AnnotationConfigApplicationContext context = new AnnotationConfigApplicationContext(AppConfig.class);
		SingleBean singleBean = context.getBean(SingleBean.class);
		System.out.println("<=====>"+singleBean.getTestStr());
	}
}
@ComponentScan("com.geek")
public class AppConfig {
}
@Component
public class SingleBean {
	private String testStr = "testStr";

	public String getTestStr() {
		return testStr;
	}
}

注意:以上代碼僅需要引入spring-context依賴即可。

3. 源碼分析

​ 上面的demo在調用AnnotationConfigApplicationContext構造函數的時候,AppConfig類會被註冊到AnnotatedBeanDefinitionReader,由這個reader把AppConfig解釋為beanDefination,從而被spring獲取到要實例化的類信息,以下為bean生產的源碼及其註釋。(源碼基於springFramework 5.1.X)

3.1 創建入口

​ 單例bean的創建的入口為DefaultListableBeanFactory.java#preInstantiateSingletons,下面源碼可見創建的bean條件為非抽象,非@LazyInit註解,Scope為singleTon(默認為singleTon)。

@Override
	public void preInstantiateSingletons() throws BeansException {
		if (logger.isTraceEnabled()) {
			logger.trace("Pre-instantiating singletons in " + this);
		}
		// Iterate over a copy to allow for init methods which in turn register new bean definitions.
		// While this may not be part of the regular factory bootstrap, it does otherwise work fine.
		//所有可能需要去實例化的class(lazy,scope)
		List<String> beanNames = new ArrayList<>(this.beanDefinitionNames);

		// Trigger initialization of all non-lazy singleton beans...
		for (String beanName : beanNames) {
			RootBeanDefinition bd = getMergedLocalBeanDefinition(beanName);
			/**
			 * 非抽象,非懶初始化,單例bean
			 */
			if (!bd.isAbstract() && bd.isSingleton() && !bd.isLazyInit()) {
				if (isFactoryBean(beanName)) {
					Object bean = getBean(FACTORY_BEAN_PREFIX + beanName);
					if (bean instanceof FactoryBean) {
						final FactoryBean<?> factory = (FactoryBean<?>) bean;
						boolean isEagerInit;
						if (System.getSecurityManager() != null && factory instanceof SmartFactoryBean) {
							isEagerInit = AccessController.doPrivileged((PrivilegedAction<Boolean>)
											((SmartFactoryBean<?>) factory)::isEagerInit,
									getAccessControlContext());
						}
						else {
							isEagerInit = (factory instanceof SmartFactoryBean &&
									((SmartFactoryBean<?>) factory).isEagerInit());
						}
						if (isEagerInit) {
							getBean(beanName);
						}
					}
				}
				//非工廠bean實例化
				else {
					getBean(beanName);
				}
			}
		}
		/**
		 * 實例化完成后觸發實現了SmartInitializingSingleton方法的bean
		 * 的afterSingletonsInstantiated方法
 		 */
		// Trigger post-initialization callback for all applicable beans...
		for (String beanName : beanNames) {
			Object singletonInstance = getSingleton(beanName);
			if (singletonInstance instanceof SmartInitializingSingleton) {
				final SmartInitializingSingleton smartSingleton = (SmartInitializingSingleton) singletonInstance;
				if (System.getSecurityManager() != null) {
					AccessController.doPrivileged((PrivilegedAction<Object>) () -> {
						smartSingleton.afterSingletonsInstantiated();
						return null;
					}, getAccessControlContext());
				}
				else {
					smartSingleton.afterSingletonsInstantiated();
				}
			}
		}
	}

3.2 創建前doGetBean代碼邏輯

getBean方法進來后便是直接調用doGetBean,doGetBean執行的源碼解釋如下:
protected <T> T doGetBean(final String name, @Nullable final Class<T> requiredType,
			@Nullable final Object[] args, boolean typeCheckOnly) throws BeansException {
		/**
		 * 獲取beanName
		 * 1,去掉factortoryBean前綴&
		 * 2,帶有別名的bean轉換為原來名字
		 */
		final String beanName = transformedBeanName(name);
		Object bean;
		// Eagerly check singleton cache for manually registered singletons.
		/**
		 * 從DefaultSingletonBeanRegistry的singletonObjects
		 * (spring內部用來緩存單例bean的currentHashMap)檢查是否存在該bean,不存在則創建
		 * 涉及單例模式下的循環依賴解決
		 */
		Object sharedInstance = getSingleton(beanName);
		if (sharedInstance != null && args == null) {
			if (logger.isTraceEnabled()) {
				if (isSingletonCurrentlyInCreation(beanName)) {
					logger.trace("Returning eagerly cached instance of singleton bean '" + beanName +
							"' that is not fully initialized yet - a consequence of a circular reference");
				}
				else {
					logger.trace("Returning cached instance of singleton bean '" + beanName + "'");
				}
			}
			/**
			 *獲取給定bean實例的對象,如果是Factory Bean,
			 * 則可以是bean實例本身或其創建的對象。
			 */
			bean = getObjectForBeanInstance(sharedInstance, name, beanName, null);
		}
		else {
			// Fail if we're already creating this bean instance:
			// We're assembly within a circular reference.
			/**
			 * 原型模式下的bean存在循環依賴則會拋異常
			 */
			if (isPrototypeCurrentlyInCreation(beanName)) {
				throw new BeanCurrentlyInCreationException(beanName);
			}
			// Check if bean definition exists in this factory.
			/**
			 * 找不到則從父容器中查找
			 */
			BeanFactory parentBeanFactory = getParentBeanFactory();
			if (parentBeanFactory != null && !containsBeanDefinition(beanName)) {
				// Not found -> check parent.
				String nameToLookup = originalBeanName(name);
				if (parentBeanFactory instanceof AbstractBeanFactory) {
					return ((AbstractBeanFactory) parentBeanFactory).doGetBean(
							nameToLookup, requiredType, args, typeCheckOnly);
				}
				else if (args != null) {
					// Delegation to parent with explicit args.
					return (T) parentBeanFactory.getBean(nameToLookup, args);
				}
				else if (requiredType != null) {
					// No args -> delegate to standard getBean method.
					return parentBeanFactory.getBean(nameToLookup, requiredType);
				}
				else {
					return (T) parentBeanFactory.getBean(nameToLookup);
				}
			}
			if (!typeCheckOnly) {
				markBeanAsCreated(beanName);
			}
			try {
				/**
				 * 父容器中也找不到該bean,則需要重新實例化
				 * 1,獲取要實例化bean的beanDefinition,
				 * 2,檢查bean的實例化需要依賴的其他bean
				 */
				final RootBeanDefinition mbd = getMergedLocalBeanDefinition(beanName);
				checkMergedBeanDefinition(mbd, beanName, args);

				// Guarantee initialization of beans that the current bean depends on.
				String[] dependsOn = mbd.getDependsOn();
				if (dependsOn != null) {
					for (String dep : dependsOn) {
						/**
						 * 若給定的依賴 bean 已經註冊為依賴給定的bean
						 */
						if (isDependent(beanName, dep)) {
							throw new BeanCreationException(mbd.getResourceDescription(), beanName,
									"Circular depends-on relationship between '" + beanName + "' and '" + dep + "'");
						}
						registerDependentBean(dep, beanName);
						try {
							/**
							 * 遞歸調用getBean,優先創建依賴的bean
							 */
							getBean(dep);
						}
						catch (NoSuchBeanDefinitionException ex) {
							throw new BeanCreationException(mbd.getResourceDescription(), beanName,
									"'" + beanName + "' depends on missing bean '" + dep + "'", ex);
						}
					}
				}
				// Create bean instance.
				if (mbd.isSingleton()) {
					/**
					 * 通過調用DefaultSingletonBeanRegistry的getSingleton,從而調用核心方法createBean創建
					 */
					sharedInstance = getSingleton(beanName, () -> {
						try {
							return createBean(beanName, mbd, args);
						}
						catch (BeansException ex) {
							// Explicitly remove instance from singleton cache: It might have been put there
							// eagerly by the creation process, to allow for circular reference resolution.
							// Also remove any beans that received a temporary reference to the bean.
							destroySingleton(beanName);
							throw ex;
						}
					});
					bean = getObjectForBeanInstance(sharedInstance, name, beanName, mbd);
				}

				else if (mbd.isPrototype()) {
					// It's a prototype -> create a new instance.
					Object prototypeInstance = null;
					try {
						beforePrototypeCreation(beanName);
						prototypeInstance = createBean(beanName, mbd, args);
					}
					finally {
						afterPrototypeCreation(beanName);
					}
					bean = getObjectForBeanInstance(prototypeInstance, name, beanName, mbd);
				}

				else {
					String scopeName = mbd.getScope();
					final Scope scope = this.scopes.get(scopeName);
					if (scope == null) {
						throw new IllegalStateException("No Scope registered for scope name '" + scopeName + "'");
					}
					try {
						Object scopedInstance = scope.get(beanName, () -> {
							beforePrototypeCreation(beanName);
							try {
								return createBean(beanName, mbd, args);
							}
							finally {
								afterPrototypeCreation(beanName);
							}
						});
						bean = getObjectForBeanInstance(scopedInstance, name, beanName, mbd);
					}
					catch (IllegalStateException ex) {
						throw new BeanCreationException(beanName,
								"Scope '" + scopeName + "' is not active for the current thread; consider " +
								"defining a scoped proxy for this bean if you intend to refer to it from a singleton",
								ex);
					}
				}
			}
			catch (BeansException ex) {
				cleanupAfterBeanCreationFailure(beanName);
				throw ex;
			}
		}
		/**
		 * 檢查需要的bean類型是否符合
		 */
		// Check if required type matches the type of the actual bean instance.
		if (requiredType != null && !requiredType.isInstance(bean)) {
			try {
				T convertedBean = getTypeConverter().convertIfNecessary(bean, requiredType);
				if (convertedBean == null) {
					throw new BeanNotOfRequiredTypeException(name, requiredType, bean.getClass());
				}
				return convertedBean;
			}
			catch (TypeMismatchException ex) {
				if (logger.isTraceEnabled()) {
					logger.trace("Failed to convert bean '" + name + "' to required type '" +
							ClassUtils.getQualifiedName(requiredType) + "'", ex);
				}
				throw new BeanNotOfRequiredTypeException(name, requiredType, bean.getClass());
			}
		}
		return (T) bean;
	}

doGetBean的操作流程如下:

1,執行transformedBeanName方法轉換beanName

​ 傳遞的參數可能是bean的alias或者為FactoryBean,transformedBeanName執行的操作:(1)若傳進來的FactoryBean(FactoryBean以&作為前綴標記),去掉&修飾符。(2)經過(1)的處理后,有alias的bean則從aliasMap中獲取bean的原始beanName。

2,從容器的緩存中獲取bean

​ getSingleton先從spring三級緩存中的第一級singletonObjects(Map結構)中獲取,若不存在,則檢查該bean是否正在創建isSingletonCurrentlyInCreation(beanName)) ,正在創建的bean會從二級緩存earlySingletonObjects(Map結構)獲取。獲取到緩存的bean後會調用AbstractBeanFactory#getObjectForBeanInstance轉換bean的實例本身返回。因為從緩存中拿到的可能是factoryBean,所以getObjectForBeanInstance需要把是通過從緩存factoryBeanObjectCache獲取或通過factory.getObject()獲得相應的bean返回。

3,bean實例化前檢查

​ (1)先檢查是否原型模式下的bean是否存在循環依賴,是則會拋異常。

​ (2)檢查父類工廠(parentBeanFactory)是否存在,存在則從parentBeanFactory中遞歸調用doGetBean。

​ (3)獲取改bean的beanDefinition,檢查該bean實例化過程中是否涉及依賴了其他的bean,若是則遞歸調用getBean,優先創建依賴的bean。(涉及單例下的循環以來解決,下篇文章詳細介紹)。

​ (4)對創建bean代碼加synchronized和執行beforeSingletonCreation(beanName)前置處理。

3.3 創建前createBean邏輯

​ 經過前面的doGetBean的一輪檢查與準備后,便在AbstractAutowireCapableBeanFactory#createBean中開始bean的創建。

/**
	 * Central method of this class: creates a bean instance,
	 * populates the bean instance, applies post-processors, etc.
	 * 解析指定 BeanDefinition 的 class
	 * 處理 override 屬性
	 * 實例化的前置處理
	 * 創建 bean
	 * @see #doCreateBean
	 */
	@Override
	protected Object createBean(String beanName, RootBeanDefinition mbd, @Nullable Object[] args)
			throws BeanCreationException {

		if (logger.isTraceEnabled()) {
			logger.trace("Creating instance of bean '" + beanName + "'");
		}
		RootBeanDefinition mbdToUse = mbd;

		// Make sure bean class is actually resolved at this point, and
		// clone the bean definition in case of a dynamically resolved Class
		// which cannot be stored in the shared merged bean definition.
		/**
		 * 解釋bean的class,看beanDefinition是否有class,否則load class
		 */
		Class<?> resolvedClass = resolveBeanClass(mbd, beanName);
		if (resolvedClass != null && !mbd.hasBeanClass() && mbd.getBeanClassName() != null) {
			mbdToUse = new RootBeanDefinition(mbd);
			mbdToUse.setBeanClass(resolvedClass);
		}
		/**
		 * 對bean不存在lookup-method 和 replace-method
		 * 標記其方法的overloaded為false
		 */
		// Prepare method overrides.
		try {
			mbdToUse.prepareMethodOverrides();
		}
		catch (BeanDefinitionValidationException ex) {
			throw new BeanDefinitionStoreException(mbdToUse.getResourceDescription(),
					beanName, "Validation of method overrides failed", ex);
		}

		try {
			/**
			 * 調用實現實現BeanPostProcessor的bean後置處理生成代理對象,
			 * 有代理對象則直接返回代理對象
			 */
			// Give BeanPostProcessors a chance to return a proxy instead of the target bean instance.
			Object bean = resolveBeforeInstantiation(beanName, mbdToUse);
			if (bean != null) {
				return bean;
			}
		}
		catch (Throwable ex) {
			throw new BeanCreationException(mbdToUse.getResourceDescription(), beanName,
					"BeanPostProcessor before instantiation of bean failed", ex);
		}

		try {
			/**
			 * 無需代理的bean實例化
			 */
			Object beanInstance = doCreateBean(beanName, mbdToUse, args);
			if (logger.isTraceEnabled()) {
				logger.trace("Finished creating instance of bean '" + beanName + "'");
			}
			return beanInstance;
		}
		catch (BeanCreationException | ImplicitlyAppearedSingletonException ex) {
			// A previously detected exception with proper bean creation context already,
			// or illegal singleton state to be communicated up to DefaultSingletonBeanRegistry.
			throw ex;
		}
		catch (Throwable ex) {
			throw new BeanCreationException(
					mbdToUse.getResourceDescription(), beanName, "Unexpected exception during bean creation", ex);
		}
	}

createBean的操作流程如下:

1,resolveBeanClass

​ 解釋beanDefinition的class,並且保存在beanDefinition中。

2,prepareMethodOverrides

​ 處理bean中的lookup-method (在單例bean用 @Lookup註解標記的方法,註解的方法返回的對象是原型)和 replace-method( 標記的方法,標記bean中A的方法被實現被另外一個實現MethodReplacer接口的B方法替代)。

3,resolveBeforeInstantiation

​ 調用實現實現BeanPostProcessor的bean後置處理生成代理對象,有代理對象則直接返回代理對象。(spring AOP則是基於此處實現)

3.4 bean的真正實例化createBeanInstance

​ 在AbstractAutowireCapableBeanFactory#createBeanInstance中,真正創建bean,源碼及註釋如下:

protected BeanWrapper createBeanInstance(String beanName, RootBeanDefinition mbd, @Nullable Object[] args) {
		// Make sure bean class is actually resolved at this point.
		Class<?> beanClass = resolveBeanClass(mbd, beanName);
		if (beanClass != null && !Modifier.isPublic(beanClass.getModifiers()) && !mbd.isNonPublicAccessAllowed()) {
			throw new BeanCreationException(mbd.getResourceDescription(), beanName,
					"Bean class isn't public, and non-public access not allowed: " + beanClass.getName());
		}
		/**
		 * 通過提供supplier回調方法創建
		 */
		Supplier<?> instanceSupplier = mbd.getInstanceSupplier();
		if (instanceSupplier != null) {
			return obtainFromSupplier(instanceSupplier, beanName);
		}
		/**
		 * 通過工廠方法創建 bean 實例,可以是靜態工廠方法或者實例工廠
		 */
		if (mbd.getFactoryMethodName() != null) {
			return instantiateUsingFactoryMethod(beanName, mbd, args);
		}
		// Shortcut when re-creating the same bean...
		boolean resolved = false;
		boolean autowireNecessary = false;
		if (args == null) {
			synchronized (mbd.constructorArgumentLock) {
				/**
				 * 查找已經bean已經緩存解析的構造函數或者工廠方法
				 */
				if (mbd.resolvedConstructorOrFactoryMethod != null) {
					resolved = true;
					autowireNecessary = mbd.constructorArgumentsResolved;
				}
			}
		}
		/**
		 * 已經有緩存的構造函數或者工廠方法,直接實例化
		 */
		if (resolved) {
			if (autowireNecessary) {
				return autowireConstructor(beanName, mbd, null, null);
			}
			else {
				return instantiateBean(beanName, mbd);
			}
		}
		/**
		 * 通過實現BeanPostProcessor的代理類autowired的構造函數實例化
		 */
		// Candidate constructors for autowiring?
		Constructor<?>[] ctors = determineConstructorsFromBeanPostProcessors(beanClass, beanName);
		if (ctors != null || mbd.getResolvedAutowireMode() == AUTOWIRE_CONSTRUCTOR ||
				mbd.hasConstructorArgumentValues() || !ObjectUtils.isEmpty(args)) {
			return autowireConstructor(beanName, mbd, ctors, args);
		}
		/**
		 * 通過本身帶有autowired的構造函數實例化,通過調用反射newInstance實現
		 */
		// Preferred constructors for default construction?
		ctors = mbd.getPreferredConstructors();
		if (ctors != null) {
			return autowireConstructor(beanName, mbd, ctors, null);
		}
		/**
		 * 無參構造函數實例化,通過調用反射newInstance實現
		 */
		// No special handling: simply use no-arg constructor.
		return instantiateBean(beanName, mbd);
	}

由上述源碼可以看出,實例化bean操作流程如下:

1,如果存在 Supplier 回調,則通過提供supplier回調方法創建,如以下方式定義的bean:

@RunWith(SpringRunner.class)
@SpringBootTest(classes = Spring5Application.class)
public class BeanRegistrationTest {
    @Autowired
    private GenericWebApplicationContext context;
    
    context.registerBean(A.class, () -> new A());
}

2,如果存在工廠方法,則通過工廠方法創建 bean 實例,可以是靜態工廠方法或者實例工廠,如以下方式定義的bean:

public class AFactory implements FactoryBean<A> {
	@Override
	public A getObject() throws Exception {
		return new A();
	}
	@Override
	public Class<?> getObjectType() {
		return A.class;
	}
}
//或:
@Configuration
public class BeanConfigration {
	@Bean
	public A a(){
		return new A();
	}

}

3,已經有緩存的構造函數或者工廠方法,直接實例化。

4,以上三點都不存在,則使用帶參構造函數與無參構造函數實例化。如以下方式定義的bean:

@Commponet
public class A{}

4.總結

​ spring單例bean的實例化流程大概就是這樣,很多細節地方,包括循環依賴處理,bean屬性填充等細節點下一章介紹。

參考

  • 《Spring 源碼深度解析》- 郝佳
  • 《死磕spring源碼》-chenssy

查看更多文章關注公眾號:好奇心森林

本站聲明:網站內容來源於博客園,如有侵權,請聯繫我們,我們將及時處理

【其他文章推薦】

※產品缺大量曝光嗎?你需要的是一流包裝設計!

※自行創業缺乏曝光? 網頁設計幫您第一時間規劃公司的形象門面

※回頭車貨運收費標準

※推薦評價好的iphone維修中心

※超省錢租車方案

台中搬家遵守搬運三大原則,讓您的家具不再被破壞!

※推薦台中搬家公司優質服務,可到府估價

akka-typed(4) – EventSourcedBehavior in action

  前面提到過,akka-typed中較重要的改變是加入了EventSourcedBehavior。也就是說增加了一種專門負責EventSource模式的actor, 最終和其它種類的actor一道可以完美實現CQRS。新的actor,我還是把它稱為persistentActor,還是一種能維護和維持運行狀態的actor。即,actor內部狀態可以存放在數據庫里,然後通過一組功能函數來提供對狀態的處理轉變,即持續化處理persistence。當然作為一種具備EventSourcedBehavior的actor, 普遍應有的actor屬性、方法、消息處理協議、監管什麼的都還必須存在。在這篇討論里我們就通過案例和源碼來說明一下EventSourcedBehavior是如何維護內部狀態及作為一種actor又應該怎麼去使用它。

我們把上一篇討論里購物車的例子拿來用,再增加一些消息回復response機制,主要是彙報購物車狀態:

object ItemInfo { case class Item(name: String, price: Double) } object MyCart { import ItemInfo._ sealed trait Command sealed trait Event extends CborSerializable sealed trait Response //commands
  case class AddItem(item: Item) extends Command case object PayCart extends Command case class CountItems(replyTo: ActorRef[Response]) extends Command //event
  case class ItemAdded(item: Item) extends Event case object CartPaid extends Event //state
  case class CartLoad(load: List[Item] = Nil) //response
  case class PickedItems(items: List[Item]) extends Response case object CartEmpty extends Response val commandHandler: (CartLoad, Command) => Effect[Event,CartLoad] = { (state, cmd) => cmd match { case AddItem(item) => Effect.persist(ItemAdded(item)) case PayCart => Effect.persist(CartPaid) case CountItems(replyTo) => Effect.none.thenRun { cart => cart.load match { case Nil => replyTo ! CartEmpty case listOfItems => replyTo ! PickedItems(listOfItems) } } } } val eventHandler: (CartLoad,Event) => CartLoad = { (state,evt) => evt match { case ItemAdded(item) => state.copy(load = item :: state.load) case CartPaid => state.copy(load = Nil) } } def apply(): Behavior[Command] = EventSourcedBehavior[Command,Event,CartLoad]( persistenceId = PersistenceId("10","1013"), emptyState = CartLoad(), commandHandler = commandHandler, eventHandler = eventHandler ) } object Shopper { import ItemInfo._ sealed trait Command extends CborSerializable case class GetItem(item: Item) extends Command case object Settle extends Command case object GetCount extends Command case class WrappedResponse(res: MyCart.Response) extends Command def apply(): Behavior[Command] = Behaviors.setup[Command] { ctx => val shoppingCart = ctx.spawn(MyCart(), "shopping-cart") val cartRef: ActorRef[MyCart.Response] = ctx.messageAdapter(WrappedResponse) Behaviors.receiveMessage { msg => msg match { case GetItem(item) => shoppingCart ! MyCart.AddItem(item) case Settle => shoppingCart ! MyCart.PayCart case GetCount => shoppingCart ! MyCart.CountItems(cartRef) case WrappedResponse(res) => res match { case MyCart.PickedItems(items) => ctx.log.info("**************Current Items in Cart: {}*************", items) case MyCart.CartEmpty => ctx.log.info("**************shopping cart is empty!***************") } } Behaviors.same } } } object ShoppingCart extends App { import ItemInfo._ val shopper = ActorSystem(Shopper(),"shopper") shopper ! Shopper.GetItem(Item("banana",11.20)) shopper ! Shopper.GetItem(Item("watermelon",4.70)) shopper ! Shopper.GetCount shopper ! Shopper.Settle shopper ! Shopper.GetCount scala.io.StdIn.readLine() shopper.terminate() }

實際上EventSourcedBehavior里還嵌入了回復機制,完成一項Command處理后必須回復指令方,否則程序無法通過編譯。如下:

private def withdraw(acc: OpenedAccount, cmd: Withdraw): ReplyEffect[Event, Account] = { if (acc.canWithdraw(cmd.amount)) Effect.persist(Withdrawn(cmd.amount)).thenReply(cmd.replyTo)(_ => Confirmed) else Effect.reply(cmd.replyTo)(Rejected(s"Insufficient balance ${acc.balance} to be able to withdraw ${cmd.amount}")) }

不過這個回復機制是一種副作用。即,串連在Effect產生之後立即實施。這個動作是在eventHandler之前。在這個時段無法回復最新的狀態。

說到side-effect, 如Effect.persist().thenRun(produceSideEffect): 當成功持續化event后可以安心進行一些其它的操作。例如,當影響庫存數的event被persist后可以馬上從賬上扣減庫存。

在上面這個ShoppingCart例子里我們沒有發現狀態轉換代碼如Behaviors.same。這隻能是EventSourcedBehavior屬於更高層次的Behavior,狀態轉換已經嵌入在eventHandler里了,還記着這個函數的款式吧  (State,Event) => State, 這個State就是狀態了。

Events persist在journal里,如果persist操作中journal出現異常,EventSourcedBehavior自備了安全監管策略,如下:

  def apply(): Behavior[Command] = EventSourcedBehavior[Command,Event,CartLoad]( persistenceId = PersistenceId("10","1013"), emptyState = CartLoad(), commandHandler = commandHandler, eventHandler = eventHandler ).onPersistFailure( SupervisorStrategy .restartWithBackoff(minBackoff = 10.seconds, maxBackoff = 60.seconds, randomFactor = 0.1) .withMaxRestarts(3) .withResetBackoffAfter(10.seconds))

值得注意的是:這個策略只適用於onPersistFailure(),從外部用Behaviors.supervisor()包嵌是無法實現處理PersistFailure效果的。但整個actor還是需要一種Backoff策略,因為在EventSourcedBehavior內部commandHandler,eventHandler里可能也會涉及一些數據庫操作。在操作失敗后需要某種Backoff重啟策略。那麼我們可以為actor增加監控策略如下:

  def apply(): Behavior[Command] = Behaviors.supervise( Behaviors.setup { ctx => EventSourcedBehavior[Command, Event, CartLoad]( persistenceId = PersistenceId("10", "1013"), emptyState = CartLoad(), commandHandler = commandHandler, eventHandler = eventHandler ).onPersistFailure( SupervisorStrategy .restartWithBackoff(minBackoff = 10.seconds, maxBackoff = 60.seconds, randomFactor = 0.1) .withMaxRestarts(3) .withResetBackoffAfter(10.seconds)) } ).onFailure( SupervisorStrategy .restartWithBackoff(minBackoff = 10.seconds, maxBackoff = 60.seconds, randomFactor = 0.1) .withMaxRestarts(3) .withResetBackoffAfter(10.seconds) )

現在這個MyCart可以說已經是個安全、強韌性的actor了。

既然是一種persistentActor,那麼持久化的管理應該也算是核心功能了。EventSourcedBehavior通過接收信號提供了對持久化過程監控功能,如:

 def apply(): Behavior[Command] = Behaviors.supervise( Behaviors.setup[Command] { ctx => EventSourcedBehavior[Command, Event, CartLoad]( persistenceId = PersistenceId("10", "1013"), emptyState = CartLoad(), commandHandler = commandHandler, eventHandler = eventHandler ).onPersistFailure( SupervisorStrategy .restartWithBackoff(minBackoff = 10.seconds, maxBackoff = 60.seconds, randomFactor = 0.1) .withMaxRestarts(3) .withResetBackoffAfter(10.seconds) ).receiveSignal { case (state, RecoveryCompleted) => ctx.log.info("**************Recovery Completed with state: {}***************",state) case (state, SnapshotCompleted(meta))  => ctx.log.info("**************Snapshot Completed with state: {},id({},{})***************",state,meta.persistenceId, meta.sequenceNr) case (state,RecoveryFailed(err)) => ctx.log.error("recovery failed with: {}",err.getMessage) case (state,SnapshotFailed(meta,err)) => ctx.log.error("snapshoting failed with: {}",err.getMessage) } } ).onFailure( SupervisorStrategy .restartWithBackoff(minBackoff = 10.seconds, maxBackoff = 60.seconds, randomFactor = 0.1) .withMaxRestarts(3) .withResetBackoffAfter(10.seconds) )

EventSourcedBehavior.receiveSignal是個偏函數:

  def receiveSignal(signalHandler: PartialFunction[(State, Signal), Unit]): EventSourcedBehavior[Command, Event, State]

下面是一個EventSourcedBehavior Signal 清單:

sealed trait EventSourcedSignal extends Signal @DoNotInherit sealed abstract class RecoveryCompleted extends EventSourcedSignal case object RecoveryCompleted extends RecoveryCompleted { def instance: RecoveryCompleted = this } final case class RecoveryFailed(failure: Throwable) extends EventSourcedSignal { def getFailure(): Throwable = failure } final case class SnapshotCompleted(metadata: SnapshotMetadata) extends EventSourcedSignal { def getSnapshotMetadata(): SnapshotMetadata = metadata } final case class SnapshotFailed(metadata: SnapshotMetadata, failure: Throwable) extends EventSourcedSignal { def getFailure(): Throwable = failure def getSnapshotMetadata(): SnapshotMetadata = metadata } object SnapshotMetadata { /** * @param persistenceId id of persistent actor from which the snapshot was taken. * @param sequenceNr sequence number at which the snapshot was taken. * @param timestamp time at which the snapshot was saved, defaults to 0 when unknown. * in milliseconds from the epoch of 1970-01-01T00:00:00Z. */ def apply(persistenceId: String, sequenceNr: Long, timestamp: Long): SnapshotMetadata =
    new SnapshotMetadata(persistenceId, sequenceNr, timestamp) } /** * Snapshot metadata. * * @param persistenceId id of persistent actor from which the snapshot was taken. * @param sequenceNr sequence number at which the snapshot was taken. * @param timestamp time at which the snapshot was saved, defaults to 0 when unknown. * in milliseconds from the epoch of 1970-01-01T00:00:00Z. */ final class SnapshotMetadata(val persistenceId: String, val sequenceNr: Long, val timestamp: Long) { override def toString: String = s"SnapshotMetadata($persistenceId,$sequenceNr,$timestamp)" } final case class DeleteSnapshotsCompleted(target: DeletionTarget) extends EventSourcedSignal { def getTarget(): DeletionTarget = target } final case class DeleteSnapshotsFailed(target: DeletionTarget, failure: Throwable) extends EventSourcedSignal { def getFailure(): Throwable = failure def getTarget(): DeletionTarget = target } final case class DeleteEventsCompleted(toSequenceNr: Long) extends EventSourcedSignal { def getToSequenceNr(): Long = toSequenceNr } final case class DeleteEventsFailed(toSequenceNr: Long, failure: Throwable) extends EventSourcedSignal { def getFailure(): Throwable = failure def getToSequenceNr(): Long = toSequenceNr }

當然,EventSourcedBehavior之所以能具備自我修復能力其中一項是因為它有對持久化的事件重演機制。如果每次啟動都需要對所有歷史事件進行重演的話會很不現實。必須用snapshot來濃縮歷史事件:

  def apply(): Behavior[Command] = Behaviors.supervise( Behaviors.setup[Command] { ctx => EventSourcedBehavior[Command, Event, CartLoad]( persistenceId = PersistenceId("10", "1013"), emptyState = CartLoad(), commandHandler = commandHandler, eventHandler = eventHandler ).onPersistFailure( SupervisorStrategy .restartWithBackoff(minBackoff = 10.seconds, maxBackoff = 60.seconds, randomFactor = 0.1) .withMaxRestarts(3) .withResetBackoffAfter(10.seconds) ).receiveSignal { case (state, RecoveryCompleted) => ctx.log.info("**************Recovery Completed with state: {}***************",state) case (state, SnapshotCompleted(meta))  => ctx.log.info("**************Snapshot Completed with state: {},id({},{})***************",state,meta.persistenceId, meta.sequenceNr) case (state,RecoveryFailed(err)) => ctx.log.error("recovery failed with: {}",err.getMessage) case (state,SnapshotFailed(meta,err)) => ctx.log.error("snapshoting failed with: {}",err.getMessage) }.snapshotWhen { case (state,CartPaid,seqnum) => ctx.log.info("*****************snapshot taken at: {} with state: {}",seqnum,state) true
          case (state,event,seqnum) => false }.withRetention(RetentionCriteria.snapshotEvery(numberOfEvents = 100, keepNSnapshots = 2)) } ).onFailure( SupervisorStrategy .restartWithBackoff(minBackoff = 10.seconds, maxBackoff = 60.seconds, randomFactor = 0.1) .withMaxRestarts(3) .withResetBackoffAfter(10.seconds) )

下面是本次示範的源碼:

build.sbt

name := "learn-akka-typed"

version := "0.1"

scalaVersion := "2.13.1"
scalacOptions in Compile ++= Seq("-deprecation", "-feature", "-unchecked", "-Xlog-reflective-calls", "-Xlint")
javacOptions in Compile ++= Seq("-Xlint:unchecked", "-Xlint:deprecation")

val AkkaVersion = "2.6.5"
val AkkaPersistenceCassandraVersion = "1.0.0"


libraryDependencies ++= Seq(
  "com.typesafe.akka" %% "akka-cluster-sharding-typed" % AkkaVersion,
  "com.typesafe.akka" %% "akka-persistence-typed" % AkkaVersion,
  "com.typesafe.akka" %% "akka-persistence-query" % AkkaVersion,
  "com.typesafe.akka" %% "akka-serialization-jackson" % AkkaVersion,
  "com.typesafe.akka" %% "akka-persistence-cassandra" % AkkaPersistenceCassandraVersion,
  "com.typesafe.akka" %% "akka-slf4j" % AkkaVersion,
  "ch.qos.logback"     % "logback-classic"             % "1.2.3"
)

application.conf

akka.actor.allow-java-serialization = on
akka {
  loglevel = DEBUG
  actor {
    serialization-bindings {
      "com.learn.akka.CborSerializable" = jackson-cbor
    }
  }
  # use Cassandra to store both snapshots and the events of the persistent actors
  persistence {
    journal.plugin = "akka.persistence.cassandra.journal"
    snapshot-store.plugin = "akka.persistence.cassandra.snapshot"
  }

}
akka.persistence.cassandra {
  # don't use autocreate in production
  journal.keyspace = "poc"
  journal.keyspace-autocreate = on
  journal.tables-autocreate = on
  snapshot.keyspace = "poc_snapshot"
  snapshot.keyspace-autocreate = on
  snapshot.tables-autocreate = on
}

datastax-java-driver {
  basic.contact-points = ["192.168.11.189:9042"]
  basic.load-balancing-policy.local-datacenter = "datacenter1"
}

ShoppingCart.scala

package com.learn.akka

import akka.actor.typed._
import akka.persistence.typed._
import akka.actor.typed.scaladsl.Behaviors
import akka.persistence.typed.scaladsl._
import scala.concurrent.duration._

object ItemInfo {
  case class Item(name: String, price: Double)
}

object MyCart {
 import ItemInfo._

  sealed trait Command
  sealed trait Event extends CborSerializable
  sealed trait Response

  //commands
  case class AddItem(item: Item) extends Command
  case object PayCart extends Command
  case class CountItems(replyTo: ActorRef[Response]) extends Command

  //event
  case class ItemAdded(item: Item) extends Event
  case object CartPaid extends Event

  //state
  case class CartLoad(load: List[Item] = Nil)

  //response
  case class PickedItems(items: List[Item]) extends Response
  case object CartEmpty extends Response

  val commandHandler: (CartLoad, Command) => Effect[Event,CartLoad] = { (state, cmd) =>
    cmd match {
      case AddItem(item) =>
        Effect.persist(ItemAdded(item))
      case PayCart =>
        Effect.persist(CartPaid)
      case CountItems(replyTo) =>
        Effect.none.thenRun { cart =>
          cart.load match {
            case Nil =>
              replyTo ! CartEmpty
            case listOfItems =>
              replyTo ! PickedItems(listOfItems)
          }
        }
    }
  }

  val eventHandler: (CartLoad,Event) => CartLoad = { (state,evt) =>
    evt match {
      case ItemAdded(item) =>
         state.copy(load = item :: state.load)
      case CartPaid =>
        state.copy(load = Nil)
    }
  }

  def apply(): Behavior[Command] =
    Behaviors.supervise(
      Behaviors.setup[Command] { ctx =>
        EventSourcedBehavior[Command, Event, CartLoad](
          persistenceId = PersistenceId("10", "1013"),
          emptyState = CartLoad(),
          commandHandler = commandHandler,
          eventHandler = eventHandler
        ).onPersistFailure(
          SupervisorStrategy
            .restartWithBackoff(minBackoff = 10.seconds, maxBackoff = 60.seconds, randomFactor = 0.1)
            .withMaxRestarts(3)
            .withResetBackoffAfter(10.seconds)
        ).receiveSignal {
          case (state, RecoveryCompleted) =>
            ctx.log.info("**************Recovery Completed with state: {}***************",state)
          case (state, SnapshotCompleted(meta))  =>
            ctx.log.info("**************Snapshot Completed with state: {},id({},{})***************",state,meta.persistenceId, meta.sequenceNr)
          case (state,RecoveryFailed(err)) =>
            ctx.log.error("recovery failed with: {}",err.getMessage)
          case (state,SnapshotFailed(meta,err)) =>
            ctx.log.error("snapshoting failed with: {}",err.getMessage)
        }.snapshotWhen {
          case (state,CartPaid,seqnum) =>
            ctx.log.info("*****************snapshot taken at: {} with state: {}",seqnum,state)
            true
          case (state,event,seqnum) => false
        }.withRetention(RetentionCriteria.snapshotEvery(numberOfEvents = 100, keepNSnapshots = 2))
      }
    ).onFailure(
      SupervisorStrategy
        .restartWithBackoff(minBackoff = 10.seconds, maxBackoff = 60.seconds, randomFactor = 0.1)
        .withMaxRestarts(3)
        .withResetBackoffAfter(10.seconds)
    )
}

object Shopper {

  import ItemInfo._

  sealed trait Command extends CborSerializable

  case class GetItem(item: Item) extends Command
  case object Settle extends Command
  case object GetCount extends Command

  case class WrappedResponse(res: MyCart.Response) extends Command

  def apply(): Behavior[Command] = Behaviors.setup[Command] { ctx =>
    val shoppingCart = ctx.spawn(MyCart(), "shopping-cart")
    val cartRef: ActorRef[MyCart.Response] = ctx.messageAdapter(WrappedResponse)
    Behaviors.receiveMessage { msg =>
      msg match {
        case GetItem(item) =>
          shoppingCart ! MyCart.AddItem(item)
        case Settle =>
          shoppingCart ! MyCart.PayCart
        case GetCount =>
          shoppingCart ! MyCart.CountItems(cartRef)
        case WrappedResponse(res) => res match {
          case MyCart.PickedItems(items) =>
            ctx.log.info("**************Current Items in Cart: {}*************", items)
          case MyCart.CartEmpty =>
            ctx.log.info("**************shopping cart is empty!***************")
        }
      }
      Behaviors.same
    }
  }

}


object ShoppingCart extends App {
  import ItemInfo._
  val shopper = ActorSystem(Shopper(),"shopper")
  shopper ! Shopper.GetItem(Item("banana",11.20))
  shopper ! Shopper.GetItem(Item("watermelon",4.70))
  shopper ! Shopper.GetCount
  shopper ! Shopper.Settle
  shopper ! Shopper.GetCount
  scala.io.StdIn.readLine()

  shopper.terminate()

}


本站聲明:網站內容來源於博客園,如有侵權,請聯繫我們,我們將及時處理

【其他文章推薦】

※回頭車貨運收費標準

※產品缺大量曝光嗎?你需要的是一流包裝設計!

※自行創業缺乏曝光? 網頁設計幫您第一時間規劃公司的形象門面

※推薦評價好的iphone維修中心

※教你寫出一流的銷售文案?

台中搬家公司教你幾個打包小技巧,輕鬆整理裝箱!

台中搬家遵守搬運三大原則,讓您的家具不再被破壞!

鋁複合材料能存氣體 氫氣車電池新招

摘錄自2020年4月19日聯合新聞網報導

美國西北大學法爾哈教授所帶領的團隊,最近成功研發一種以鋁做為主元素的複合材料:NU-1501,有望成為氫氣車大量儲存氣體的新選項。該材料在結構上與海綿相似,擁有許多小孔可儲存氣體,NU-1501可透過壓力的不同來儲存或釋放氣體。比起現有的氣體儲存槽更加安全、輕量與便宜,若加以應用,有極大潛力。

為了降低交通運輸業所造成的碳排放,可達到零碳排的氫氣車近年來成為重要的研究主軸。氫氣車主要透過氫和氧的化學反應來產生電,過程並不會產生任何二氧化碳。但因為氫氣十分易燃且體積龐大,在未加壓的狀況下,跑100公里需要11,000公升的氫氣。

目前業界主要採取將氫氣加壓到700巴,比汽車胎壓還要高出300倍,除了有安全疑慮外,特別設計過的氣體儲存槽也相當笨重與昂貴。而NU-1051除了能攜帶更多的氫氣外,也只需要比較低的壓力,因此十分具有發展潛力。

能源議題
環境經濟
能源轉型
循環經濟
國際新聞
氫氣車
海綿

本站聲明:網站內容來源環境資訊中心https://e-info.org.tw/,如有侵權,請聯繫我們,我們將及時處理

【其他文章推薦】

※自行創業缺乏曝光? 網頁設計幫您第一時間規劃公司的形象門面

網頁設計一頭霧水該從何著手呢? 台北網頁設計公司幫您輕鬆架站!

※想知道最厲害的網頁設計公司"嚨底家"!

※別再煩惱如何寫文案,掌握八大原則!

※產品缺大量曝光嗎?你需要的是一流包裝設計!

※回頭車貨運收費標準

台中搬家公司費用怎麼算?

十來萬買車要能上班還能自駕游,你的城市適合哪輛車?

廣汽菲克-Jeep自由本站聲明:網站內容來源於http://www.auto6s.com/,如有侵權,請聯繫我們,我們將及時處理

【其他文章推薦】

※別再煩惱如何寫文案,掌握八大原則!

網頁設計一頭霧水該從何著手呢? 台北網頁設計公司幫您輕鬆架站!

※超省錢租車方案

※教你寫出一流的銷售文案?

網頁設計最專業,超強功能平台可客製化

※產品缺大量曝光嗎?你需要的是一流包裝設計!

台中搬家遵守搬運三大原則,讓您的家具不再被破壞!

城市SUV就不能越野?進山後這台車性格大變

無疆界。盡馳騁本次試駕的地點選址是廣州王子山,奧迪本次並沒有專門為試駕活動搭建一塊可以輕鬆通過考驗的場地,而是以不常規的純天然全路況山林作為試驗全新奧迪Q7的考試場。在鋪裝路面上,將空氣懸架調節至最低狀態,此時離地間隙為186mm,車身姿態更低,高速狀態下行駛異常穩定,2。

廣州王子山奧迪Q7任性越野

奧迪Q7的形象一直以來都給人一種優雅穩重,大氣成熟的印象。似乎它的車主就應該西裝革履一本正經的出入五星級酒店和出席高檔商務場所。然而很多人並不知道,當它脫離了城市的喧囂和繁華之後,在崎嶇難行的非鋪裝路面,奧迪Q7也會露出崢嶸任性的一面。

初現肌肉——粗獷中的精緻

全新奧迪Q7上市已經有一段時間,相比較上一代奧迪Q7,全新的奧迪Q7在外觀層面進行了“全面瘦身”,車身尺寸有所減小,儘管在很多人眼裡似乎全新的奧迪Q7少了一分霸氣,但是個人認為,更加平直簡練的線條,使得全新奧迪Q7更多了一分精緻感。如果說老款的奧迪Q7更像一個兇猛的肌肉男,那麼全新奧迪Q7則更像一個肌肉線條更加勻稱卻不失力量感的健美先生。

凸顯內涵——小尺寸中的大肚量

全新奧迪Q7的內飾採用了全新的設計語言,整體造型設計更加簡潔明快,作為一款奧迪品牌旗艦型的SUV,細節之處的精細程度毋庸置疑。

鋁製和木紋飾板的搭配,彰顯了豪華感的同時更體現出現代工藝氣息,搭配上第二代的MMI智能信息系統以及點火之後緩緩升起的8.3英寸液晶显示屏,檔次感豪華感與科技感並存的車廂確實讓人覺得相當高級。

不少人會覺得,全新Q7的車身尺寸全面縮水,會不會提升Q7車內的乘坐壓抑感,帶着疑問小編也是坐進全新Q7的後排體驗一番,實際感受過後覺得並不會,全新Q7的長寬高數據為:5069*1968*1716mm,軸距長為3001mm,空間足夠寬敞,加之座椅十分舒適度也算不錯,駕駛位坐姿設計合理,視野盲區不大,全新Q7的駕乘感受在同級當中可謂是處於領先水準。

裝備齊全才能游刃有餘

全新奧迪Q7的標準離地間隙達到201mm,在一般的道路通過性上已經有着非常紮實的基礎,並且搭載quattro全時四驅系統以及可變式空氣懸挂(非頂配車型需選裝),在不同的道路模式下有着不同的行駛姿態,以及百公里加速僅需7.22秒的2.0T渦輪增壓發動機,強悍的性能和齊全的裝備,讓奧迪Q7在面對極限路況時才有着充足的信心和底氣。

無疆界;盡馳騁

本次試駕的地點選址是廣州王子山,奧迪本次並沒有專門為試駕活動搭建一塊可以輕鬆通過考驗的場地,而是以不常規的純天然全路況山林作為試驗全新奧迪Q7的考試場。

在鋪裝路面上,將空氣懸架調節至最低狀態,此時離地間隙為186mm,車身姿態更低,高速狀態下行駛異常穩定,2.0T的發動機並不會顯得拖沓無力,隨着油門的深入,到達1600轉之時所迸發出的370牛米的峰值扭矩,儘管它是一台大尺寸豪華SUV,但也能讓駕駛者充分體驗一把速度與激情。

既然作為一款搭載着全時四驅和可變式空氣懸架的大尺寸SUV,在王子山這種純天然的山路中行進既是作為一個較為嚴酷的考驗項目,也是全新Q7展現強悍性能的用武之地。面對着崎嶇的道路環境,將氣動懸架的高度提升至最高狀態(261mm),高聳的底盤極大降低了因為道路石塊而托底的風險。

得益於調校得恰到好處的轉向手感,在速度不快的越野道路上,大尺寸的Q7顯得異常靈活,穩定的車身姿態使得在路況較為驚險的非鋪裝路面上有着十足的信心支撐。

王子山上的路況十分複雜,由於嶺南一帶潮濕的氣候,儘管白天陽光十分燦爛,但是路面依然有不少地方非常濕滑,甚至還有一些淌流着的小溪和溝壑需要跨越,但是全新奧迪Q7面對這些對於普通城市SUV來說已經算是極限的道路,依然顯得游刃有餘,勝似閑庭信步。

這是由於奧迪Q7的前後橋都配備了了開放式差速器和輪間限滑系統,並且quattro四驅在動力配比上日常是前後橋40:60的比例分攤動力輸出,而在極限狀況下可以使得前橋最大動力供給達到70%,而後橋可支配動力最高可以達到85%,極大保證了全新Q7面對惡劣路況的適應性。

檔次不減;盛名不負

以往對於奧迪Q7的形象一直是一台大品牌、高品質、高檔次的豪華型城市SUV,似乎它的一切就應該那麼有條不紊,似乎它就一定是一款在公路上馳騁的大塊頭豪華車。

然而畢竟作為一款旗艦型全時四驅SUV,奧迪Q7的先天基因依然流淌着一款SUV該有的性格與野性,不受“城市SUV”標準的束縛、不受“全民SUV”時代的限制,憑藉著強悍的性能表現,奧迪Q7,一款豪華品牌旗艦SUV,除了可以帶來頂級奢華的高檔感以外,照樣可以讓車主縱情翻山越嶺感受喧囂以外的非凡。本站聲明:網站內容來源於http://www.auto6s.com/,如有侵權,請聯繫我們,我們將及時處理

【其他文章推薦】

網頁設計最專業,超強功能平台可客製化

※自行創業缺乏曝光? 網頁設計幫您第一時間規劃公司的形象門面

※回頭車貨運收費標準

※推薦評價好的iphone維修中心

※教你寫出一流的銷售文案?

台中搬家公司教你幾個打包小技巧,輕鬆整理裝箱!

台中搬家公司費用怎麼算?

動力橫評|跑進10秒 海馬S5領先不止一點

在0-100公里加速上,海馬S5-9。81秒、長安CS35-11。02秒、寶駿560-12。01秒。從加速上來看,在8萬級別中,能進入10秒的真是屈指可數。相比長安CS35和寶駿560來說,在整個加速過程中,海馬S5在起步的瞬間動力來得更加直接,而且在中後段也不會出現乏力情況。

在市場表現上,售價8萬至10萬的8萬級SUV近兩年相當火爆。針對上述情況,找了能見度比較高的三款八萬級熱銷車型,在動力方面做個實測對比,(為什麼對比動力?因為注重內涵,外觀下次測)這次對比的三款車型分別是:長安CS35、海馬S5、寶駿560、均是1.5T動力總成

從上表的綜合數據來看,三者的動力系統都算主流,不謙虛地說也算是這個級別里相對靠前的,不過海馬S5的參數表現都要略優於其它兩款車型。三款對比車型均採用1.5T渦輪增壓發動機,海馬S5的最大馬力為163ps、最大扭矩223N·m;寶駿560的最大馬力150ps,最大扭矩230N·m;長安CS35的最大馬力156ps,最大扭矩215N·m。從賬面數據來看,海馬S5的優勢非常明顯。

此外,海馬S5的1.5T渦輪增壓發動機採用了新一代小慣量渦輪,恭弘=叶 恭弘輪採用最新一代合金材料,重量更輕,慣量降低35%,有效減小渦輪遲滯,提高系統響應性,滿足低轉速大扭矩驅動,發動機1600轉時就能輸出90%最大扭矩。

從發動機的動力表現,三者在實際駕駛中,均有着不錯的親和力,起步反饋輕快,低速行駛時動力與變速箱的配合也相當不錯。但海馬S5在動力上的體驗會來得更加地直接,當發動機轉速僅為1000rpm時,就能體驗到渦輪介入,在1800rpm狀態下,即能體驗到223N·m的最大扭矩輸出狀態,且能一直保持到4000rpm,動力輸出水平在同級車型中相當出色,且最大扭矩轉速區間很寬。相比之下,寶駿560的1.5T發動機,在2000rpm時才能達到最大扭矩輸出,最大扭矩轉速區間為2000-3800rpm,明顯劣於海馬S5。

在0-100公里加速上,海馬S5-9.81秒、長安CS35-11.02秒、寶駿560-12.01秒。從加速上來看,在8萬級別中,能進入10秒的真是屈指可數。相比長安CS35和寶駿560來說,在整個加速過程中,海馬S5在起步的瞬間動力來得更加直接,而且在中後段也不會出現乏力情況。

在剎車對比測試中,海馬S5進入了40米內,如此優秀的剎車成績,可以讓它在大部分同級別、同價位的競爭對手面前炫耀一番。須知道這個級別大部分車型的100-0km/h剎車距離都是40米開外,有的甚至是43米之多。除了剎車成績優秀以外,其剎車踏板反饋回來的腳感也很棒,不僅虛位小,而且回饋力度比較均勻線性。

從動力輸出到制動力的表現,可以看出在三款車型當中,海馬S5數據和實力明顯優於寶駿560和長安CS35。

寶駿560-低速扭矩力量足夠,1擋到4擋的提速感覺明顯有力,但是進入5擋,時速超過100公里/小時的時候,提速就會顯得很乏力。

長安CS35-發機機是三菱的4G15T改造而來,加速只能說夠用,不能深踩,高轉速時發動機的聲音讓人奔潰。

海馬S5-上車地板油S檔,兩千轉加速明顯,還有推背感,雖然不算強,但能有這個的體驗反饋給你,後段的力量儲備也是相對充足,在賽道直路最快跑165時速,底盤不會給你坐船的感覺,懸挂也是支撐到位,在高轉速時,發動機也是會有聲音但是,在一個可接受範圍。

回看市場,如今小型SUV由不入流,到成為主流,最多也不過5年,但是市場卻發生了翻天覆地的變化的變化,如今的小型SUV市場競爭已然也到了白熱化的地步。縱觀國內小型SUV細分市場,本田、現代/起亞、別克、鈴木、福特、雪佛蘭、Jeep等國際大廠都推出了合資小型SUV,在品質上力壓自主車型,同時價錢也在不斷下探,新老車型的格局正在逐漸形成,而這種格局勢必會引起小型SUV市場的一些變革,花無百日紅,新生代小型SUV正在陸續到來,如果產品力可以經得起考驗的情況下,小型SUV市場或將很快迎來一次大換血,讓我們拭目以待吧。本站聲明:網站內容來源於http://www.auto6s.com/,如有侵權,請聯繫我們,我們將及時處理

【其他文章推薦】

※產品缺大量曝光嗎?你需要的是一流包裝設計!

※自行創業缺乏曝光? 網頁設計幫您第一時間規劃公司的形象門面

※回頭車貨運收費標準

※推薦評價好的iphone維修中心

※超省錢租車方案

台中搬家遵守搬運三大原則,讓您的家具不再被破壞!

※推薦台中搬家公司優質服務,可到府估價

萬萬想不到 20萬的MPV超越40萬房車享受

在車上對坐面談彷彿是挺不錯的事情,邁特威最大的亮點是內部空間和座椅的靈活擴展性,二排座椅支持旋轉移動,但反着坐的人就不舒服了,中間圓形桌板使得第三排乘客出入比較困難,座椅設計過高不符合國人身材,長時間乘坐舒適性難保障,不實用。

前言

現在除了SUV車型最火爆外,商務精英人士最喜愛的莫過於MpV車型了,商用出差接客戶有面子,空間夠大夠舒適,一舉兩得,眾所周知,在歐洲市場,福特途睿歐和大眾邁特威已經是對老冤家了,而進口后的邁特威價格幾乎是國產後途睿歐的兩倍,誰更有性價比呢?

最近隨着自己業績越來越好,小李思索着想買一台車,畢竟自己是業務員,沒個車接客戶談商務合作什麼的不方便,從小就特別喜歡MpV的小李,就特別想買一台MpV,於是把目標鎖定在兩台車上:福特途睿歐、大眾邁特威。

方方正正的車身造型不禁讓人聯想到以前的全順、依維柯那種輕客,就有點與時代脫軌的節奏,而且給人一種低檔的感覺,還有令人有些審美疲勞的家族式前臉沒什麼改進,不過挺耐看的。

再看途睿歐則給人一種很豪邁的視覺感受,車身線條很硬朗但沒有硬邦邦的感覺,車側突出的輪眉凸顯其壯碩的的身材,柔中帶剛更顯威武,前臉有着萌萌噠的造型,很和藹可親,是一輛宜商宜旅的車子。

老爸家裡那台老捷達確實實用,兢兢業業服務了好多年,這點在大眾邁特威內飾上一樣,採用套娃的設計,大量的鋼琴烤漆面板和方方正正的設計元素和外觀比較搭配,營造了比較高檔的感覺,但是沒什麼新意,開着居然和轎車是一樣的Feel。

途睿歐的內飾造型層次感更豐富,看起來並不會出現所謂的視覺疲勞感,操作區域幾乎圍繞駕駛者四周,實用人性化為上,上深下淺的配色很有商務風格,給人溫馨舒適的乘坐體驗,低矮的左右側窗線設計使得兩側視野很好,很容易上手。

我們來看一下配置上的差異,邁特威會佔有優勢,但相差不大的配置但一想到相差20多萬的價格,突然感覺有點藍瘦,像天窗和導航系統這麼基本的配置,邁特威要去到54.98萬的車型才有配備。

而途睿歐20.39萬車型就有了,前後排自動空調是全系標配,為了乘員上下更方便,還配備了側踏板,還有貼心的後排220v電源支持手提筆記本等設備的使用,能及時收發郵件和處理文件。

旋轉、跳躍我閉着眼。。。在車上對坐面談彷彿是挺不錯的事情,邁特威最大的亮點是內部空間和座椅的靈活擴展性,二排座椅支持旋轉移動,但反着坐的人就不舒服了,中間圓形桌板使得第三排乘客出入比較困難,座椅設計過高不符合國人身材,長時間乘坐舒適性難保障,不實用。

4976*2032*1990mm的車身尺寸使得途睿歐比邁特威大了一圈,採用2+2+3的座椅布局,中間留有通道,橫縱向空間更大,以往一般MpV比較雞肋的第三排空間,途睿歐表現卻很出色,完全是三個獨立座椅,不會再出現肩膀碰肩膀的尷尬情況,儲物空間隨手可及,驚人的後備箱空間即使在常規狀態下也達到1360L,實用性上更出色。

話說高端車型為什麼開起來那麼舒服,像奔馳奧迪等高端車型上配備都配備了空氣懸挂,可以調節懸挂的軟硬,能適應不同路況,而途睿歐採用了同級罕見的RAS后空氣懸挂,隨時隨地享受最舒適的駕乘體驗;人機工程學上做得很轎車化,座椅可以調得比較低接近SUV的坐姿,比較垂直的方向盤角度,掄方向比搓麻將還要順滑。

麵包車開起來是什麼感覺的,是不是重心太高,有點發飄,邁特威採用了後半拖曳臂獨立式懸挂,雖然有DCC模式可調,但感覺跨度不太明顯,軟硬有點兩極分化,始終把握不好合適的度,不過舒適性方面還是有一貫大眾車的風格。

賬面數據上EA888發動機+7擋雙離合的組合表現更為出色,用在高爾夫Gti是挺猛的,但拖動邁特威這2.5噸重的車子起步似乎有點吃力,必要時刻還得靠S擋來解決動力不足的問題,還有考慮到用車成本上,油耗和保養費用也是不佔優勢的。

而途睿歐搭載的是福特2.0T EcoBoost發動機,與路虎、捷豹等高端車型使用的是同宗同源的,燃油經濟性更佳,動力也相差無幾,還一個令人讚歎的就是它整體的NVH水平,不管是發動機還是底盤,都達到了乘用車的優良水平,綜合性能更強,搭配5擋手動變速箱,可靠性更佳。

再糾正下小李子的想法,進口車所交的各種關稅、消費稅、增值稅後導致邁特威的價格都去到40多萬了,而途睿歐國產後的價格就完全不用這些花費,性價比更高更接地氣,所以勸你還是移情別戀吧。

兩朋友笑日:你小子現在知道的挺多啊。本站聲明:網站內容來源於http://www.auto6s.com/,如有侵權,請聯繫我們,我們將及時處理

【其他文章推薦】

※回頭車貨運收費標準

※產品缺大量曝光嗎?你需要的是一流包裝設計!

※自行創業缺乏曝光? 網頁設計幫您第一時間規劃公司的形象門面

※推薦評價好的iphone維修中心

※教你寫出一流的銷售文案?

台中搬家公司教你幾個打包小技巧,輕鬆整理裝箱!

台中搬家遵守搬運三大原則,讓您的家具不再被破壞!

Python3 源碼閱讀 – 內存管理機制

Python 內存管理分層架構

/* An object allocator for Python.

   Here is an introduction to the layers of the Python memory architecture,
   showing where the object allocator is actually used (layer +2), It is
   called for every object allocation and deallocation (PyObject_New/Del),
   unless the object-specific allocators implement a proprietary allocation
   scheme (ex.: ints use a simple free list). This is also the place where
   the cyclic garbage collector operates selectively on container objects.


    Object-specific allocators
    _____   ______   ______       ________
   [ int ] [ dict ] [ list ] ... [ string ]       Python core         |
+3 | <----- Object-specific memory -----> | <-- Non-object memory --> |
    _______________________________       |                           |
   [   Python's object allocator   ]      |                           |
+2 | ####### Object memory ####### | <------ Internal buffers ------> |
    ______________________________________________________________    |
   [          Python's raw memory allocator (PyMem_ API)          ]   |
+1 | <----- Python memory (under PyMem manager's control) ------> |   |
    __________________________________________________________________
   [    Underlying general-purpose allocator (ex: C library malloc)   ]
 0 | <------ Virtual memory allocated for the python process -------> |

   =========================================================================
    _______________________________________________________________________
   [                OS-specific Virtual Memory Manager (VMM)               ]
-1 | <--- Kernel dynamic storage allocation & management (page-based) ---> |
    __________________________________   __________________________________
   [                                  ] [                                  ]
-2 | <-- Physical memory: ROM/RAM --> | | <-- Secondary storage (swap) --> |

*/

reference:Objects/obmalloc.c

layer 3: Object-specific memory(int/dict/list/string....)
		python 實現並維護
		用戶對Python對象的直接操作,主要是各類特定對象的緩衝池機制,緩衝池,比如小整數對象池等等
layer 2: Python's object allocator
		實現了創建/銷毀python對象的接口(PyObject_New/Del),涉及對象參數/引用計數等

layer 1: Python's raw memory allocator (PyMem_ API)
		包裝了第0層的內存管理接口,提供同一個raw memory管理接口
		封裝的原因:不同操作系統C行為不一致,保證可移植性,相同語義相同行為
		
layer 0: Underlying general-purpose allocator (ex: C library malloc)
		操作系統提供的內存管理接口,由操作系統實現並管理,Python不能干涉這一層的行為,大內存 分配調用malloc函數分配內存

Python 內存分配策略之-block,pool

Python中有分為大內存和小內存,512K為分界線

  • 大內存使用系統malloc進行分配

  • 小內存使用python內存池進行分配

1. 如果要分配的內存空間大於 SMALL_REQUEST_THRESHOLD bytes(512 bytes), 將直接使用layer 1的內存分配接口進行分配
2. 否則, 使用不同的block來滿足分配需求
申請一塊大小28字節的內存, 實際從內存中劃到32字節的一個block (從size class index為3的pool裏面劃出)

block

內存塊block 是python內存的最小單位

* For small requests we have the following table:
 *
 * Request in bytes     Size of allocated block      Size class idx
 * ----------------------------------------------------------------
 *        1-8                     8                       0
 *        9-16                   16                       1
 *       17-24                   24                       2
 *       25-32                   32                       3
 *       33-40                   40                       4
 *       41-48                   48                       5
 *       49-56                   56                       6
 *       57-64                   64                       7
 *       65-72                   72                       8
 *        ...                   ...                     ...
 *      497-504                 504                      62
 *      505-512                 512                      63
 *
 *      0, SMALL_REQUEST_THRESHOLD + 1 and up: routed to the underlying
 *      allocator.
 */

pool

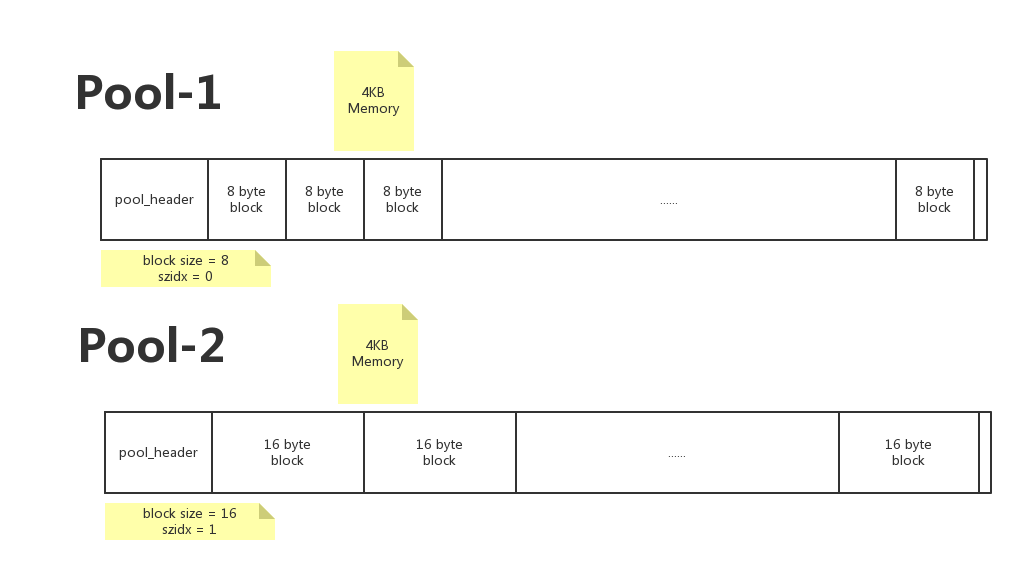
pool內存池,管理block, 一個pool管理着一堆固定大小的內存塊,在Python中, 一個pool的大小通常為一個系統內存頁. 4kB

#define SYSTEM_PAGE_SIZE        (4 * 1024)
#define SYSTEM_PAGE_SIZE_MASK   (SYSTEM_PAGE_SIZE - 1)

#define POOL_SIZE               SYSTEM_PAGE_SIZE        /* must be 2^N */
#define POOL_SIZE_MASK          SYSTEM_PAGE_SIZE_MASK

pool的4kB內存 = pool_header + block集合(N多大小一樣的block)

typedef uint8_t block;

/* Pool for small blocks. */
struct pool_header {
    union { block *_padding;
            uint count; } ref;          /* number of allocated blocks    */
    block *freeblock;                   /* pool's free list head         */
    struct pool_header *nextpool;       /* next pool of this size class  */
    struct pool_header *prevpool;       /* previous pool       ""        */
    uint arenaindex;                    /* index into arenas of base adr */
    uint szidx;                         /* block size class index        */
    uint nextoffset;                    /* bytes to virgin block         */
    uint maxnextoffset;                 /* largest valid nextoffset      */
};

pool_header 作用

與其他pool鏈接, 組成雙向鏈表
2. 維護pool中可用的block, 單鏈表
3. 保存 szidx , 這個和該pool中block的大小有關係, (block size=8, szidx=0), (block size=16, szidx=1)...用於內存分配時匹配到擁有對應大小block的pool

pool 初始化

void *
PyObject_Malloc(size_t nbytes)
{
  ...

          init_pool:
            // 1. 連接到 used_pools 雙向鏈表, 作為表頭
            // 注意, 這裏 usedpools[0] 保存着 block size = 8 的所有used_pools的表頭
            /* Frontlink to used pools. */
            next = usedpools[size + size]; /* == prev */
            pool->nextpool = next;
            pool->prevpool = next;
            next->nextpool = pool;
            next->prevpool = pool;
            pool->ref.count = 1;

            // 如果已經初始化過了...這裏看初始化, 跳過
            if (pool->szidx == size) {
                /* Luckily, this pool last contained blocks
                 * of the same size class, so its header
                 * and free list are already initialized.
                 */
                bp = pool->freeblock;
                pool->freeblock = *(block **)bp;
                UNLOCK();
                return (void *)bp;
            }


            /*
             * Initialize the pool header, set up the free list to
             * contain just the second block, and return the first
             * block.
             */
            // 開始初始化pool_header
            // 這裏 size = (uint)(nbytes - 1) >> ALIGNMENT_SHIFT;  其實是Size class idx, 即szidx
            pool->szidx = size;

            // 計算獲得每個block的size
            size = INDEX2SIZE(size);

            // 注意 #define POOL_OVERHEAD           ROUNDUP(sizeof(struct pool_header))
            // bp => 初始化為pool + pool_header size,  跳過pool_header的內存
            bp = (block *)pool + POOL_OVERHEAD;

            // 計算偏移量, 這裏的偏移量是絕對值
            // #define POOL_SIZE               SYSTEM_PAGE_SIZE        /* must be 2^N */
            // POOL_SIZE = 4kb, POOL_OVERHEAD = pool_header size
            // 下一個偏移位置: pool_header size + 2 * size
            pool->nextoffset = POOL_OVERHEAD + (size << 1);
            // 4kb - size
            pool->maxnextoffset = POOL_SIZE - size;

            // freeblock指向 bp + size = pool_header size + size
            pool->freeblock = bp + size;

            // 賦值NULL
            *(block **)(pool->freeblock) = NULL;
            UNLOCK();
            return (void *)bp;
        }

pool 進行block分配 – 總體代碼

  if (pool != pool->nextpool) {   //
            /*
             * There is a used pool for this size class.
             * Pick up the head block of its free list.
             */
            ++pool->ref.count;
            bp = pool->freeblock; // 指針指向空閑block起始位置
            assert(bp != NULL);

            // 代碼-1
            // 調整 pool->freeblock (假設A節點)指向鏈表下一個, 即bp首字節指向的下一個節點(假設B節點) , 如果此時!= NULL
            // 表示 A節點可用, 直接返回
            if ((pool->freeblock = *(block **)bp) != NULL) {
                UNLOCK();
                return (void *)bp;
            }

            // 代碼-2
            /*
             * Reached the end of the free list, try to extend it.
             */
            // 有足夠的空間, 分配一個, pool->freeblock 指向後移
            if (pool->nextoffset <= pool->maxnextoffset) {
                /* There is room for another block. */
                // 變更位置信息
                pool->freeblock = (block*)pool +
                                  pool->nextoffset;
                pool->nextoffset += INDEX2SIZE(size);


                *(block **)(pool->freeblock) = NULL; // 注意, 指向NULL
                UNLOCK();

                // 返回bp
                return (void *)bp;
            }

            // 代碼-3
            /* Pool is full, unlink from used pools. */  // 滿了, 需要從下一個pool獲取
            next = pool->nextpool;
            pool = pool->prevpool;
            next->prevpool = pool;
            pool->nextpool = next;
            UNLOCK();
            return (void *)bp;
        }

pool進行block分配 -1

內存塊尚未分配完, 且此時不存在回收的block, 全新進來的時候, 分配第一塊block

(pool->freeblock = *(block **)bp) == NULL

當進入代碼邏輯2時,表示有空閑的block, 代碼2的執行流程圖如下

pool進行block分配 – 2 回收了某幾個block

回收涉及的代碼:

void
PyObject_Free(void *p)
{
    poolp pool;
    block *lastfree;
    poolp next, prev;
    uint size;

    pool = POOL_ADDR(p);
    if (Py_ADDRESS_IN_RANGE(p, pool)) {
        /* We allocated this address. */
        LOCK();
        /* Link p to the start of the pool's freeblock list.  Since
         * the pool had at least the p block outstanding, the pool
         * wasn't empty (so it's already in a usedpools[] list, or
         * was full and is in no list -- it's not in the freeblocks
         * list in any case).
         */
        assert(pool->ref.count > 0);            /* else it was empty */
        // p被釋放, p的第一個字節值被設置為當前freeblock的值
        *(block **)p = lastfree = pool->freeblock;
        // freeblock被更新為指向p的首地址
        pool->freeblock = (block *)p;

        // 相當於往list中頭插入了一個節點

     ...
    }
}

每釋放一個block,該blcok就會變成pool->freeblock的頭結點, 假設已經連續分配了5塊, 第1塊和第4塊被釋放,此時的內存圖示如下:

此時再一個block分配調用進來, 執行分配, 進入的邏輯是代碼-1

bp = pool->freeblock; // 指針指向空閑block起始位置
// 代碼-1
// 調整 pool->freeblock (假設A節點)指向鏈表下一個, 即bp首字節指向的下一個節點(假設B節點) , 如果此時!= NULL
// 表示 A節點可用, 直接返回
if ((pool->freeblock = *(block **)bp) != NULL) {
    UNLOCK();
    return (void *)bp;
}

pool進行block分配 – 3 pool用完了

pool中內存空間都用完了, 進入代碼-3

/* Pool is full, unlink from used pools. */  // 滿了, 需要從下一個pool獲取
next = pool->nextpool;
pool = pool->prevpool;
next->prevpool = pool;
pool->nextpool = next;
UNLOCK();
return (void *)bp;

Python 內存分配策略之-arena

arena: 多個pool聚合的結果, 可放置64個pool

#define ARENA_SIZE              (256 << 10)     /* 256KB */

arena結構

一個完整的arena = arena_object + pool集合

/* Record keeping for arenas. */
struct arena_object {
    /* The address of the arena, as returned by malloc.  Note that 0
     * will never be returned by a successful malloc, and is used
     * here to mark an arena_object that doesn't correspond to an
     * allocated arena.
     */
    uintptr_t address;

    /* Pool-aligned pointer to the next pool to be carved off. */
    block* pool_address;

    /* The number of available pools in the arena:  free pools + never-
     * allocated pools.
     */
    uint nfreepools;

    /* The total number of pools in the arena, whether or not available. */
    uint ntotalpools;

    /* Singly-linked list of available pools. */
    struct pool_header* freepools;

    /* Whenever this arena_object is not associated with an allocated
     * arena, the nextarena member is used to link all unassociated
     * arena_objects in the singly-linked `unused_arena_objects` list.
     * The prevarena member is unused in this case.
     *
     * When this arena_object is associated with an allocated arena
     * with at least one available pool, both members are used in the
     * doubly-linked `usable_arenas` list, which is maintained in
     * increasing order of `nfreepools` values.
     *
     * Else this arena_object is associated with an allocated arena
     * all of whose pools are in use.  `nextarena` and `prevarena`
     * are both meaningless in this case.
     */
    struct arena_object* nextarena;
    struct arena_object* prevarena;
};
arena_object的作用
1. 與其他arena連接, 組成雙向鏈表
2. 維護arena中可用的pool, 單鏈表
  • pool_header和管理的blocks內存是一塊連續的內存 => pool_header被申請時,其管理的的block集合的內存一併被申請 uint maxnextoffset; /* largest valid nextoffset */
  • arena_object 和其管理的內存是分離的 => arena_object被申請時,其管理的pool集合的內存沒有被申請,而是在某一時刻建立關係的

arena的兩種狀態

/* The head of the singly-linked, NULL-terminated list of available
 * arena_objects.
 */
// 單鏈表
static struct arena_object* unused_arena_objects = NULL;

/* The head of the doubly-linked, NULL-terminated at each end, list of
 * arena_objects associated with arenas that have pools available.
 */
// 雙向鏈表
static struct arena_object* usable_arenas = NULL;

arena 初始化

* Allocate a new arena.  If we run out of memory, return NULL.  Else
 * allocate a new arena, and return the address of an arena_object
 * describing the new arena.  It's expected that the caller will set
 * `usable_arenas` to the return value.
 */
static struct arena_object*
new_arena(void)
{
    struct arena_object* arenaobj;
    uint excess;        /* number of bytes above pool alignment */
    void *address;
    static int debug_stats = -1;

    if (debug_stats == -1) {
        const char *opt = Py_GETENV("PYTHONMALLOCSTATS");
        debug_stats = (opt != NULL && *opt != '\0');
    }
    if (debug_stats)
        _PyObject_DebugMallocStats(stderr);

    // 判斷是否需要擴充"未使用"的arena_object列表
    if (unused_arena_objects == NULL) {
        uint i;
        uint numarenas;
        size_t nbytes;

        /* Double the number of arena objects on each allocation.
         * Note that it's possible for `numarenas` to overflow.
         */
        // 確定需要申請的個數, 首次初始化, 16, 之後每次翻倍
        numarenas = maxarenas ? maxarenas << 1 : INITIAL_ARENA_OBJECTS;
        if (numarenas <= maxarenas)
            return NULL;                /* overflow */
#if SIZEOF_SIZE_T <= SIZEOF_INT
        if (numarenas > SIZE_MAX / sizeof(*arenas))
            return NULL;                /* overflow */
#endif
        nbytes = numarenas * sizeof(*arenas);
        // 申請內存
        arenaobj = (struct arena_object *)PyMem_RawRealloc(arenas, nbytes);
        if (arenaobj == NULL)
            return NULL;
        arenas = arenaobj;

        /* We might need to fix pointers that were copied.  However,
         * new_arena only gets called when all the pages in the
         * previous arenas are full.  Thus, there are *no* pointers
         * into the old array. Thus, we don't have to worry about
         * invalid pointers.  Just to be sure, some asserts:
         */
        assert(usable_arenas == NULL);
        assert(unused_arena_objects == NULL);

        /* Put the new arenas on the unused_arena_objects list. */
        for (i = maxarenas; i < numarenas; ++i) {
            arenas[i].address = 0;              /* mark as unassociated */
            // 新申請的一律為0, 標識着這個arena處於"未使用"
            arenas[i].nextarena = i < numarenas - 1 ?
                                   &arenas[i+1] : NULL;
        }

         // 將其放入unused_arena_objects鏈表中
        // unused_arena_objects 為新分配內存空間的開頭
        /* Update globals. */
        unused_arena_objects = &arenas[maxarenas];
        maxarenas = numarenas;
    }

    /* Take the next available arena object off the head of the list. */
    assert(unused_arena_objects != NULL);
    // 從unused_arena_objects中, 獲取一個未使用的object
    arenaobj = unused_arena_objects;
    unused_arena_objects = arenaobj->nextarena;  // 更新鏈表
    assert(arenaobj->address == 0);
    // 申請內存, 256KB, 內存地址賦值給arena的address. 這塊內存可用
    address = _PyObject_Arena.alloc(_PyObject_Arena.ctx, ARENA_SIZE);
    if (address == NULL) {
        /* The allocation failed: return NULL after putting the
         * arenaobj back.
         */
        arenaobj->nextarena = unused_arena_objects;
        unused_arena_objects = arenaobj;
        return NULL;
    }
    arenaobj->address = (uintptr_t)address;

    ++narenas_currently_allocated;
    ++ntimes_arena_allocated;
    if (narenas_currently_allocated > narenas_highwater)
        narenas_highwater = narenas_currently_allocated;
    arenaobj->freepools = NULL;
    /* pool_address <- first pool-aligned address in the arena
       nfreepools <- number of whole pools that fit after alignment */
    arenaobj->pool_address = (block*)arenaobj->address;
    arenaobj->nfreepools = MAX_POOLS_IN_ARENA;
    // 將pool的起始地址調整為系統頁的邊界
    // 申請到 256KB, 放棄了一些內存, 而將可使用的內存邊界pool_address調整到了與系統頁對齊
    excess = (uint)(arenaobj->address & POOL_SIZE_MASK);
    if (excess != 0) {
        --arenaobj->nfreepools;
        arenaobj->pool_address += POOL_SIZE - excess;
    }
    arenaobj->ntotalpools = arenaobj->nfreepools;

    return arenaobj;
}

從arenas取一個arena進行初始化

arena分配

new一個全新的arena

static void*
pymalloc_alloc(void *ctx, size_t nbytes)
 {
            // 剛開始沒有可用的arena
            if (usable_arenas == NULL) {
              // new一個, 作為雙向鏈表的表頭
              usable_arenas = new_arena();
              if (usable_arenas == NULL) {
                  UNLOCK();
                  goto redirect;
              }

              usable_arenas->nextarena =
                  usable_arenas->prevarena = NULL;

           }

          .......

          // 從arena中獲取一個pool
          pool = (poolp)usable_arenas->pool_address;
          assert((block*)pool <= (block*)usable_arenas->address +
                                 ARENA_SIZE - POOL_SIZE);
          pool->arenaindex = usable_arenas - arenas;
          assert(&arenas[pool->arenaindex] == usable_arenas);
          pool->szidx = DUMMY_SIZE_IDX;

          // 更新 pool_address 向下一個節點
          usable_arenas->pool_address += POOL_SIZE;
          // 可用節點數量-1
          --usable_arenas->nfreepools;

}

從全新的arena中獲取一個pool

假設arena是舊的, 怎麼分配的pool, 跟pool分配block原理一樣,使用單鏈表記錄freepools

pool = usable_arenas->freepools;
if (pool != NULL) {

當arena中一整塊pool被釋放的時候

/* Free a memory block allocated by pymalloc_alloc().
   Return 1 if it was freed.
   Return 0 if the block was not allocated by pymalloc_alloc(). */
static int
pymalloc_free(void *ctx, void *p) {
    struct arena_object* ao;
    uint nf;  /* ao->nfreepools */

    /* Link the pool to freepools.  This is a singly-linked
               * list, and pool->prevpool isn't used there.
              */
    ao = &arenas[pool->arenaindex];
    pool->nextpool = ao->freepools;
    ao->freepools = pool;
    nf = ++ao->nfreepools;
}

在pool整塊被釋放的時候, 會將pool加入到arena->freepools作為單鏈表的表頭, 然後, 在從非全新arena中分配pool時, 優先從arena->freepools裏面取, 如果取不到, 再從arena內存塊裏面獲取

注: 上圖中nfreepools = n – 2

當arena1用完了,獲取arena1指向的下一個節點arena2

static void*
pymalloc_alloc(void *ctx, size_t nbytes)
{


          // 當發現用完了最後一個pool!!!!!!!!!!!
          // nfreepools = 0
          if (usable_arenas->nfreepools == 0) {
              assert(usable_arenas->nextarena == NULL ||
                     usable_arenas->nextarena->prevarena ==
                     usable_arenas);
              /* Unlink the arena:  it is completely allocated. */

              // 找到下一個節點!
              usable_arenas = usable_arenas->nextarena;
              // 右下一個
              if (usable_arenas != NULL) {
                  usable_arenas->prevarena = NULL; // 更新下一個節點的prevarens
                  assert(usable_arenas->address != 0);
              }
              // 沒有下一個, 此時 usable_arenas = NULL, 下次進行內存分配的時候, 就會從arenas數組中取一個

          }

  }

注意: 這裡有個邏輯, 就是每分配一個pool, 就檢查是不是用到了最後一個, 如果是, 需要變更usable_arenas到下一個可用的節點, 如果沒有可用的, 那麼下次進行內存分配的時候, 會判定從arenas數組中取一個

arena回收

內存分配和回收最小單位是block, 當一個block被回收的時候, 可能觸發pool被回收, pool被回收, 將會觸發arena的回收機制

    1. arena中所有pool都是閑置的(empty), 將arena內存釋放, 返回給操作系統
    1. 如果arena中之前所有的pool都是佔用的(used), 現在釋放了一個pool(empty), 需要將 arena加入到usable_arenas, 會加入鏈表表頭
    1. 如果arena中empty的pool個數n, 則從useable_arenas開始尋找可以插入的位置. 將arena插入. (useable_arenas是一個有序鏈表, 按empty pool的個數, 保證empty pool數量越多, 被使用的幾率越小, 最終被整體釋放的機會越大)

內存分配的步驟

關注點:如何尋找到一塊可用的nbytes的blcok內存?

pool = usedpools[size + size]

if pool:

​ pool 沒滿,取一個blcok返回

​ pool 滿了,從下一個pool取一個blcok返回

else:

​ 獲取arena, 从里面初始化一個pool, 拿到第一個blcok返回

進行內存分配和銷毀, 所有操作都是在pool上進行的

問題: pool中所有block的size一樣, 但是在arena中, 每個pool的size都可能不一樣, 那麼最終這些pool是怎麼維護的? 怎麼根據大小找到需要的block所在的pool? => usedpools

pool在內存池中的三種狀態

  1. used狀態:pool中至少有一個block已經被使用,並且至少有一個block未被使用,這種狀態的pool受控於Python內部維護的usedpool數組
  2. full狀態:pool中所有的block都已經被使用,這種狀態的pool在arena中, 但不在arena的freepools鏈表中,處於full的pool各自獨立, 不會被鏈表維護起來
  3. empty狀態:pool中所有的blcok都未被使用,處於這個狀態的pool的集合通過其pool_header中的nextpool構成一個鏈表,鏈表的表頭示arena_object中的freepools

Python內部維護的usedpools數組是一個非常巧妙的實現,維護着所有的處於used狀態的pool,當申請內存時,python就會通過usedpools尋找到一個可用的pool(處於used狀態),從中分配一個block。因此我們想,一定有一個usedpools相關聯的機制,完成從申請的內存的大小到size class index之間的轉換,否則python就無法找到最合適的pool了。這種機制和usedpools的結構有着密切的關係,我們看一下它的結構

usedpools

usedpools數組: 維護着所有處於used狀態的pool, 當申請內存的時候, 會通過usedpools尋找到一塊可用的(處於used狀態的)pool, 從中分配一個block。

//obmalloc.c
typedef uint8_t block;
#define PTA(x)  ((poolp )((uint8_t *)&(usedpools[2*(x)]) - 2*sizeof(block *)))
#define PT(x)   PTA(x), PTA(x)

//在我當前的機器就是512/8=64個,對應的size class index就是從0到63
#define NB_SMALL_SIZE_CLASSES   (SMALL_REQUEST_THRESHOLD / ALIGNMENT)

static poolp usedpools[2 * ((NB_SMALL_SIZE_CLASSES + 7) / 8) * 8] = {
    PT(0), PT(1), PT(2), PT(3), PT(4), PT(5), PT(6), PT(7)
#if NB_SMALL_SIZE_CLASSES > 8
    , PT(8), PT(9), PT(10), PT(11), PT(12), PT(13), PT(14), PT(15)
#if NB_SMALL_SIZE_CLASSES > 16
    , PT(16), PT(17), PT(18), PT(19), PT(20), PT(21), PT(22), PT(23)
#if NB_SMALL_SIZE_CLASSES > 24
    , PT(24), PT(25), PT(26), PT(27), PT(28), PT(29), PT(30), PT(31)
#if NB_SMALL_SIZE_CLASSES > 32
    , PT(32), PT(33), PT(34), PT(35), PT(36), PT(37), PT(38), PT(39)
#if NB_SMALL_SIZE_CLASSES > 40
    , PT(40), PT(41), PT(42), PT(43), PT(44), PT(45), PT(46), PT(47)
#if NB_SMALL_SIZE_CLASSES > 48
    , PT(48), PT(49), PT(50), PT(51), PT(52), PT(53), PT(54), PT(55)
#if NB_SMALL_SIZE_CLASSES > 56
    , PT(56), PT(57), PT(58), PT(59), PT(60), PT(61), PT(62), PT(63)
#if NB_SMALL_SIZE_CLASSES > 64
#error "NB_SMALL_SIZE_CLASSES should be less than 64"
#endif /* NB_SMALL_SIZE_CLASSES > 64 */
#endif /* NB_SMALL_SIZE_CLASSES > 56 */
#endif /* NB_SMALL_SIZE_CLASSES > 48 */
#endif /* NB_SMALL_SIZE_CLASSES > 40 */
#endif /* NB_SMALL_SIZE_CLASSES > 32 */
#endif /* NB_SMALL_SIZE_CLASSES > 24 */
#endif /* NB_SMALL_SIZE_CLASSES > 16 */
#endif /* NB_SMALL_SIZE_CLASSES >  8 */
};

如果正在申請28字節, python首先會獲取(size class index) size = (uint )(nbytes - 1) >> ALIGNMENT_SHIFT 顯然這裏size=3, 那麼在usedpools中,尋找第3+3=6個元素,發現usedpools[6]的值是指向usedpools[4]的地址

//obmalloc.c
/* Pool for small blocks. */
struct pool_header {
    union { block *_padding;
            uint count; } ref;          /* 當然pool裏面的block數量    */
    block *freeblock;                   /* 一個鏈表,指向下一個可用的block   */
    struct pool_header *nextpool;       /* 指向下一個pool  */
    struct pool_header *prevpool;       /* 指向上一個pool       ""        */
    uint arenaindex;                    /* 在area裏面的索引 */
    uint szidx;                         /* block的大小(固定值?後面說)     */
    uint nextoffset;                    /* 下一個可用block的內存偏移量         */
    uint maxnextoffset;                 /* 最後一個block距離開始位置的距離     */
};

顯然是從usedpools[6](即usedpools+4)開始向後偏移8個字節(一個ref的大小加上一個freeblock的大小)后的內存,正好是usedpools[6]的地址(即usedpools+6),這是python內部的trick

當我們要申請一個size class為32字節的pool,想要將其放入這個usedpools中時,要怎麼做呢?從上面的描述我們知道,只需要進行usedpools[i+i] -> nextpool = pool即可,其中i為size class index,對應於32字節,這個i為3.當下次需要訪問size class 為32字節(size class index為3)的pool時,只需要簡單地訪問usedpools[3+3]就可以得到了。python正是使用這個usedpools快速地從眾多的pool中快速地尋找到一個最適合當前內存需求的pool,從中分配一塊block。

//obmalloc.c
static int
pymalloc_alloc(void *ctx, void **ptr_p, size_t nbytes)
{
    block *bp;
    poolp pool;
    poolp next;
    uint size;
    ...
    LOCK();
    //獲得size class index
    size = (uint)(nbytes - 1) >> ALIGNMENT_SHIFT;
    //直接通過usedpools[size+size],這裏的size不就是我們上面說的i嗎?
    pool = usedpools[size + size];
    //如果usedpools中有可用的pool
    if (pool != pool->nextpool) {
        ... //有可用pool
    }
    ... //無可用pool,嘗試獲取empty狀態的pool
}  

內存池全局結構

參考:

pyhton源碼閱讀-內存管理機制

python源碼解析第17章-python內存管理與垃圾回收

後期查缺補漏需要看的文章

Memory management by Zpoint
Memory management in Python

本站聲明:網站內容來源於博客園,如有侵權,請聯繫我們,我們將及時處理

【其他文章推薦】

※自行創業缺乏曝光? 網頁設計幫您第一時間規劃公司的形象門面

網頁設計一頭霧水該從何著手呢? 台北網頁設計公司幫您輕鬆架站!

※想知道最厲害的網頁設計公司"嚨底家"!

※別再煩惱如何寫文案,掌握八大原則!

※產品缺大量曝光嗎?你需要的是一流包裝設計!

※回頭車貨運收費標準

台中搬家公司費用怎麼算?

動物園因疫情撐不下去……就怕全餓死 浣熊恐率先安樂死

摘錄自2020年04月25日自由時報報導

英國一間小型動物園因為無法負擔龐大的支出,負責人說,最壞的打算就是將動物「安樂死」,而浣熊將會首當其衝。

綜合外媒報導,51歲的安迪.科威爾(Andy Cowell)在英國肯特郡聖瑪利胡(St Mary Hoo, Kent)經營一間小型動物園,受疫情影響,園區遊客銳減,他花盡畢生積蓄,還是無法負擔一日2000英鎊(約新台幣7萬4000元)的龐大開銷,最壞的打算是將動物安樂死,避免牠們活活餓死。由於浣熊被英國政府列為入侵物種,因此會最先成為安樂死對象。

生活環境
國際新聞
英國
武漢肺炎
動物園
疫情下的食衣住行

本站聲明:網站內容來源環境資訊中心https://e-info.org.tw/,如有侵權,請聯繫我們,我們將及時處理

【其他文章推薦】

※別再煩惱如何寫文案,掌握八大原則!

網頁設計一頭霧水該從何著手呢? 台北網頁設計公司幫您輕鬆架站!

※超省錢租車方案

※教你寫出一流的銷售文案?

網頁設計最專業,超強功能平台可客製化

※產品缺大量曝光嗎?你需要的是一流包裝設計!

台中搬家遵守搬運三大原則,讓您的家具不再被破壞!