004.OpenShift命令及故障排查

一 CLI訪問OpenShift資源

1.1 資源操作


OCP將OpenShift集群中的為由主節點管理的對象統稱為資源,如:node、service、pod、project、deployment、user。

即使針對的是不同的資源,OpenShift命令行工具也提供了一種統一的、一致的方法來更新、修改、刪除和查詢這些資源。

oc命令行工具提供了在軟件開發項目的整個交付生命周期中修改和管理資源的常見操作。

1.2 安裝oc工具


在OpenShift安裝過程中,oc命令行工具安裝在所有master和node節點上,還可以在不屬於OpenShift集群的機器。

安裝后,可以使用用戶名和密碼對任何主節點通過身份驗證后執行相關命令。

根據使用的平台,安裝oc命令行工具有以下幾種方式:

yum安裝:在RHEL平台上,可通過以下命令安裝oc客戶端命令。

[user@host ~]$ sudo yum install atomic-openshift-clients

其它 Linux 發行版本和操作系統,需在擁有 OpenShift 訂閱后,在 Red Hat Customer Portal 中下載。

提示:oc安裝完成后自動補全需要退出一次才可生效,或者source /etc/bash_completion.d/oc。

1.3 oc主要查詢命令


[student@workstation ~]$ oc –help #显示幫助信息

[student@workstation ~]$ oc login -u developer -p redhat https://master.lab.example.com #登錄到OpenShift集群

提示:從client成功通過身份驗證之後,OpenShift將授權令牌保存在用戶的主文件夾中。此令牌用於後續請求,從而無需重新輸入憑據或完整的主URL。

  1 [root@master ~]# oc whoami
  2 system:admin					#master的root用戶為集群的最高權限的用戶
  3 [student@workstation ~]$ oc whoami		        #查看當前用戶
  4 developer
  5 [student@workstation ~]$ oc new-project working	#創建project
  6 [student@workstation ~]$ oc status		        #查看項目狀態
  7 In project working on server https://master.lab.example.com:443
  8 You have no services, deployment configs, or build configs.
  9 Run 'oc new-app' to create an application.
 10 [student@workstation ~]$ oc delete project working	#刪除project
 11 [student@workstation ~]$ oc logout		        #退出該集群。
 12 [student@workstation ~]$ oc get pods		#查看pod
 13 NAME                      READY     STATUS    RESTARTS   AGE
 14 hello-openshift-1-6ls8z   1/1       Running   0          4h
 15 [student@workstation ~]$ oc get all		        #查看所有主要組件信息
 16 [student@workstation ~]$ oc get pods -w		#-w表示以監視模式運行


1.4 oc 其他命令


oc describe:如果oc get提供的摘要不夠,可以使用oc describe命令檢索關於資源的更詳細信息。

[student@workstation ~]$ oc describe pod hello-openshift-1-6ls8z

oc export:使用oc export命令導出資源的定義。典型的用例包括創建備份,或者用於修改定義。默認情況下,export命令以YAML格式輸出對象表示,但是可以通過提供-o選項來更改。

oc create:使用oc create命令從資源定義創建資源。通常,這與用於編輯定義的oc export命令相匹配。

oc delete RESOURCE_TYPE name:使用oc delete命令從OpenShift集群中刪除資源。

注意:部分資源直接刪除後會重新創建,如基於rc的pod,需要對OpenShift體系資源展示形式有一個基本的了解。

oc exec:使用oc exec命令在容器中執行命令,可以使用此命令作為腳本的一部分運行交互式和非交互式批處理命令。

oc rsh POD:oc rsh pod命令打開到容器的遠程shell會話,要遠程登錄到容器shell並執行命令,請運行以下命令。

[student@workstation ~]$ oc rsh <pod>

注意:oc rsh需要pod中存在相應的shell,如bash。

二 OpenShift資源類型

2.1 常見資源


OpenShift容器平台中的應用程序由不同類型的資源組成,主要常見的類型有:

  • Container:如何在可移植Linux環境中運行一個或多個進程的定義。容器從一個映像啟動,並且通常與同一機器上的其他容器隔離。
  • Image:一個分層的Linux文件系統,包含應用程序代碼、依賴關係和函數庫等。image由一個名稱標識,該名稱可以是當前集群的本地名稱,也可以指向遠程Docker倉庫。
  • Pod:部署在節點上並共享唯一IP地址和卷(持久存儲)的一個或多個容器,Pods還為每個容器定義安全性和運行時策略。
  • Label:標籤是鍵值對,可以分配給系統中的任何資源進行分組和選擇。通常資源使用標籤來標識其他資源集。
  • Volume:默認情況下容器不是持久性的,即容器的內容在重新啟動時被清除。volume是掛載在pod及其容器上的文件系統,它們可能由許多本地或網絡的存儲提供。最簡單的卷類型是EmptyDir,它是一台機器上的臨時目錄。
  • Node:node是集群中用來運行容器的節點,node通常由管理員管理,而不是由最終用戶管理。
  • Service:service是表示一組pod的邏輯名稱,service被分配一個IP地址和一個DNS名稱,可以通過端口或route向集群外部公開。名為SERVICE_HOST的環境變量會自動注入到其他pod中。
  • Route:route是一個DNS條目,創建它是為了指向一個service,以便可以從集群外部訪問它。可以配置一個或多個路由器來處理這些route,通常通過HAProxy負載均衡器。
  • Replication Controller:Replication Controller基於匹配一組label的Templates維護特定數量的pod。如果刪除了pod,控制器將創建該pod的新副本。Replication Controller最常用來表示基於image的應用程序部分的單個部署。
  • Deployment Configuration:deployment configuration定義pod的模板,並在屬性更改時管理部署新映像或配置更改。單個deployment configuration通常類似於單個微服務。deployment configuration可以支持許多不同的部署模式,包括完全重啟、可定製的滾動更新以及生命周期前後的順序。每個deployment都表示為一個replication controller。
  • Build Configuration:build configuration包含如何將源代碼和基本image構建為新image的描述。Build可以是基於源代碼的,可以為常見語言(如Java、PHP、Ruby或Python)或基於docker的(從Dockerfile創建構建)使用構建器映像。每個build configuration都有webhook,可以通過對其基本映像的更改自動觸發。
  • Build:構建從源代碼、其他圖像、Dockerfiles或二進制輸入創建新image。Build在容器中運行,具有與普通pod相同的限制。Build通常會導致將image推入Docker倉庫中,但也可以選擇運行post-build測試而不push到image倉庫。
  • Image Streams and Image Stream Tags:IS使用標記名稱對相關is進行分組。它類似於源代碼倉庫中的分支。每個is可以有一個或多個標記(默認標記稱為“latest”),這些標記可能指向外部Docker倉庫、同一is中的其他標記,或者被控製為直接指向已知image。此外,可以通過集成的Docker倉庫直接將image push到docker倉庫。
  • Secret:secret資源可以保存文本或二進制secrets,以便注入至pod。默認情況下,在/var/run/secrets/kubernetes.io/serviceaccount上,每個容器都有一個secret,其中包含訪問API有限特權的令牌。可以創建新的secret並將它們掛載到自己的pod中,也可以引用構建中的secret(用於連接遠程服務器),或者使用它們將遠程image導入到is中。
  • Project:所有上述資源(node除外)都存在於項目中。項目具有成員列表及其role(如view、edit或admin),以及運行的pod上的一組安全控制,並限制項目可以使用多少資源,資源名稱在項目中是惟一的。


使用oc types命令快速查看可用的概念和類型。

2.2 創建應用


簡單的應用程序、複雜的多層應用程序和微服務應用程序都可以使用資源定義文件來描述。

這個文件包含許多pod定義、連接這些pod的服務定義、用於水平伸縮應用程序pod的rc或dc、用於持久存儲應用程序數據的持久卷,以及OpenShift可以管理的任何其他需要的內容。

oc new-app命令可以使用-o json或-o yaml選項分別創建以json或yaml格式的定義文件的資源。可以使用oc create -f <filename>命令調用定義文件,並將其用於創建應用程序,或者與其他資源定義文件合併以創建複合應用程序。

oc new-app命令可以以許多不同的方式創建在OpenShift上運行的pod應用程序。它可以使用source-to-image (S2I)流程從現有docker映像、Dockerfiles或原始源代碼創建pod。

運行oc new-app -h命令,了解在OpenShift上創建新應用程序的所有不同選項。最常見的選項如下:

運行以下命令創建應用程序。OpenShift根據Docker配置文件的ADD_REGISTRY選項定義的倉庫 pull image。

$ oc new-app mysql MYSQL_USER=user MYSQL_PASSWORD=pass MYSQL_DATABASE=testdb -l

db=mysql

根據私有倉庫中的image創建應用程序。

$ oc new-app –docker-image=myregistry.com/mycompany/myapp –name=myapp

根據存儲在Git庫中的源代碼創建應用程序。

$ oc new-app https://github.com/openshift/ruby-hello-world –name=ruby-hello

創建基於存儲在Git庫中的源代碼並引用IS的應用程序。

$ oc new-app https://mygitrepo/php-hello -i php:7.0 –name=php-hello

從Docker配置文件的ADD_REGISTRY指令定義的可用倉庫之一創建一個基於mysql映像的應用程序。l db=mysql選項定義了一個值為mysql的db標籤。

$ oc new-app mysql MYSQL_USER=user \

MYSQL_PASSWORD=pass \

MYSQL_DATABASE=testdb \

-l db=mysql

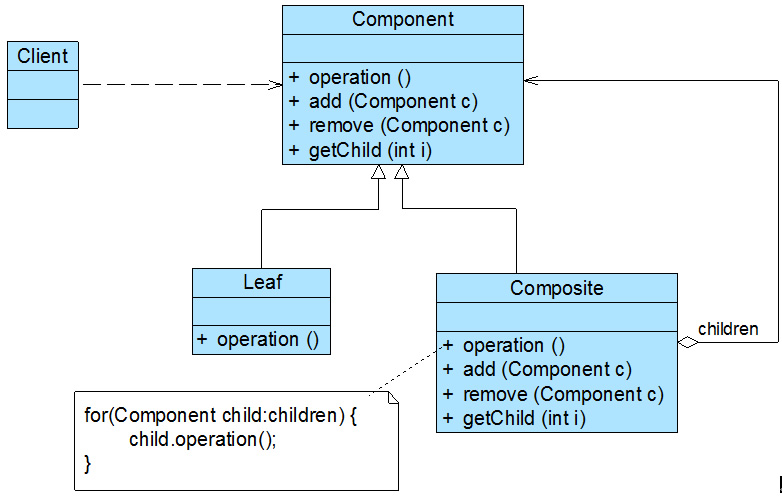
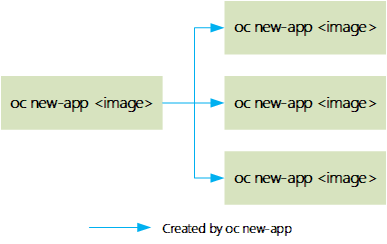
下圖显示了oc new-app命令在參數為容器image時創建的Kubernetes和OpenShift資源。該命令創建dc、is和svc,可以通過端口或route從外部訪問。


提示:通過使用帶有源代碼的oc new-app,將創建一個build configuration,而bc又從源代碼創建一個新的應用程序。但是,如果命令中沒有使用源代碼,則不會創建gc。該命令始終為應用程序創建dc和svc。

三 oc使用練習

3.1 前置準備


準備完整的OpenShift集群,參考《003.OpenShift網絡》2.1。

3.2 本練習準備


[student@workstation ~]$ lab manage-oc setup

3.3 驗證OpenShift

  1 [student@workstation ~]$ oc login -u admin -p redhat https://master.lab.example.com
  2 [student@workstation ~]$ oc project default
  3 Already on project "default" on server "https://master.lab.example.com:443".
  4 [student@workstation ~]$ oc project default
  5 Already on project "default" on server "https://master.lab.example.com:443".
  6 [student@workstation ~]$ oc get nodes
  7 NAME                     STATUS    ROLES     AGE       VERSION
  8 master.lab.example.com   Ready     master    23h       v1.9.1+a0ce1bc657
  9 node1.lab.example.com    Ready     compute   23h       v1.9.1+a0ce1bc657
 10 node2.lab.example.com    Ready     compute   23h       v1.9.1+a0ce1bc657
 11 [student@workstation ~]$ oc describe node master.lab.example.com		#查看master節點詳情
 12 [student@workstation ~]$ oc describe node node1.lab.example.com
 13 [student@workstation ~]$ oc describe node node2.lab.example.com
 14 [student@workstation ~]$ oc get pods -o wide
 15 NAME                       READY     STATUS    RESTARTS   AGE       IP              NODE
 16 docker-registry-1-8v7sh    1/1       Running   4          23h       10.129.0.30     node2.lab.example.com
 17 docker-registry-1-rrmhm    1/1       Running   2          23h       10.128.0.12     node1.lab.example.com
 18 registry-console-1-xzxxp   1/1       Running   4          23h       10.129.0.31     node2.lab.example.com
 19 router-1-fwttd             1/1       Running   4          23h       172.25.250.12   node2.lab.example.com
 20 router-1-xdw84             1/1       Running   2          23h       172.25.250.11   node1.lab.example.com
 21 [student@workstation ~]$ oc  describe pod docker-registry-1-8v7sh		#查看pod詳情


3.4 pod操作


[student@workstation ~]$ oc exec docker-registry-1-8v7sh hostname #執行pod中命令

docker-registry-1-8v7sh

[student@workstation ~]$ oc exec router-1-fwttd ls /

[student@workstation ~]$ oc exec docker-registry-1-8v7sh cat /etc/resolv.conf

提示:只要pod中存在的命令,都可以通過oc exec直接執行。

[student@workstation ~]$ oc rsh docker-registry-1-8v7sh #進入pod的shell

sh-4.2$ ls /

3.5 oc其他操作


[student@workstation ~]$ oc status -v #現實詳細的狀態


[student@workstation ~]$ oc get events #查看集群生命周期事件

[student@workstation ~]$ oc get all #獲取所有資源信息

3.6 導出資源


[student@workstation ~]$ oc export pod docker-registry-1-8v7sh

提示:oc export命令通常用於導出現有資源,並將它們轉換為配置文件(YAML或JSON),以便備份或在集群的其他地方重新創建資源。

[student@workstation ~]$ oc export svc,dc docker-registry –as-template=docker-registry

#通過將–as-template選項傳遞給oc export命令,將多個資源作為OpenShift模板同時導出。

[student@workstation ~]$ oc export svc,dc docker-registry > docker-registry.yaml #也可以使用重定嚮導出

[student@workstation ~]$ oc export –help #查看幫助

四 oc常見故障排除

4.1 常見環境信息


使用RPM安裝的OCP,那麼master和node的ocp相關服務將作為Red Hat Enterprise Linux服務運行。從master和node使用標準的sosreport實用程序,收集關於環境的信息,以及docker和openshift相關的信息。

[root@master ~]# sosreport -k docker.all=on -k docker.logs=on

sosreport命令創建一個包含所有相關信息的壓縮歸檔文件,並將其保存在/var/tmp目錄中。

另一個有用的診斷工具是oc adm diagnostics命令,能夠在OpenShift集群上運行多個診斷檢查,包括network、日誌、內部倉庫、master節點和node節點的服務檢查等等。oc adm diagnostics –help命令,獲取幫助。

4.2 常見診斷命令


oc客戶端命令是用來檢測和排除OpenShift集群中的問題的主要工具。它有許多選項,能夠檢測、診斷和修復由集群管理的主機和節點、服務和資源的問題。若已授權所需的權限,可以直接編輯集群中大多數託管資源的配置。

  • oc get events


事件允許OpenShift記錄集群中生命周期事件的信息,以統一的方式查看關於OpenShift組件的信息。oc get events命令提供OpenShift namespace的事件信息,可實現以下事件的捕獲:

    • Pod創建和刪除
    • pod調度的節點
    • master和node節點的狀態


事件通常用於故障排除,從而獲得關於集群中的故障和問題的高級信息,然後使用日誌文件和其他oc子命令進一步定位。

示例:使用以下命令獲得特定項目中的事件列表。

[student@workstation ~]$ oc get events -n <project>

也可以通過Web控制台進行事件的查看events。

  • oc log


oc logs命令查看build、deployment或pod的日誌輸出,。

示例1:使用oc命令查看pod的日誌。

[student@workstation ~]$ oc logs pod

示例2:使用oc命令查看build的日誌。

[student@workstation ~]$ oc logs bc/build-name

使用oc logs命令和-f選項實時跟蹤日誌輸出。例如,這對於連續監視build的進度和檢查錯誤非常有用。

也可以通過Web控制台進行事件的查看log。

  • oc rsync


oc rsync命令將內容複製到正在運行的pod中的目錄或從目錄複製內容。如果一個pod有多個容器,可以使用-c選項指定容器ID。否則,它默認為pod中的第一個容器。通常用於從容器傳輸日誌文件和配置文件。

示例1:將pod目錄中的內容複製到本地目錄。

[student@workstation ~]$ oc rsync <pod>:<pod_dir> <local_dir> -c <container>

示例2:將內容從本地目錄複製到pod的目錄中。

[student@workstation ~]$ oc rsync <local_dir> <pod>:<pod_dir> -c <container>

  • oc port-forward


使用oc port-forward命令將一個或多個本地端口轉發到pod。這允許在本地監聽特定或隨機端口,並將數據轉發到pod中的特定端口。

示例1:本地監聽3306並轉發到pod的3306.

[student@workstation ~]$ oc port-forward <pod> 3306:3306

五 TS常見故障

5.1 資源限制和配額問題


對於設置了資源限制和配額的項目,不適當的資源配置將導致部署失敗。使用oc get events和oc describe命令來排查失敗的原因。

例如試圖創建超過項目中pod數量配額限制的pod數量,那麼在運行oc get events命令時會提示:

Warning FailedCreate {hello-1-deploy} Error creating: pods “hello-1” is forbidden:

exceeded quota: project-quota, requested: cpu=250m, used: cpu=750m, limited: cpu=900m

5.2 S2I build失敗


使用oc logs命令查看S2I構建失敗。例如,要查看名為hello的構建配置的日誌:

[student@workstation ~]$ oc logs bc/hello

例如可以通過在build configuration策略中指定BUILD_LOGLEVEL環境變量來調整build日誌的詳細程度。

  1 {
  2 "sourceStrategy": {
  3 ...
  4 "env": [
  5 {
  6 "name": "BUILD_LOGLEVEL",
  7 "value": "5"
  8 }
  9 ]
 10 }
 11 }


5.3 ErrImagePull和imgpullback錯誤


通常是由不正確的deployment configuration造成、部署期間引用的錯誤或缺少image或Docker配置不當造成。

使用oc get events和oc describe命令排查,通過使用oc edit dc/<deploymentconfig>編輯deployment configuration來修復錯誤。

5.4 docker配置異常


master和node上不正確的docker配置可能會在部署期間導致許多錯誤。

通常檢查ADD_REGISTRY、INSECURE_REGISTRY和BLOCK_REGISTRY設置。使用systemctl status, oc logs, oc get events和oc describe命令對問題進行排查。

可以通添加/etc/sysconfig/docker配置文件中的–log-level參數來更改docker服務日誌級別。

示例:將日誌級別設置為debug。

OPTIONS=’–insecure-registry=172.30.0.0/16 –selinux-enabled –log-level=debug’

5.5 master和node節點失敗


運行systemctl status命令,對atomicopenshift-master、atom-openshift-node、etcd和docker服務中的問題進行排查。使用journalctl -u <unit-name>命令查看與前面列出的服務相關的系統日誌。

可以通過在各自的配置文件中編輯–loglevel變量,然後重新啟動關聯的服務,來增加來自atom-openshift-node、atomicopenshift-master-controllers和atom-openshift-master-api服務的詳細日誌記錄。

示例:設置OpenShift主控制器log level為debug級別,修改/etc/sysconfig/atomic-openshift-master-controllers文件。

OPTIONS=–loglevel=4 –listen=https://0.0.0.0:8444

延伸:

Red Hat OpenShift容器平台有五個級別的日誌詳細程度,無論日誌配置如何,日誌中都會出現帶有致命、錯誤、警告和某些信息嚴重程度的消息。

  • 0:只有錯誤和警告
  • 2:正常信息(默認)
  • 4:debug級信息
  • 6:api級debug信息(請求/響應)
  • 8:帶有完整請求體的API debug信息

5.6 調度pod失敗


OpenShift master調度pod在node上運行,通常由於node本身沒有處於就緒狀態,也由於資源限制和配額,pod無法運行。

使用oc get nodes命令驗證節點的狀態。在調度失敗期間,pod將處於掛起狀態,可以使用oc get pods -o wide命令進行檢查,該命令還显示了計劃在哪個節點上運行pod。使用oc get events和oc describe pod命令檢查調度失敗的詳細信息。

示例1:如下所示pod調度失敗,原因是CPU不足。

{default-scheduler } Warning FailedScheduling pod (FIXEDhello-phb4j) failed to

fit in any node

fit failure on node (hello-wx0s): Insufficient cpu

fit failure on node (hello-tgfm): Insufficient cpu

fit failure on node (hello-qwds): Insufficient cpu

示例2:如下所示pod調度失敗,原因是節點沒有處於就緒狀態,可通過oc describe排查。

{default-scheduler } Warning FailedScheduling pod (hello-phb4j): no nodes

available to schedule pods

六 常見問題排查

6.1 前置準備


準備完整的OpenShift集群,參考《003.OpenShift網絡》2.1。

6.2 本練習準備


[student@workstation ~]$ lab common-troubleshoot setup

6.3 創建應用


[student@workstation ~]$ oc new-project common-troubleshoot

[student@workstation ~]$ oc new-app –name=hello -i php:5.4 \ #從源代碼創建應用

> http://services.lab.example.com/php-helloworld


6.4 查看詳情


[student@workstation ~]$ oc describe is php -n openshift


結論:由上可知,倉庫中不存在所需鏡像。

6.5 修正錯誤


[student@workstation ~]$ oc new-app –name=hello -i php:7.0 http://services.lab.example.com/php-helloworld

[student@workstation ~]$ oc get pod -o wide #再次查看發現一隻出於pending

NAME READY STATUS RESTARTS AGE IP NODE

hello-1-build 0/1 Pending 0 40s <none> <none>

6.6 查看詳情

  1 [student@workstation ~]$ oc log hello-1-build		#查看log
  2 W0720 20:22:16.455008   18942 cmd.go:358] log is DEPRECATED and will be removed in a future version. Use logs instead.
  3 [student@workstation ~]$ oc get events			#查看事件
  4 LAST SEEN   FIRST SEEN   COUNT     NAME                             KIND      SUBOBJECT   TYPE      REASON             SOURCE              MESSAGE
  5 56s         4m           15        hello-1-build.15b31cbd8da8ff1e   Pod                   Warning   FailedScheduling   default-scheduler   0/3 nodes are available: 1 MatchNodeSelector, 2 NodeNotReady.
  6 [student@workstation ~]$ oc describe pod hello-1-build	#查看詳情
  7 ……
  8 Warning  FailedScheduling  31s (x22 over 5m)  default-scheduler  0/3 nodes are available: 1 MatchNodeSelector, 2 NodeNotReady.
  9 結論:由上可知,沒有node可供調度此pod。
 10 [root@master ~]# oc get nodes				#在master節點進一步排查node情況
 11 NAME                     STATUS     ROLES     AGE       VERSION
 12 master.lab.example.com   Ready      master    1d        v1.9.1+a0ce1bc657
 13 node1.lab.example.com    NotReady   compute   1d        v1.9.1+a0ce1bc657
 14 node2.lab.example.com    NotReady   compute   1d        v1.9.1+a0ce1bc657
 15 結論:由上可知,node狀態異常,都未出於ready狀態。


6.7 檢查服務


[root@node1 ~]# systemctl status atomic-openshift-node.service

[root@node2 ~]# systemctl status atomic-openshift-node.service

[root@node1 ~]# systemctl status docker

[root@node2 ~]# systemctl status docker


結論:由上可知,node節點的docker異常。

6.8 啟動服務


[root@node1 ~]# systemctl start docker

[root@node2 ~]# systemctl start docker

6.9 確認驗證


[root@master ~]# oc get nodes #再次查看node狀態

NAME STATUS ROLES AGE VERSION

master.lab.example.com Ready master 1d v1.9.1+a0ce1bc657

node1.lab.example.com Ready compute 1d v1.9.1+a0ce1bc657

node2.lab.example.com Ready compute 1d v1.9.1+a0ce1bc657

[student@workstation ~]$ oc get pods #確認pod是否正常調度至node

NAME READY STATUS RESTARTS AGE

hello-1-build 1/1 Running 0 22m

[student@workstation ~]$ oc describe is #查看is詳情


結論:由上可知,IS也將image推送至內部倉庫。

七 oc命令綜合實驗

7.1 前置準備


準備完整的OpenShift集群,參考《003.OpenShift網絡》2.1。

7.2 本練習準備


[student@workstation ~]$ lab execute-review setup

7.3 git項目至本地


[student@workstation ~]$ cd /home/student/DO280/labs/execute-review/

[student@workstation execute-review]$ git clone http://services.lab.example.com/node-hello

7.4 docker構建image


[student@workstation execute-review]$ cd node-hello/

[student@workstation node-hello]$ docker build -t node-hello:latest .

[student@workstation node-hello]$ docker images #查看image

REPOSITORY TAG IMAGE ID CREATED SIZE

node-hello latest ff48daa00d8e 12 seconds ago 495 MB

registry.lab.example.com/rhscl/nodejs-6-rhel7 latest fba56b5381b7 22 months ago 489 MB

7.5 修改docker tag


[student@workstation node-hello]$ docker tag ff48daa00d8e \

> registry.lab.example.com/node-hello:latest

[student@workstation node-hello]$ docker images

REPOSITORY TAG IMAGE ID CREATED SIZE

node-hello latest ff48daa00d8e About a minute ago 495 MB

registry.lab.example.com/node-hello latest ff48daa00d8e About a minute ago 495 MB

registry.lab.example.com/rhscl/nodejs-6-rhel7 latest fba56b5381b7 22 months ago 489 MB

7.6 push image

[student@workstation node-hello]$ docker push registry.lab.example.com/node-hello:latest

7.7 創建project


[student@workstation ~]$ oc login -u developer -p redhat \

> https://master.lab.example.com

[student@workstation ~]$ oc projects

[student@workstation ~]$ oc project execute-review

[student@workstation ~]$ oc new-app registry.lab.example.com/node-hello –name hello

[student@workstation ~]$ oc get all #查看全部資源


7.8 排查ImagePullBackOff


[student@workstation ~]$ oc logs hello-1-2jkkj #查看日誌

Error from server (BadRequest): container “hello” in pod “hello-1-2jkkj” is waiting to start: trying and failing to pull image

[student@workstation ~]$ oc describe pod hello-1-2jkkj #查看詳情

[student@workstation ~]$ oc get events –sort-by=’.metadata.creationTimestamp’ #查看事件

結論:由上可知,為image pull失敗。

7.9 手動pull鏡像


[student@workstation ~]$ oc get pod -o wide

NAME READY STATUS RESTARTS AGE IP NODE

hello-1-2jkkj 0/1 ImagePullBackOff 0 8m 10.128.0.45 node1.lab.example.com

hello-1-deploy 1/1 Running 0 8m 10.129.0.72 node2.lab.example.com

[root@node1 ~]# docker pull registry.lab.example.com/node-hello #手動拉去也失敗

Using default tag: latest

Trying to pull repository registry.lab.example.com/node-hello …

All endpoints blocked.

結論:由上可知,所有endpoint都被阻塞了。這種類型的錯誤通常發生在OpenShift中,原因是不正確的部署配置或無效docker配置。

7.10 修正docker配置


[root@node1 ~]# vi /etc/sysconfig/docker

將BLOCK_REGISTRY=’–block-registry registry.access.redhat.com –block-registry docker.io –block-registry registry.

lab.example.com’

修改為

BLOCK_REGISTRY=’–block-registry registry.access.redhat.com –block-registry docker.io’

[root@node1 ~]# systemctl restart docker

提示:node2也需要如上操作。

7.11 更新pod


[student@workstation ~]$ oc rollout latest hello

[student@workstation ~]$ oc get pods #確認

NAME READY STATUS RESTARTS AGE

hello-1-deploy 0/1 Error 0 22m

hello-2-75x9t 1/1 Running 0 47s

7.12 確認驗證


[student@workstation ~]$ oc logs hello-2-75x9t #查看log

nodejs server running on http://0.0.0.0:3000

7.13 暴露服務


[student@workstation ~]$ oc expose svc hello –hostname=hello.apps.lab.example.com

route “hello” exposed

7.14 測試服務


[student@workstation ~]$ curl http://hello.apps.lab.example.com

Hi! I am running on host -> hello-2-75x9t

[student@workstation ~]$ lab execute-review grade #腳本驗證試驗

本站聲明:網站內容來源於博客園,如有侵權,請聯繫我們,我們將及時處理

【其他文章推薦】

※別再煩惱如何寫文案,掌握八大原則!

網頁設計一頭霧水該從何著手呢? 台北網頁設計公司幫您輕鬆架站!

※超省錢租車方案

※教你寫出一流的銷售文案?

網頁設計最專業,超強功能平台可客製化

設計模式系列之組合模式(Composite Pattern)——樹形結構的處理

說明:設計模式系列文章是讀劉偉所著《設計模式的藝術之道(軟件開發人員內功修鍊之道)》一書的閱讀筆記。個人感覺這本書講的不錯,有興趣推薦讀一讀。詳細內容也可以看看此書作者的博客https://blog.csdn.net/LoveLion/article/details/17517213

模式概述

樹形結構在軟件中隨處可見,例如操作系統中的目錄結構、應用軟件中的菜單、辦公系統中的公司組織結構等等,如何運用面向對象的方式來處理這種樹形結構是組合模式需要解決的問題。組合模式通過一種巧妙的設計方案使得用戶可以一致性地處理整個樹形結構或者樹形結構的一部分,也可以一致性地處理樹形結構中的恭弘=叶 恭弘子節點(不包含子節點的節點)和容器節點(包含子節點的節點)。

模式定義

組合模式(Composite Pattern):組合多個對象形成樹形結構以表示具有“整體—部分”關係的層次結構。組合模式對單個對象(即恭弘=叶 恭弘子對象)和組合對象(即容器對象)的使用具有一致性,組合模式又可以稱為“整體—部分”(Part-Whole)模式,它是一種對象結構型模式。

模式結構圖

組合模式結構圖如下所示:

在組合模式結構圖中包含如下幾個角色:

  • Component(抽象構件):它可以是接口或抽象類,為恭弘=叶 恭弘子構件和容器構件對象聲明接口,在該角色中可以包含所有子類共有行為的聲明和實現。在抽象構件中定義了訪問及管理它的子構件的方法,如增加子構件、刪除子構件、獲取子構件等。

  • Leaf(恭弘=叶 恭弘子構件):它在組合結構中表示恭弘=叶 恭弘子節點對象,恭弘=叶 恭弘子節點沒有子節點,它實現了在抽象構件中定義的行為。對於那些訪問及管理子構件的方法,可以通過異常等方式進行處理。

  • Composite(容器構件):它在組合結構中表示容器節點對象,容器節點包含子節點,其子節點可以是恭弘=叶 恭弘子節點,也可以是容器節點,它提供一個集合用於存儲子節點,實現了在抽象構件中定義的行為,包括那些訪問及管理子構件的方法,在其業務方法中可以遞歸調用其子節點的業務方法。

組合模式的關鍵是定義了一個抽象構件類,它既可以代表恭弘=叶 恭弘子,又可以代表容器,而客戶端針對該抽象構件類進行編程,無須知道它到底表示的是恭弘=叶 恭弘子還是容器,可以對其進行統一處理。同時容器對象與抽象構件類之間還建立一個聚合關聯關係,在容器對象中既可以包含恭弘=叶 恭弘子,也可以包含容器,以此實現遞歸組合,形成一個樹形結構。

模式偽代碼

對於客戶端而言,一般針對抽象構件編程,而無須關心其具體子類是容器構件還是恭弘=叶 恭弘子構件。抽象構建類典型代碼如下:

public abstract class Component {
    public abstract void add(Component c); //增加成員

    public abstract void remove(Component c); //刪除成員

    public abstract Component getChild(int i); //獲取成員

    public abstract void operation();  //業務方法
}

如果繼承抽象構件的是恭弘=叶 恭弘子構件,則其典型代碼如下所示:

public class Leaf extends Component {
    @Override
    public void add(Component c) {
        //異常處理或錯誤提示 
    }

    @Override
    public void remove(Component c) {
        //異常處理或錯誤提示 
    }

    @Override
    public Component getChild(int i) {
        //異常處理或錯誤提示 
        return null;
    }

    @Override
    public void operation() {
        //恭弘=叶 恭弘子構件具體業務方法的實現
    }
}

如果繼承抽象構件的是容器構件,則其典型代碼如下所示:

public class Composite extends Component {

    private List<Component> list = new ArrayList<>();

    @Override
    public void add(Component c) {
        list.add(c);
    }

    @Override
    public void remove(Component c) {
        list.remove(c);
    }

    @Override
    public Component getChild(int i) {
        return (Component) list.get(i);
    }

    @Override
    public void operation() {
        //容器構件具體業務方法的實現
        //遞歸調用成員構件的業務方法
        for (Object obj : list) {
            ((Component) obj).operation();
        }
    }
}

客戶端對抽象構件類進行編程

public class Client {
    public static void main(String[] args) {
        Component component;
        component = new Leaf();
        //component = new Composite();

        // 無須知道到底是恭弘=叶 恭弘子還是容器
        // 可以對其進行統一處理
        component.operation();
    }
}

模式簡化

透明組合模式

透明組合模式中,抽象構件Component中聲明了所有用於管理成員對象的方法,包括add()、remove()以及getChild()等方法,這樣做的好處是確保所有的構件類都有相同的接口。在客戶端看來,恭弘=叶 恭弘子對象與容器對象所提供的方法是一致的,客戶端可以相同地對待所有的對象。透明組合模式也是組合模式的標準形式。

透明組合模式的完整結構圖如下:

也可以將恭弘=叶 恭弘子構件的add()remove()等方法的實現代碼移至Component中,由Component提供統一的默認實現,這樣子類就不必強制去實現管理子Component。代碼如下所示:

public abstract class Component {
    public void add(Component c) {
        throw new RuntimeException("不支持的操作");
    }

    public void remove(Component c) {
        throw new RuntimeException("不支持的操作");
    }

    public Component getChild(int i) {
        throw new RuntimeException("不支持的操作");
    }

    public abstract void operation();  //業務方法
}

透明組合模式的缺點是不夠安全,因為恭弘=叶 恭弘子對象和容器對象在本質上是有區別的。恭弘=叶 恭弘子對象不可能有下一個層次的對象,即不可能包含成員對象,因此為其提供add()、remove()以及getChild()等方法是沒有意義的,這在編譯階段不會出錯,但在運行階段如果調用這些方法可能會出錯(如果沒有提供相應的錯誤處理代碼)。

安全組合模式

安全組合模式中,在抽象構件Component中沒有聲明任何用於管理成員對象的方法,而是在Composite類中聲明並實現這些方法。

安全組合模式的完整結構圖如下:

此時Component就應該這樣定義了

public abstract class Component {
    // 業務方法
    public abstract void operation();
}

安全組合模式的缺點是不夠透明,因為恭弘=叶 恭弘子構件和容器構件具有不同的方法,且容器構件中那些用於管理成員對象的方法沒有在抽象構件類中定義,因此客戶端不能完全針對抽象編程,必須有區別地對待恭弘=叶 恭弘子構件和容器構件。在實際應用中,安全組合模式的使用頻率也非常高,在Java AWT中使用的組合模式就是安全組合模式。

模式應用

模式在JDK中的應用

Java SE中的AWTSwing包的設計就基於組合模式,在這些界麵包中為用戶提供了大量的容器構件(如Container)和成員構件(如CheckboxButtonTextComponent等),其結構如下圖所示

Component類是抽象構件,CheckboxButtonTextComponent是恭弘=叶 恭弘子構件,而Container是容器構件,在AWT中包含的恭弘=叶 恭弘子構件還有很多。在一個容器構件中可以包含恭弘=叶 恭弘子構件,也可以繼續包含容器構件,這些恭弘=叶 恭弘子構件和容器構件一起組成了複雜的GUI界面。除此以外,在XML解析組織結構樹處理文件系統設計等領域,組合模式都得到了廣泛應用。

模式在開源項目中的應用

Springorg.springframework.web.method.support.HandlerMethodArgumentResolver使用了安全組合模式。提取關鍵代碼如下:

public interface HandlerMethodArgumentResolver {
    
    boolean supportsParameter(MethodParameter parameter);

    Object resolveArgument(MethodParameter parameter, @Nullable ModelAndViewContainer mavContainer,
                           NativeWebRequest webRequest, @Nullable WebDataBinderFactory binderFactory) throws Exception;

}

再看下它的一個實現類org.springframework.web.method.support.HandlerMethodArgumentResolverComposite

public class HandlerMethodArgumentResolverComposite implements HandlerMethodArgumentResolver {


    private final List<HandlerMethodArgumentResolver> argumentResolvers = new LinkedList<>();

    /**
     * Add the given {@link HandlerMethodArgumentResolver}.
     */
    public HandlerMethodArgumentResolverComposite addResolver(HandlerMethodArgumentResolver resolver) {
        this.argumentResolvers.add(resolver);
        return this;
    }

    /**
     * Add the given {@link HandlerMethodArgumentResolver HandlerMethodArgumentResolvers}.
     */
    public HandlerMethodArgumentResolverComposite addResolvers(
            @Nullable HandlerMethodArgumentResolver... resolvers) {

        if (resolvers != null) {
            Collections.addAll(this.argumentResolvers, resolvers);
        }
        return this;
    }

    /**
     * Clear the list of configured resolvers.
     */
    public void clear() {
        this.argumentResolvers.clear();
    }


    @Override
    public boolean supportsParameter(MethodParameter parameter) {
        return getArgumentResolver(parameter) != null;
    }


    @Override
    public Object resolveArgument(MethodParameter parameter, @Nullable ModelAndViewContainer mavContainer,
                                  NativeWebRequest webRequest, @Nullable WebDataBinderFactory binderFactory) throws Exception {

        HandlerMethodArgumentResolver resolver = getArgumentResolver(parameter);
        if (resolver == null) {
            throw new IllegalArgumentException("Unsupported parameter type [" +
                    parameter.getParameterType().getName() + "]. supportsParameter should be called first.");
        }
        return resolver.resolveArgument(parameter, mavContainer, webRequest, binderFactory);
    }
}

模式總結

主要優點

  1. 組合模式可以清楚地定義分層次的複雜對象,表示對象的全部或部分層次,它讓客戶端忽略了層次的差異,方便對整個層次結構進行控制。

  2. 客戶端可以一致地使用一個組合結構或其中單個對象,不必關心處理的是單個對象還是整個組合結構,簡化了客戶端代碼。

  3. 組合模式為樹形結構的面向對象實現提供了一種靈活的解決方案,通過恭弘=叶 恭弘子對象和容器對象的遞歸組合,可以形成複雜的樹形結構,但對樹形結構的控制卻非常簡單。

適用場景

(1) 在具有整體和部分的層次結構中,希望通過一種方式忽略整體與部分的差異,客戶端可以一致地對待它們。

(2) 在一個使用面向對象語言開發的系統中需要處理一個樹形結構。

(3) 在一個系統中能夠分離出恭弘=叶 恭弘子對象和容器對象,而且它們的類型不固定,需要增加一些新的類型。

本站聲明:網站內容來源於博客園,如有侵權,請聯繫我們,我們將及時處理

【其他文章推薦】

※教你寫出一流的銷售文案?

※廣告預算用在刀口上,台北網頁設計公司幫您達到更多曝光效益

※回頭車貨運收費標準

※別再煩惱如何寫文案,掌握八大原則!

※超省錢租車方案

※產品缺大量曝光嗎?你需要的是一流包裝設計!

能防颱、調節水患 和古墳並立的日本太陽能發電廠

文:宋瑞文(加州能源特約撰述)

本站聲明:網站內容來源環境資訊中心https://e-info.org.tw/,如有侵權,請聯繫我們,我們將及時處理

【其他文章推薦】

※帶您來了解什麼是 USB CONNECTOR  ?

※自行創業缺乏曝光? 網頁設計幫您第一時間規劃公司的形象門面

※如何讓商品強力曝光呢? 網頁設計公司幫您建置最吸引人的網站,提高曝光率!

※綠能、環保無空污,成為電動車最新代名詞,目前市場使用率逐漸普及化

※廣告預算用在刀口上,台北網頁設計公司幫您達到更多曝光效益

※教你寫出一流的銷售文案?

綠色運輸衝一波 城市的規劃與挑戰

文:詹詒絜(台達電子文教基金會高級專員)

本站聲明:網站內容來源環境資訊中心https://e-info.org.tw/,如有侵權,請聯繫我們,我們將及時處理

【其他文章推薦】

※為什麼 USB CONNECTOR 是電子產業重要的元件?

網頁設計一頭霧水該從何著手呢? 台北網頁設計公司幫您輕鬆架站!

※台北網頁設計公司全省服務真心推薦

※想知道最厲害的網頁設計公司"嚨底家"!

※推薦評價好的iphone維修中心

遵守自然法則的吃蟲文化 日本自古就有「追蜂」少年

文:宋瑞文

本站聲明:網站內容來源環境資訊中心https://e-info.org.tw/,如有侵權,請聯繫我們,我們將及時處理

【其他文章推薦】

USB CONNECTOR掌控什麼技術要點? 帶您認識其相關發展及效能

台北網頁設計公司這麼多該如何選擇?

※智慧手機時代的來臨,RWD網頁設計為架站首選

※評比南投搬家公司費用收費行情懶人包大公開

※回頭車貨運收費標準

聯合國專家:防疫措施恐釀全球缺糧

摘錄自2020年03月26日自由時報報導

武漢肺炎讓全球各地都有民眾因恐慌而瘋狂囤積生活用品、糧食,聯合國糧農組織(FAO)首席經濟學家托雷羅(Maximo Torero)警告,各國實施的防疫措施,恐怕會導致全球糧食短缺。

綜合外電報導,各國為確保物資充足,紛紛祭出提高關稅、限制出口、禁止人口移動等措施。托雷羅表示,從2007年的糧食危機就有觀察到,貿易壁壘會造成價格波動,進而使狀況惡化。雖然目前全球的糧食狀況看似很好,但幾週內糧食問題就會逐漸浮現,並隨著蔬果進入收成季節,於兩個月內惡化。

限制人口流動雖然能有效防止疫情傳播,但邁入收成季的蔬果園也將難以招募到熟練的臨時工,許多作物可能來不及在腐壞前收成。托雷羅也建議消費者,可以透過避免恐慌搶購、囤貨、浪費物資,緩解防疫措施導致的糧食問題。

本站聲明:網站內容來源環境資訊中心https://e-info.org.tw/,如有侵權,請聯繫我們,我們將及時處理

【其他文章推薦】

網頁設計一頭霧水該從何著手呢? 台北網頁設計公司幫您輕鬆架站!

網頁設計公司推薦不同的風格,搶佔消費者視覺第一線

※想知道購買電動車哪裡補助最多?台中電動車補助資訊懶人包彙整

南投搬家公司費用,距離,噸數怎麼算?達人教你簡易估價知識!

※教你寫出一流的銷售文案?

※超省錢租車方案

報告指亞馬遜雨林去年火災次數飆升三成

摘錄自2020年1月9日星島日報報導

巴西國家太空研究院(INPE)周三發表一份報告顯示,2019年全年在南美洲亞馬遜雨林內發生的火災,比對上一年大幅上升30%。

根據 INPE 提供的數據,在2019年,在亞馬遜地區偵測到的火災多達8萬9178宗,比2018年的6萬8345宗大幅增加。不過,這個數字仍然低於10萬9630宗的歷史性平均紀錄。

亞馬遜森林去年發生的特大山火,引起國際社會廣泛關注。巴西總統博爾索納羅的政策和立場受到各方抨擊,指他上台後只顧經濟利益,把環保及全球氣候暖化的問題置之不理。巴西在2019年斬伐林木及開墾土地的數字,創下10年來新高。如何保護亞馬遜森林成為一個緊急議題。

本站聲明:網站內容來源環境資訊中心https://e-info.org.tw/,如有侵權,請聯繫我們,我們將及時處理

【其他文章推薦】

網頁設計一頭霧水該從何著手呢? 台北網頁設計公司幫您輕鬆架站!

網頁設計公司推薦不同的風格,搶佔消費者視覺第一線

※Google地圖已可更新顯示潭子電動車充電站設置地點!!

※廣告預算用在刀口上,台北網頁設計公司幫您達到更多曝光效益

※別再煩惱如何寫文案,掌握八大原則!

網頁設計最專業,超強功能平台可客製化

英國新創開發藻類塗層 打造會行光合作用的衣服

環境資訊中心綜合外電;姜唯 編譯;林大利 審校

本站聲明:網站內容來源環境資訊中心https://e-info.org.tw/,如有侵權,請聯繫我們,我們將及時處理

【其他文章推薦】

網頁設計公司推薦不同的風格,搶佔消費者視覺第一線

※廣告預算用在刀口上,台北網頁設計公司幫您達到更多曝光效益

※自行創業缺乏曝光? 網頁設計幫您第一時間規劃公司的形象門面

南投搬家公司費用需注意的眉眉角角,別等搬了再說!

※教你寫出一流的銷售文案?

流產、死胎層出不窮 南蘇丹隱匿石油業環境報告 犧牲者至今未受保障

環境資訊中心綜合外電;姜唯 編譯;林大利 審校

本站聲明:網站內容來源環境資訊中心https://e-info.org.tw/,如有侵權,請聯繫我們,我們將及時處理

【其他文章推薦】

※帶您來了解什麼是 USB CONNECTOR  ?

※自行創業缺乏曝光? 網頁設計幫您第一時間規劃公司的形象門面

※如何讓商品強力曝光呢? 網頁設計公司幫您建置最吸引人的網站,提高曝光率!

※綠能、環保無空污,成為電動車最新代名詞,目前市場使用率逐漸普及化

※廣告預算用在刀口上,台北網頁設計公司幫您達到更多曝光效益

※教你寫出一流的銷售文案?

Quartz.Net系列(七):Trigger之SimpleScheduleBuilder詳解

所有方法圖


 SimpleScheduleBuilder方法

RepeatForever:指定觸發器將無限期重複。

WithRepeatCount:指定重複次數

var trigger = TriggerBuilder.Create().WithSimpleSchedule(s=>s.WithIntervalInSeconds(1).RepeatForever()).Build();


            var trigger = TriggerBuilder.Create().WithSimpleSchedule(s=>s.WithIntervalInSeconds(1)
                                                                         .WithRepeatCount(10)).Build();


注:底層實現是repeatCount+1,也就是總共執行repeatCount+1次

        /// <summary>
        /// Specify a the number of time the trigger will repeat - total number of
        /// firings will be this number + 1.
        /// </summary>
        /// <remarks>
        /// </remarks>
        /// <param name="repeatCount">the number of seconds at which the trigger should repeat.</param>
        /// <returns>the updated SimpleScheduleBuilder</returns>
        /// <seealso cref="ISimpleTrigger.RepeatCount" />
        /// <seealso cref="RepeatForever" />
        public SimpleScheduleBuilder WithRepeatCount(int repeatCount)
        {
            this.repeatCount = repeatCount;
            return this;
        }


WithInterval:以毫秒為單位指定重複間隔,由於是TimeSpan也可以指定時分秒

WithIntervalInHours:以小時為單位指定重複間隔

WithIntervalInMinutes:以分鐘單位指定重複間隔

WithIntervalInSeconds:以秒為單位指定重複間隔

            var trigger = TriggerBuilder.Create().WithSimpleSchedule(s=>s .WithIntervalInSeconds(1)
                                                                          .WithInterval(TimeSpan.FromDays(1))
                                                                          .WithIntervalInMinutes(1)
                                                                          .WithIntervalInHours(1)
                                                                          .WithRepeatCount(5))
                                                 .Build();

注:底層都是通過WithInterval實現的

        /// <summary>
        /// Specify a repeat interval in milliseconds.
        /// </summary>
        /// <remarks>
        /// </remarks>
        /// <param name="timeSpan">the time span at which the trigger should repeat.</param>
        /// <returns>the updated SimpleScheduleBuilder</returns>
        /// <seealso cref="ISimpleTrigger.RepeatInterval" />
        /// <seealso cref="WithRepeatCount(int)" />
        public SimpleScheduleBuilder WithInterval(TimeSpan timeSpan)
        {
            interval = timeSpan;
            return this;
        }

        /// <summary>
        /// Specify a repeat interval in seconds.
        /// </summary>
        /// <remarks>
        /// </remarks>
        /// <param name="seconds">the time span at which the trigger should repeat.</param>
        /// <returns>the updated SimpleScheduleBuilder</returns>
        /// <seealso cref="ISimpleTrigger.RepeatInterval" />
        /// <seealso cref="WithRepeatCount(int)" />
        public SimpleScheduleBuilder WithIntervalInSeconds(int seconds)
        {
            return WithInterval(TimeSpan.FromSeconds(seconds));
        }

靜態方法:

RepeatMinutelyForever

RepeatMinutelyForTotalCount

RepeatSecondlyForever

RepeatSecondlyForTotalCount

RepeatHourlyForever

RepeatHourlyForTotalCount

var trigger = TriggerBuilder.Create().WithSchedule(SimpleScheduleBuilder.RepeatSecondlyForTotalCount(2)).Build();


 /// <summary>
        /// Create a SimpleScheduleBuilder set to repeat forever with a 1 minute interval.
        /// </summary>
        /// <remarks>
        /// </remarks>
        /// <returns>the new SimpleScheduleBuilder</returns>
        public static SimpleScheduleBuilder RepeatMinutelyForever()
        {
            SimpleScheduleBuilder sb = Create()
                .WithInterval(TimeSpan.FromMinutes(1))
                .RepeatForever();

            return sb;
        }

        /// <summary>
        /// Create a SimpleScheduleBuilder set to repeat forever with an interval
        /// of the given number of minutes.
        /// </summary>
        /// <remarks>
        /// </remarks>
        /// <returns>the new SimpleScheduleBuilder</returns>
        public static SimpleScheduleBuilder RepeatMinutelyForever(int minutes)
        {
            SimpleScheduleBuilder sb = Create()
                .WithInterval(TimeSpan.FromMinutes(minutes))
                .RepeatForever();

            return sb;
        }

        /// <summary>
        /// Create a SimpleScheduleBuilder set to repeat forever with a 1 second interval.
        /// </summary>
        /// <remarks>
        /// </remarks>
        /// <returns>the new SimpleScheduleBuilder</returns>
        public static SimpleScheduleBuilder RepeatSecondlyForever()
        {
            SimpleScheduleBuilder sb = Create()
                .WithInterval(TimeSpan.FromSeconds(1))
                .RepeatForever();

            return sb;
        }

        /// <summary>
        /// Create a SimpleScheduleBuilder set to repeat forever with an interval
        /// of the given number of seconds.
        /// </summary>
        /// <remarks>
        /// </remarks>
        /// <returns>the new SimpleScheduleBuilder</returns>
        public static SimpleScheduleBuilder RepeatSecondlyForever(int seconds)
        {
            SimpleScheduleBuilder sb = Create()
                .WithInterval(TimeSpan.FromSeconds(seconds))
                .RepeatForever();

            return sb;
        }

        /// <summary>
        /// Create a SimpleScheduleBuilder set to repeat forever with a 1 hour interval.
        /// </summary>
        /// <remarks>
        /// </remarks>
        /// <returns>the new SimpleScheduleBuilder</returns>
        public static SimpleScheduleBuilder RepeatHourlyForever()
        {
            SimpleScheduleBuilder sb = Create()
                .WithInterval(TimeSpan.FromHours(1))
                .RepeatForever();

            return sb;
        }

        /// <summary>
        /// Create a SimpleScheduleBuilder set to repeat forever with an interval
        /// of the given number of hours.
        /// </summary>
        /// <remarks>
        /// </remarks>
        /// <returns>the new SimpleScheduleBuilder</returns>
        public static SimpleScheduleBuilder RepeatHourlyForever(int hours)
        {
            SimpleScheduleBuilder sb = Create()
                .WithInterval(TimeSpan.FromHours(hours))
                .RepeatForever();

            return sb;
        }

        /// <summary>
        /// Create a SimpleScheduleBuilder set to repeat the given number
        /// of times - 1  with a 1 minute interval.
        /// </summary>
        /// <remarks>
        /// <para>Note: Total count = 1 (at start time) + repeat count</para>
        /// </remarks>
        /// <returns>the new SimpleScheduleBuilder</returns>
        public static SimpleScheduleBuilder RepeatMinutelyForTotalCount(int count)
        {
            if (count < 1)
            {
                throw new ArgumentException("Total count of firings must be at least one! Given count: " + count);
            }

            SimpleScheduleBuilder sb = Create()
                .WithInterval(TimeSpan.FromMinutes(1))
                .WithRepeatCount(count - 1);

            return sb;
        }

        /// <summary>
        /// Create a SimpleScheduleBuilder set to repeat the given number
        /// of times - 1  with an interval of the given number of minutes.
        /// </summary>
        /// <remarks>
        /// <para>Note: Total count = 1 (at start time) + repeat count</para>
        /// </remarks>
        /// <returns>the new SimpleScheduleBuilder</returns>
        public static SimpleScheduleBuilder RepeatMinutelyForTotalCount(int count, int minutes)
        {
            if (count < 1)
            {
                throw new ArgumentException("Total count of firings must be at least one! Given count: " + count);
            }

            SimpleScheduleBuilder sb = Create()
                .WithInterval(TimeSpan.FromMinutes(minutes))
                .WithRepeatCount(count - 1);

            return sb;
        }

        /// <summary>
        /// Create a SimpleScheduleBuilder set to repeat the given number
        /// of times - 1  with a 1 second interval.
        /// </summary>
        /// <remarks>
        /// <para>Note: Total count = 1 (at start time) + repeat count</para>
        /// </remarks>
        /// <returns>the new SimpleScheduleBuilder</returns>
        public static SimpleScheduleBuilder RepeatSecondlyForTotalCount(int count)
        {
            if (count < 1)
            {
                throw new ArgumentException("Total count of firings must be at least one! Given count: " + count);
            }

            SimpleScheduleBuilder sb = Create()
                .WithInterval(TimeSpan.FromSeconds(1))
                .WithRepeatCount(count - 1);

            return sb;
        }

        /// <summary>
        /// Create a SimpleScheduleBuilder set to repeat the given number
        /// of times - 1  with an interval of the given number of seconds.
        /// </summary>
        /// <remarks>
        /// <para>Note: Total count = 1 (at start time) + repeat count</para>
        /// </remarks>
        /// <returns>the new SimpleScheduleBuilder</returns>
        public static SimpleScheduleBuilder RepeatSecondlyForTotalCount(int count, int seconds)
        {
            if (count < 1)
            {
                throw new ArgumentException("Total count of firings must be at least one! Given count: " + count);
            }

            SimpleScheduleBuilder sb = Create()
                .WithInterval(TimeSpan.FromSeconds(seconds))
                .WithRepeatCount(count - 1);

            return sb;
        }

        /// <summary>
        /// Create a SimpleScheduleBuilder set to repeat the given number
        /// of times - 1  with a 1 hour interval.
        /// </summary>
        /// <remarks>
        /// <para>Note: Total count = 1 (at start time) + repeat count</para>
        /// </remarks>
        /// <returns>the new SimpleScheduleBuilder</returns>
        public static SimpleScheduleBuilder RepeatHourlyForTotalCount(int count)
        {
            if (count < 1)
            {
                throw new ArgumentException("Total count of firings must be at least one! Given count: " + count);
            }

            SimpleScheduleBuilder sb = Create()
                .WithInterval(TimeSpan.FromHours(1))
                .WithRepeatCount(count - 1);

            return sb;
        }

        /// <summary>
        /// Create a SimpleScheduleBuilder set to repeat the given number
        /// of times - 1  with an interval of the given number of hours.
        /// </summary>
        /// <remarks>
        /// <para>Note: Total count = 1 (at start time) + repeat count</para>
        /// </remarks>
        /// <returns>the new SimpleScheduleBuilder</returns>
        public static SimpleScheduleBuilder RepeatHourlyForTotalCount(int count, int hours)
        {
            if (count < 1)
            {
                throw new ArgumentException("Total count of firings must be at least one! Given count: " + count);
            }

            SimpleScheduleBuilder sb = Create()
                .WithInterval(TimeSpan.FromHours(hours))
                .WithRepeatCount(count - 1);

            return sb;
        }


本站聲明:網站內容來源於博客園,如有侵權,請聯繫我們,我們將及時處理

【其他文章推薦】

※為什麼 USB CONNECTOR 是電子產業重要的元件?

網頁設計一頭霧水該從何著手呢? 台北網頁設計公司幫您輕鬆架站!

※台北網頁設計公司全省服務真心推薦

※想知道最厲害的網頁設計公司"嚨底家"!

※推薦評價好的iphone維修中心