手把手教你實現熱更新功能,帶你了解 Arthas 熱更新背後的原理

文章來源:

一、前言

一天下午正在摸魚的時候,測試小姐姐走了過來求助,說是需要改動測試環境 mock 應用。但是這個應用一時半會又找不到源代碼存在何處。但是測試小姐姐的活還是一定要幫,突然想起了 Arthas 可以熱更新應用代碼,按照網上的步驟,反編譯應用代碼,加上需要改動的邏輯,最後熱更新成功。對此,測試小姐姐很滿意,並表示下次會少提 Bug。

嘿嘿,以前一直對熱更新背後原理很好奇,藉著這個機會,研究一下熱更新的原理。

二、Arthas 熱更新

我們先來看下 Arthas 是如何熱更新的。

詳情參考:

假設我們現在有一個 HelloService 類,邏輯如下,現在我們使用 Arthas 熱更新代碼,讓其輸出 hello arthas

public class HelloService {

    public static void main(String[] args) throws InterruptedException {

        while (true){
            TimeUnit.SECONDS.sleep(1);
            hello();
        }
    }

    public static void hello(){
        System.out.println("hello world");
    }

}

2.1、jad 反編譯代碼

首先運行 jad 命令反編譯 class 文件獲取源代碼,運行命令如下:。

jad --source-only com.andyxh.HelloService > /tmp/HelloService.java

2.2、修改反編譯之後的代碼

拿到源代碼之後,使用 VIM 等文本編輯工具編輯源代碼,加入需要改動的邏輯。

2.3、查找 ClassLoader

然後使用 sc 命令查找加載修改類的 ClassLoader,運行命令如下:

$ sc -d  com.andyxh.HelloService | grep classLoaderHash
 classLoaderHash   4f8e5cde

這裏運行之後將會得到 ClassLoader 哈希值。

2.4、 mc 內存編譯源代碼

使用 mc 命令編譯上一步修改保存的源代碼,生成最終 class 文件。

$ mc -c 4f8e5cde  /tmp/HelloService.java  -d /tmp
Memory compiler output:
/tmp/com/andyxh/HelloService.class
Affect(row-cnt:1) cost in 463 ms.

2.5、redefine 熱更新代碼

運行 redefine 命令:

$ redefine /tmp/com/andyxh/HelloService.class
redefine success, size: 1

熱更新成功之後,程序輸出結果如下:

一般情況下,我們本地將會有源代碼,上面的步驟我們可以進一步省略,我們可以先在自己 IDE 上改動代碼,編譯生成 class 文件。這樣我們只需要運行 redefine 命令即可。也就是說實際上起到作用只是 redefine

三、 Instrumentation 與 attach 機制

Arthas 熱更新功能看起來很神奇,實際上離不開 JDK 一些 API,分別為 instrument API 與 attach API。

3.1 Instrumentation

Java Instrumentation 是 JDK5 之後提供接口。使用這組接口,我們可以獲取到正在運行 JVM 相關信息,使用這些信息我們構建相關監控程序檢測 JVM。另外, 最重要我們可以替換修改類的,這樣就實現了熱更新。

Instrumentation 存在兩種使用方式,一種為 pre-main 方式,這種方式需要在虛擬機參數指定 Instrumentation 程序,然後程序啟動之前將會完成修改或替換類。使用方式如下:

java -javaagent:jar Instrumentation_jar -jar xxx.jar

有沒有覺得這種啟動方式很熟悉,仔細觀察一下 IDEA 運行輸出窗口。

另外很多應用監控工具,如:zipkin、pinpoint、skywalking。

這種方式只能在應用啟動之前生效,存在一定的局限性。

JDK6 針對這種情況作出了改進,增加 agent-main 方式。我們可以在應用啟動之後,再運行 Instrumentation 程序。啟動之後,只有連接上相應的應用,我們才能做出相應改動,這裏我們就需要使用 Java 提供 attach API。

3.2 Attach API

Attach API 位於 tools.jar 包,可以用來連接目標 JVM。Attach API 非常簡單,內部只有兩個主要的類,VirtualMachineVirtualMachineDescriptor

VirtualMachine 代表一個 JVM 實例, 使用它提供 attach 方法,我們就可以連接上目標 JVM。

 VirtualMachine vm = VirtualMachine.attach(pid);

VirtualMachineDescriptor 則是一個描述虛擬機的容器類,通過該實例我們可以獲取到 JVM PID(進程 ID),該實例主要通過 VirtualMachine#list 方法獲取。

        for (VirtualMachineDescriptor descriptor : VirtualMachine.list()){

            System.out.println(descriptor.id());
        }

介紹完熱更新涉及的相關原理,接下去使用上面 API 實現熱更新功能。

四、實現熱更新功能

這裏我們使用 Instrumentation agent-main 方式。

4.1、實現 agent-main

首先需要編寫一個類,包含以下兩個方法:

public static void agentmain (String agentArgs, Instrumentation inst);          [1]
public static void agentmain (String agentArgs);            [2]

上面的方法只需要實現一個即可。若兩個都實現, [1] 優先級大於 [2],將會被優先執行。

接着讀取外部傳入 class 文件,調用 Instrumentation#redefineClasses,這個方法將會使用新 class 替換當前正在運行的 class,這樣我們就完成了類的修改。

public class AgentMain {
    /**
     *
     * @param agentArgs 外部傳入的參數,類似於 main 函數 args
     * @param inst
     */
    public static void agentmain(String agentArgs, Instrumentation inst) {
        // 從 agentArgs 獲取外部參數
        System.out.println("開始熱更新代碼");
        // 這裏將會傳入 class 文件路徑
        String path = agentArgs;
        try {
            // 讀取 class 文件字節碼
            RandomAccessFile f = new RandomAccessFile(path, "r");
            final byte[] bytes = new byte[(int) f.length()];
            f.readFully(bytes);
            // 使用 asm 框架獲取類名
            final String clazzName = readClassName(bytes);

            // inst.getAllLoadedClasses 方法將會獲取所有已加載的 class
            for (Class clazz : inst.getAllLoadedClasses()) {
                // 匹配需要替換 class
                if (clazz.getName().equals(clazzName)) {
                    ClassDefinition definition = new ClassDefinition(clazz, bytes);
                    // 使用指定的 class 替換當前系統正在使用 class
                    inst.redefineClasses(definition);
                }
            }

        } catch (UnmodifiableClassException | IOException | ClassNotFoundException e) {
            System.out.println("熱更新數據失敗");
        }


    }

    /**
     * 使用 asm 讀取類名
     *
     * @param bytes
     * @return
     */
    private static String readClassName(final byte[] bytes) {
        return new ClassReader(bytes).getClassName().replace("/", ".");
    }
}

完成代碼之後,我們還需要往 jar 包 manifest 寫入以下屬性。

## 指定 agent-main 全名
Agent-Class: com.andyxh.AgentMain
## 設置權限,默認為 false,沒有權限替換 class
Can-Redefine-Classes: true

我們使用 maven-assembly-plugin,將上面的屬性寫入文件中。

<plugin>
    <artifactId>maven-assembly-plugin</artifactId>
    <version>3.1.0</version>
    <configuration>
        <!--指定最後產生 jar 名字-->
        <finalName>hotswap-jdk</finalName>
        <appendAssemblyId>false</appendAssemblyId>
        <descriptorRefs>
            <!--將工程依賴 jar 一塊打包-->
            <descriptorRef>jar-with-dependencies</descriptorRef>
        </descriptorRefs>
        <archive>
            <manifestEntries>
                <!--指定 class 名字-->
                <Agent-Class>
                    com.andyxh.AgentMain
                </Agent-Class>
                <Can-Redefine-Classes>
                    true
                </Can-Redefine-Classes>
            </manifestEntries>
            <manifest>
                <!--指定 mian 類名字,下面將會使用到-->
                <mainClass>com.andyxh.JvmAttachMain</mainClass>
            </manifest>
        </archive>
    </configuration>
    <executions>
        <execution>
            <id>make-assembly</id> <!-- this is used for inheritance merges -->
            <phase>package</phase> <!-- bind to the packaging phase -->
            <goals>
                <goal>single</goal>
            </goals>
        </execution>
    </executions>
</plugin>

到這裏我們就完成熱更新主要代碼,接着使用 Attach API,連接目標虛擬機,觸發熱更新的代碼。

public class JvmAttachMain {
    public static void main(String[] args) throws IOException, AttachNotSupportedException, AgentLoadException, AgentInitializationException {
        // 輸入參數,第一個參數為需要 Attach jvm pid 第二參數為 class 路徑
        if(args==null||args.length<2){
            System.out.println("請輸入必要參數,第一個參數為 pid,第二參數為 class 絕對路徑");
            return;
        }
        String pid=args[0];
        String classPath=args[1];
        System.out.println("當前需要熱更新 jvm pid 為 "+pid);
        System.out.println("更換 class 絕對路徑為 "+classPath);
        // 獲取當前 jar 路徑
        URL jarUrl=JvmAttachMain.class.getProtectionDomain().getCodeSource().getLocation();
        String jarPath=jarUrl.getPath();

        System.out.println("當前熱更新工具 jar 路徑為 "+jarPath);
        VirtualMachine vm = VirtualMachine.attach(pid);//7997是待綁定的jvm進程的pid號
        // 運行最終 AgentMain 中方法
        vm.loadAgent(jarPath, classPath);
    }
}

在這個啟動類,我們最終調用 VirtualMachine#loadAgent,JVM 將會使用上面 AgentMain 方法使用傳入 class 文件替換正在運行 class。

4.2、運行

這裏我們繼續開頭使用的例子,不過這裏加入一個方法獲取 JVM 運行進程 ID。

public class HelloService {

    public static void main(String[] args) throws InterruptedException {
        System.out.println(getPid());
        while (true){
            TimeUnit.SECONDS.sleep(1);
            hello();
        }
    }

    public static void hello(){
        System.out.println("hello world");
    }

    /**
     * 獲取當前運行 JVM PID
     * @return
     */
    private static String getPid() {
        // get name representing the running Java virtual machine.
        String name = ManagementFactory.getRuntimeMXBean().getName();
        System.out.println(name);
        // get pid
        return name.split("@")[0];
    }

}

首先運行 HelloService,獲取當前 PID,接着複製 HelloService 代碼到另一個工程,修改 hello 方法輸出 hello agent,重新編譯生成新的 class 文件。

最後在命令行運行生成的 jar 包。

HelloService 輸出效果如下所示:

4.3、調試技巧

普通的應用我們可以在 IDE 直接使用 Debug 模式調試程序,但是上面的程序無法直接使用 Debug。剛開始運行的程序碰到很多問題,無奈之下,只能選擇最原始的辦法,打印錯誤日誌。後來查看 arthas 的文檔,發現上面一篇文章介紹使用 IDEA Remote Debug 模式調試程序。

首先我們需要在 HelloService JVM 參數加入以下參數:

-Xrunjdwp:transport=dt_socket,server=y,address=8001  

此時程序將會被阻塞,直到遠程調試程序連接上 8001 端口,輸出如下:

然後在 Agent-main 這個工程增加一個 remote 調試。

圖中參數如下:

-agentlib:jdwp=transport=dt_socket,server=y,suspend=n,address=8001

Agent-main 工程打上斷點,運行遠程調試, HelloService 程序將會被啟動。

最後在命令行窗口運行 Agent-main 程序,遠程調試將會暫停到相應斷點處,接下來調試就跟普通 Debug 模式一樣,不再敘述。

4.4、相關問題

由於 Attach API 位於 tools.jar 中,而在 JDK8 之前 tools.jar 與我們常用JDK jar 包並不在同一個位置,所以編譯與運行過程可能找不到該 jar 包,從而導致報錯。

如果 maven 編譯與運行都使用 JDK9 之後,不用擔心下面問題。

maven 編譯問題

maven 編譯過程可能發生如下錯誤。

解決辦法為在 pom 下加入 tools.jar 。

        <dependency>
            <groupId>jdk.tools</groupId>
            <artifactId>jdk.tools</artifactId>
            <scope>system</scope>
            <version>1.6</version>
            <systemPath>${java.home}/../lib/tools.jar</systemPath>
        </dependency>

或者使用下面依賴。

        <dependency>
            <groupId>com.github.olivergondza</groupId>
            <artifactId>maven-jdk-tools-wrapper</artifactId>
            <version>0.1</version>
            <scope>provided</scope>
            <optional>true</optional>
        </dependency>

程序運行過程 tools.jar 找不到

運行程序時拋出 java.lang.NoClassDefFoundError,主要原因還是系統未找到 tools.jar 導致。

在運行參數加入 -Xbootclasspath/a:${java_home}/lib/tools.jar,完整運行命令如下:

4.5、熱更新存在一些限制

並不是所有改動熱更新都將會成功,當前使用 Instrumentation#redefineClasses 還是存在一些限制。我們僅只能修改方法內部邏輯,屬性值等,不能添加,刪除方法或字段,也不能更改方法的簽名或繼承關係。

五、彩蛋

寫完熱更新代碼,收到一封系統郵件提示 xxx bug 待修復。恩,說好的少提 Bug 呢 o(╥﹏╥)o。

六、幫助

歡迎關注我的公眾號:程序通事,獲得日常乾貨推送。如果您對我的專題內容感興趣,也可以關注我的博客:

本站聲明:網站內容來源於博客園,如有侵權,請聯繫我們,我們將及時處理

【其他文章推薦】

USB CONNECTOR掌控什麼技術要點? 帶您認識其相關發展及效能

※評比前十大台北網頁設計台北網站設計公司知名案例作品心得分享

※智慧手機時代的來臨,RWD網頁設計已成為網頁設計推薦首選

※評比南投搬家公司費用收費行情懶人包大公開

一個excel(20M)就能幹趴你的poi,你信嗎?

  自從上一篇:后,很巧的是這次又發現一個問題,所以有了這篇文章,還是想沿用上篇的”流水帳“的方式查找問題和解決問題。這篇文章主要是因為使用POI導入一個20M的excel發生了OOM(OutOfMemoryError)異常。說來也慚愧,工作了這麼多年,還真沒導入過這種大小的文件,並且還發生了內存溢出。如果你百度下基本上清一色的告訴你:POI導入excel文件有兩種方式,第一種是用戶模式,這種模式用起來很簡單直觀,可以類比xml的dom方式解析(這裏只針對excel2007,因為2003本身就有最大條數限制並且目前基本用的很少,這裏直接忽略),第二種是event模式,這種通常是網上說的解決POI導入大excel的”萬金油“方法,可以類比為xml的sax解析方式。呵呵,我這篇文章首先就是要干趴這種方法(JVM使用-Xms512m -Xmx512m)。不信你隨便寫一個導入接口,導入如下20M大小的execl看看:鏈接: https://pan.baidu.com/s/1DUrS8ctLPp7Z6imOc1aIUQ 提取碼: hd79 。

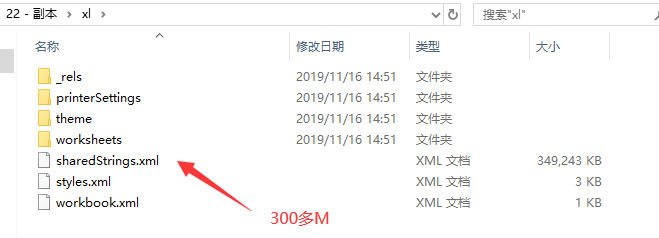
  首先,既然要導入大點的excel2007,那麼我們應該稍微了解一下這種文件如何存儲數據,我們百度上可以發現,2007其實就是一個壓縮包,可以直接修改後綴成zip然後解壓打開文件看看,如下


  上圖可以看到最大的兩個文件就兩個:sharedStrings.xml和sheet1.xml。其中sheet2.xml這個可以不關注,直接從excel刪掉都沒事,這裏沒刪除主要是沒多大關係,這個excel文件也是測試直接提供給我的。由於sheet2比較小,與這個文章說到的內存溢出並無關係,請不要胡思亂想,被分散了注意。

  直接用大文本編輯工具打開上圖兩個大文件,可以發現sharedString.xml里內容其實就是excel中每個單元格里的字符串內容(数字類型除外),sheet.xml就是每個sheet里的結構xml,了解到這裏基本上就了解了本文章說到問題的基本知識,然後下面進入正題。

  先使用百度中查到的提供的event方式導入excel,代碼如下:

package com.example.utils;

import org.apache.poi.openxml4j.opc.OPCPackage;
import org.apache.poi.xssf.eventusermodel.ReadOnlySharedStringsTable;
import org.apache.poi.xssf.eventusermodel.XSSFReader;
import org.apache.poi.xssf.usermodel.XSSFRichTextString;
import org.xml.sax.Attributes;
import org.xml.sax.InputSource;
import org.xml.sax.SAXException;
import org.xml.sax.XMLReader;
import org.xml.sax.helpers.DefaultHandler;
import org.xml.sax.helpers.XMLReaderFactory;

import java.io.File;
import java.io.InputStream;
import java.sql.SQLException;
import java.util.ArrayList;
import java.util.Iterator;
import java.util.List;

/**
 * 百度上直接copy過來的
 * XSSF and SAX (Event API)
 */
public abstract class BigDataParseExcelUtil extends DefaultHandler {
    private ReadOnlySharedStringsTable sst;
    private String lastContents;
    private boolean nextIsString;
    private int sheetIndex = -1;
    private List<String> rowlist = new ArrayList<String>();
    private int curRow = 0; // 當前行
    private int curCol = 0; // 當前列索引
    private int preCol = 0; // 上一列列索引
    private int titleRow = 0; // 標題行,一般情況下為0
    private int rowsize = 0; // 列數
    private List excelList = new ArrayList();  //excel全部轉換為list

    // excel記錄行操作方法,以sheet索引,行索引和行元素列表為參數,對sheet的一行元素進行操作,元素為String類型

    public abstract void optRows(int sheetIndex, int curRow,
                                 List<String> rowlist, List excelList) throws SQLException, Exception;

    // 只遍歷一個sheet,其中sheetId為要遍歷的sheet索引,從1開始,1-3

    /**
     * @param filename
     * @param sheetId  sheetId為要遍歷的sheet索引,從1開始,1-3
     * @throws Exception
     */
    public void processOneSheet(String filename, int sheetId) throws Exception {
        OPCPackage pkg = OPCPackage.open(filename);
        XSSFReader r = new XSSFReader(pkg);
        ReadOnlySharedStringsTable strings = new ReadOnlySharedStringsTable(pkg);
        XMLReader parser = fetchSheetParser(strings);
        // rId2 found by processing the Workbook
        // 根據 rId# 或 rSheet# 查找sheet
        InputStream sheet2 = r.getSheet("rId" + sheetId);
        sheetIndex++;
        InputSource sheetSource = new InputSource(sheet2);
        parser.parse(sheetSource);
        sheet2.close();
    }

    @Override
    public void characters(char[] ch, int start, int length)
        throws SAXException {
        // 得到單元格內容的值
        lastContents += new String(ch, start, length);
    }

    public void process(InputStream inputStream) throws Exception {
        OPCPackage pkg = OPCPackage.open(inputStream);
        XSSFReader r = new XSSFReader(pkg);
        ReadOnlySharedStringsTable strings = new ReadOnlySharedStringsTable(pkg);
        XMLReader parser = fetchSheetParser(strings);
        Iterator<InputStream> sheets = r.getSheetsData();
        while (sheets.hasNext()) {
            curRow = 0;
            sheetIndex++;
            InputStream sheet = sheets.next();
            InputSource sheetSource = new InputSource(sheet);
            parser.parse(sheetSource);
            sheet.close();
        }
    }

    /**
     * 遍歷 excel 文件
     */
    public void process(File file) throws Exception {
        OPCPackage pkg = OPCPackage.open(file);
        XSSFReader r = new XSSFReader(pkg);
        ReadOnlySharedStringsTable strings = new ReadOnlySharedStringsTable(pkg);
        XMLReader parser = fetchSheetParser(strings);
        Iterator<InputStream> sheets = r.getSheetsData();
        while (sheets.hasNext()) {
            curRow = 0;
            sheetIndex++;
            InputStream sheet = sheets.next();
            InputSource sheetSource = new InputSource(sheet);
            parser.parse(sheetSource);
            sheet.close();
        }
    }

    public XMLReader fetchSheetParser(ReadOnlySharedStringsTable sst)
        throws SAXException {
        XMLReader parser = XMLReaderFactory.createXMLReader();
        // .createXMLReader("org.apache.xerces.parsers.SAXParser");
        this.sst = sst;
        parser.setContentHandler(this);
        return parser;
    }

    @Override
    public void startElement(String uri, String localName, String name,
                             Attributes attributes) throws SAXException {
        // c => 單元格
        if (name.equals("c")) {
            // 如果下一個元素是 SST 的索引,則將nextIsString標記為true
            String cellType = attributes.getValue("t");
            String rowStr = attributes.getValue("r");
            curCol = this.getRowIndex(rowStr);
            if (cellType != null && cellType.equals("s")) {
                nextIsString = true;
            } else {
                nextIsString = false;
            }
        }
        // 置空
        lastContents = "";
    }

    @Override
    public void endElement(String uri, String localName, String name)
        throws SAXException {
        // 根據SST的索引值的到單元格的真正要存儲的字符串
        // 這時characters()方法可能會被調用多次
        if (nextIsString) {
            try {
                int idx = Integer.parseInt(lastContents);
                lastContents = new XSSFRichTextString(sst.getEntryAt(idx))
                    .toString();
            } catch (Exception e) {
            }
        }
        // v => 單元格的值,如果單元格是字符串則v標籤的值為該字符串在SST中的索引
        // 將單元格內容加入rowlist中,在這之前先去掉字符串前後的空白符
        if (name.equals("v")) {
            String value = lastContents.trim();
            value = value.equals("") ? " " : value;
            int cols = curCol - preCol;
            if (cols > 1) {
                for (int i = 0; i < cols - 1; i++) {
                    rowlist.add(preCol, "");
                }
            }
            preCol = curCol;
            rowlist.add(curCol - 1, value);
        } else {
            // 如果標籤名稱為 row ,這說明已到行尾,調用 optRows() 方法
            if (name.equals("row")) {
                int tmpCols = rowlist.size();
                if (curRow > this.titleRow && tmpCols < this.rowsize) {
                    for (int i = 0; i < this.rowsize - tmpCols; i++) {
                        rowlist.add(rowlist.size(), "");
                    }
                }
                try {
                    optRows(sheetIndex, curRow, rowlist, excelList);
                } catch (SQLException e) {
                    e.printStackTrace();
                } catch (Exception e) {
                    // TODO Auto-generated catch block
                    e.printStackTrace();
                }
                if (curRow == this.titleRow) {
                    this.rowsize = rowlist.size();
                }
                rowlist.clear();
                curRow++;
                curCol = 0;
                preCol = 0;
            }
        }
    }

    // 得到列索引,每一列c元素的r屬性構成為字母加数字的形式,字母組合為列索引,数字組合為行索引,
    // 如AB45,表示為第(A-A+1)*26+(B-A+1)*26列,45行
    public int getRowIndex(String rowStr) {
        rowStr = rowStr.replaceAll("[^A-Z]", "");
        byte[] rowAbc = rowStr.getBytes();
        int len = rowAbc.length;
        float num = 0;
        for (int i = 0; i < len; i++) {
            num += (rowAbc[i] - 'A' + 1) * Math.pow(26, len - i - 1);
        }
        return (int) num;
    }


}
package com.example.service;

import com.example.utils.BigDataParseExcelUtil;
import org.springframework.stereotype.Service;

import java.io.InputStream;
import java.sql.SQLException;
import java.util.List;

/**
 * @author: rongdi
 * @date:
 */
@Service
public class ExcelService {

    public void import1(InputStream inputStream) throws Exception {

        BigDataParseExcelUtil xlx = new BigDataParseExcelUtil() {
            @Override
            public void optRows(int sheetIndex, int curRow, List<String> rowlist, List excelList)
                throws SQLException {
                System.out.println(rowlist);
            }
        };
        xlx.process(inputStream);
    }


}
package com.example.controller;

import com.example.service.ExcelService;
import org.springframework.beans.factory.annotation.Autowired;
import org.springframework.stereotype.Controller;
import org.springframework.web.bind.annotation.RequestMapping;
import org.springframework.web.bind.annotation.RequestParam;
import org.springframework.web.bind.annotation.ResponseBody;
import org.springframework.web.multipart.MultipartFile;

/**
 * @author: rongdi
 * @date:
 */
@Controller
public class ExcelController {

    @Autowired
    private ExcelService excelService;

    @RequestMapping("/excel/import1")
    @ResponseBody
    public String import1(@RequestParam("file") MultipartFile multipartFile) throws Exception {
        excelService.import1(multipartFile.getInputStream());
        return "ok";
    }

}

  使用postman等工具,導入上面說的20M的文件,報錯如下:

   那我們優化一下不使用inputStream,直接使用一個File傳入看看

    public void import2(File file) throws Exception {
        BigDataParseExcelUtil xlx = new BigDataParseExcelUtil() {
            @Override
            public void optRows(int sheetIndex, int curRow, List<String> rowlist, List excelList)
                throws SQLException {
                System.out.println(rowlist);
            }
        };
        xlx.process(file);
    }

    @RequestMapping("/excel/import2")
    @ResponseBody
    public String import2(@RequestParam("file") MultipartFile multipartFile) throws Exception {
        // 延遲解析比率
        ZipSecureFile.setMinInflateRatio(-1.0d);
        File tmp = Files.createTempFile("tmp-", ".xlsx").toFile();
        Files.copy(multipartFile.getInputStream(), Paths.get(tmp.getPath()), StandardCopyOption.REPLACE_EXISTING);
        excelService.import2(tmp);
        return "ok";
    }

  使用postman上傳文件運行效果如下:


   這時候就發現很尷尬了,難道是POI自己代碼里就有bug,我們可以使用斷點調試確認一下這個strings里到底是不是全部放了sharedStrings.xml里的內容。

   由上證明就是這個strings裝多了導致內存溢出了,從這裏可以看出網上說使用event事件解析excel的方案基本都是行不通的,哎,我也不懂為啥百度上都是這種答案,難道他們壓根都沒遇到過大數據導入嗎?當然也有可能我冤枉了他們,因為sharedStrings.xml中存放的是每個單元格的字符串內容,這個存放是排重過的,如果雖然excel里單元格很多,但是大多都是整型或者大多都是重複的,那確實可以跳過這一步一路之後會一路暢通了,因為畢竟sax解析xml確實可以節省很多內存。

  從上分析可以看到POI就兩種方式導入:一種是用戶方式寫代碼簡單,基本按順序數格子就好,但是類比dom方式解析xml,很耗內存。第二種事件方式,類比sax方式解析xml確實很省內存,但是POI提供的類里把解析出的大量字符串放入了集合中,還是會導致內存溢出。那麼我們怎麼解決這個問題,這裏很常規的想法是到底這個strings是用來幹啥的,怎麼用的,如果可以保持strings相同邏輯功能的前提下,修改了ReadOnlySharedStringsTable這個類的邏輯,就可以解決這裏的內存溢出了。那麼我們可以直接搜索ReadOnlySharedStringsTable類里所有用到strings的方法上打上斷點,特別是從strings里取值的方法上,然後調大jvm內存避免內存溢出的情況下斷點調試如下

   我們是不是可以直接往strings里添加字符串和獲取字符串的方法那裡替換掉,不要使用strings這個集合存儲所有字符串。但是既然excel里設計成使用一個sharedStrings.xml存放公共的字符串,而不是像csv格式那樣,每次讀一行取一行數據就好了。那麼這個sharedStrings.xml中的數據總要解析出來,總要有個地方存儲裏面的數據,不然怎麼結合sheet.xml的格式獲取到每一行的數據呢?所以這裏就很尷尬了,不能每次解析sharedStrings.xml時不保存每次需要獲取strings的時候,再去解析一下這個xm吧,如果從本文章的xml上來看,要重複解析25W次,效率極其低。現在問題可以簡化成我們需要把sharedStrings.xml解析出的所有字符串放在一個地方,還能方便解析,由於怕內存溢出,肯定不能放在內存中了。那麼這裏就有一些選擇,比如解析出的字符串按加入strings集合的順序放入數據庫,文件,外部存儲或者緩存(限制內存大小,多餘寫入文件)存儲中。然後使用的時候按照索引位置idx去一一取出。本文章先使用臨時文件來放這些數據,因為不想搞那麼複雜,導入任務不管再多複雜的系統中,最終執行的都會是一個單節點,在單節點中先使用本機資源這種就近資源是最方便的。如下直接先複製源碼,然後修改上述說的兩個地方。

package com.example.utils;

import org.apache.poi.ooxml.util.SAXHelper;
import org.apache.poi.openxml4j.opc.OPCPackage;
import org.apache.poi.openxml4j.opc.PackagePart;
import org.apache.poi.ss.usermodel.RichTextString;
import org.apache.poi.util.Removal;
import org.apache.poi.xssf.model.SharedStrings;
import org.apache.poi.xssf.usermodel.XSSFRelation;
import org.apache.poi.xssf.usermodel.XSSFRichTextString;
import org.xml.sax.Attributes;
import org.xml.sax.InputSource;
import org.xml.sax.SAXException;
import org.xml.sax.XMLReader;
import org.xml.sax.helpers.DefaultHandler;

import javax.xml.parsers.ParserConfigurationException;
import java.io.File;
import java.io.FileNotFoundException;
import java.io.FileOutputStream;
import java.io.FileReader;
import java.io.IOException;
import java.io.InputStream;
import java.io.LineNumberReader;
import java.io.PushbackInputStream;
import java.nio.file.Files;
import java.util.ArrayList;
import java.util.LinkedHashMap;
import java.util.List;
import java.util.Map;

import static org.apache.poi.xssf.usermodel.XSSFRelation.NS_SPREADSHEETML;

public class ReadOnlySharedStringsTable extends DefaultHandler implements SharedStrings {

    protected final boolean includePhoneticRuns;

    /**
     * An integer representing the total count of strings in the workbook. This count does not
     * include any numbers, it counts only the total of text strings in the workbook.
     */
    protected int count;

    /**
     * An integer representing the total count of unique strings in the Shared String Table.
     * A string is unique even if it is a copy of another string, but has different formatting applied
     * at the character level.
     */
    protected int uniqueCount;

    /**
     * The shared strings table.
     */
    private List<String> strings;

    private File tmp = null;

    FileOutputStream fos = null;

    private int counts;

    private Map<Integer,String> map = new LinkedHashMap<Integer,String>();

    public ReadOnlySharedStringsTable(OPCPackage pkg)
            throws IOException, SAXException {
        this(pkg, true);
    }

    public ReadOnlySharedStringsTable(OPCPackage pkg, boolean includePhoneticRuns)
            throws IOException, SAXException {
        this.includePhoneticRuns = includePhoneticRuns;
        ArrayList<PackagePart> parts =
                pkg.getPartsByContentType(XSSFRelation.SHARED_STRINGS.getContentType());

        // Some workbooks have no shared strings table.
        if (parts.size() > 0) {
            PackagePart sstPart = parts.get(0);
            readFrom(sstPart.getInputStream());
        }
    }

    /**
     * Like POIXMLDocumentPart constructor
     *
     * Calls {@link #ReadOnlySharedStringsTable(PackagePart, boolean)}, with a
     * value of <code>true</code> to include phonetic runs.
     *
     * @since POI 3.14-Beta1
     */
    public ReadOnlySharedStringsTable(PackagePart part) throws IOException, SAXException {
        this(part, true);
    }

    /**
     * Like POIXMLDocumentPart constructor
     *
     * @since POI 3.14-Beta3
     */
    public ReadOnlySharedStringsTable(PackagePart part, boolean includePhoneticRuns)
        throws IOException, SAXException {
        this.includePhoneticRuns = includePhoneticRuns;
        readFrom(part.getInputStream());
    }
    
    /**
     * Read this shared strings table from an XML file.
     *
     * @param is The input stream containing the XML document.
     * @throws IOException if an error occurs while reading.
     * @throws SAXException if parsing the XML data fails.
     */
    public void readFrom(InputStream is) throws IOException, SAXException {
        // test if the file is empty, otherwise parse it
        PushbackInputStream pis = new PushbackInputStream(is, 1);
        int emptyTest = pis.read();
        if (emptyTest > -1) {
            pis.unread(emptyTest);
            InputSource sheetSource = new InputSource(pis);
            try {
                XMLReader sheetParser = SAXHelper.newXMLReader();
                sheetParser.setContentHandler(this);
                sheetParser.parse(sheetSource);
            } catch(ParserConfigurationException e) {
                throw new RuntimeException("SAX parser appears to be broken - " + e.getMessage());
            }
        }
    }

    /**
     * Return an integer representing the total count of strings in the workbook. This count does not
     * include any numbers, it counts only the total of text strings in the workbook.
     *
     * @return the total count of strings in the workbook
     */
    @Override
    public int getCount() {
        return this.count;
    }

    /**
     * Returns an integer representing the total count of unique strings in the Shared String Table.
     * A string is unique even if it is a copy of another string, but has different formatting applied
     * at the character level.
     *
     * @return the total count of unique strings in the workbook
     */
    @Override
    public int getUniqueCount() {
        return this.uniqueCount;
    }

    /**
     * Return the string at a given index.
     * Formatting is ignored.
     *
     * @param idx index of item to return.
     * @return the item at the specified position in this Shared String table.
     * @deprecated use <code>getItemAt</code> instead
     */
    @Removal(version = "4.2")
    @Deprecated
    public String getEntryAt(int idx) {
        /**
         * 這裏就是修改部分了,直接從按行存儲的臨時文件讀取需要的字符串
         */
        String value = map.get(idx + 1);
        if(value == null) {

            return readString(idx,1000,this.uniqueCount);
        } else {
            return value;
        }

    }

    /**
     * 從指定位置讀取size個字符串,這裡是使用局部性原理,每次讀取size個字符串,
     * 以免每次需要讀取文件,性能極低
     * @return
     */
    private String readString(int idx,int size,int numbers) {
        map.clear();
        int currNumber = idx + 1;
        if (currNumber < 0 || currNumber > numbers) {
            return null;
        }
        try {
            FileReader in = new FileReader(tmp);
            LineNumberReader reader = new LineNumberReader(in);
            try {
                String line = "";
                for(int i = 1;i <= numbers;i ++) {
                    line = reader.readLine();
                    if(i >= currNumber && i < currNumber + size) {
                        map.put(i, line);
                    }
                }
            } finally {
                reader.close();
                in.close();
            }
        } catch (Exception e) {
            System.out.println(e.getMessage());
        }
        return map.get(idx + 1);
    }


    /**
     * Returns all the strings.
     * Formatting is ignored.
     *
     * @return a list with all the strings
     * @deprecated use <code>getItemAt</code> instead
     */
    @Removal(version = "4.2")
    @Deprecated
    public List<String> getItems() {
        return strings;
    }

    @Override
    public RichTextString getItemAt(int idx) {
        return new XSSFRichTextString(getEntryAt(idx));
    }

    //// ContentHandler methods ////

    private StringBuilder characters;
    private boolean tIsOpen;
    private boolean inRPh;

    @Override
    public void startElement(String uri, String localName, String name,
                             Attributes attributes) throws SAXException {
        if (uri != null && ! uri.equals(NS_SPREADSHEETML)) {
            return;
        }

        if ("sst".equals(localName)) {
            String count = attributes.getValue("count");
            if(count != null) this.count = Integer.parseInt(count);
            String uniqueCount = attributes.getValue("uniqueCount");
            if(uniqueCount != null) this.uniqueCount = Integer.parseInt(uniqueCount);
            try {
                tmp = Files.createTempFile("tmp-", ".xlsx").toFile();
            } catch (IOException e) {
                e.printStackTrace();
            }
            //    this.strings = new ArrayList<>(this.uniqueCount);
            characters = new StringBuilder(64);
            try {
                fos = new FileOutputStream(tmp,true);
            } catch (FileNotFoundException e) {
                e.printStackTrace();
            }
        } else if ("si".equals(localName)) {
            characters.setLength(0);
        } else if ("t".equals(localName)) {
            tIsOpen = true;
        } else if ("rPh".equals(localName)) {
            inRPh = true;
            //append space...this assumes that rPh always comes after regular <t>
            if (includePhoneticRuns && characters.length() > 0) {
                characters.append(" ");
            }
        }
    }

    @Override
    public void endElement(String uri, String localName, String name) throws SAXException {
        if (uri != null && ! uri.equals(NS_SPREADSHEETML)) {
            return;
        }

        if ("si".equals(localName)) {
         //   strings.add(characters.toString().intern());
            try {
                /**
                 * 這裏就是修改的一部分,這裏直接把字符串按行存入臨時文件
                 */
                counts ++;
                fos.write((characters.toString() + "\n").getBytes());
                if(counts == this.uniqueCount) {
                    fos.close();
                }
            } catch (IOException e) {
                e.printStackTrace();
            }
        } else if ("t".equals(localName)) {
            tIsOpen = false;
        } else if ("rPh".equals(localName)) {
            inRPh = false;
        }
    }

    /**
     * Captures characters only if a t(ext) element is open.
     */
    @Override
    public void characters(char[] ch, int start, int length) throws SAXException {
        if (tIsOpen) {
            if (inRPh && includePhoneticRuns) {
                characters.append(ch, start, length);
            } else if (! inRPh){
                characters.append(ch, start, length);
            }
        }
    }

}

  然後在自己代碼里把包換成自己的包,替換POI里該類的包,運行JVM堆情況如下毫無壓力

  自此內存溢出問題大功告成!針對使用POI導入大Excel遇到的問題總結如下:

  1)網上給出的方案不管是用戶模式還是事件模式,往往都不能支持大excel的導入

  2)excel本質上是一堆excel的壓縮包(這裏只考慮2007忽略2003)改了個後綴名成xlsx

  3)使用事件導入時應先將上傳文件存入文件,再使用文件OPCPackage.open(file),如果直接傳入輸入流,由於裏面邏輯會將輸入流的所有內容先存入ByteArrayOutputStream 中,這個輸出流實際上是一個內存中的字節流,所以也會導致內存溢出。

  4)用戶模式不用考慮,事件模式會先將sharedString.xml這個大xml解析出來放入一個List中,不管通過什麼方式都繞不開需要解析這個類,因為每個單元格的字符串都放在這個xml中,而要解析這個xml最常規的方法就是保存在內存使用list和map之內的容器存放我相信不會有人會想剛解析出一個xml還要存迴文件中把,這裏基本就繞不開ReadOnlySharedStringsTable或者SharedStringsTable,就算你僥倖繞開了,想自己解析,或許還是重複這兩個類的悲劇,這就是另外一種內存溢出的根源。

  回顧一下上述實現直接把sharedStrings.xml中的內容粗略的保存到文件中,然後再從文件中獲取是屬於很低劣的實現,只能說能滿足不內存溢出,性能方面堪憂!下面直接借鑒easyexcel源碼中用到的ReadCache來實現保存sharedStrings.xml中的內容

package com.example.advanceevent;

import com.example.utils.FileUtils;
import org.ehcache.Cache;
import org.ehcache.CacheManager;
import org.ehcache.config.CacheConfiguration;
import org.ehcache.config.builders.CacheConfigurationBuilder;
import org.ehcache.config.builders.CacheManagerBuilder;
import org.ehcache.config.builders.ResourcePoolsBuilder;
import org.ehcache.config.units.MemoryUnit;
import org.ehcache.core.Ehcache;
import org.slf4j.Logger;
import org.slf4j.LoggerFactory;

import java.io.File;
import java.util.HashMap;
import java.util.UUID;

/**
 * @author: rongdi
 * @date:
 */
public class ReadCache {

    private static final Logger LOGGER = LoggerFactory.getLogger(Ehcache.class);
    private int index = 0;
    private HashMap<Integer, String> dataMap = new HashMap(1334);
    private static CacheManager fileCacheManager;
    private static CacheConfiguration<Integer, HashMap> fileCacheConfiguration;
    private static CacheManager activeCacheManager;
    private CacheConfiguration<Integer, HashMap> activeCacheConfiguration;
    private Cache<Integer, HashMap> fileCache;
    private Cache<Integer, HashMap> activeCache;
    private String cacheAlias;
    private int cacheMiss = 0;

    public ReadCache(int maxCacheActivateSize) {
        this.activeCacheConfiguration = CacheConfigurationBuilder.newCacheConfigurationBuilder(Integer.class, HashMap.class, ResourcePoolsBuilder.newResourcePoolsBuilder().heap((long)maxCacheActivateSize, MemoryUnit.MB)).withSizeOfMaxObjectGraph(1000000L).withSizeOfMaxObjectSize((long)maxCacheActivateSize, MemoryUnit.MB).build();
        init();
    }

    private void init() {
        this.cacheAlias = UUID.randomUUID().toString();
        this.fileCache = fileCacheManager.createCache(this.cacheAlias, fileCacheConfiguration);
        this.activeCache = activeCacheManager.createCache(this.cacheAlias, this.activeCacheConfiguration);
    }

    public void put(String value) {
        this.dataMap.put(this.index, value);
        if ((this.index + 1) % 1000 == 0) {
            this.fileCache.put(this.index / 1000, this.dataMap);
            this.dataMap = new HashMap(1334);
        }

        ++this.index;
        if (LOGGER.isDebugEnabled() && this.index % 1000000 == 0) {
            LOGGER.debug("Already put :{}", this.index);
        }

    }

    public String get(Integer key) {
        if (key != null && key >= 0) {
            int route = key / 1000;
            HashMap<Integer, String> dataMap = (HashMap)this.activeCache.get(route);
            if (dataMap == null) {
                dataMap = (HashMap)this.fileCache.get(route);
                this.activeCache.put(route, dataMap);
                if (LOGGER.isDebugEnabled() && this.cacheMiss++ % 1000 == 0) {
                    LOGGER.debug("Cache misses count:{}", this.cacheMiss);
                }
            }

            return (String)dataMap.get(key);
        } else {
            return null;
        }
    }

    public void putFinished() {
        if (this.dataMap != null) {
            this.fileCache.put(this.index / 1000, this.dataMap);
        }
    }

    public void destroy() {
        fileCacheManager.removeCache(this.cacheAlias);
        activeCacheManager.removeCache(this.cacheAlias);
    }

    static {
        File cacheFile = FileUtils.createCacheTmpFile();
        fileCacheManager = CacheManagerBuilder.newCacheManagerBuilder().with(CacheManagerBuilder.persistence(cacheFile)).build(true);
        activeCacheManager = CacheManagerBuilder.newCacheManagerBuilder().build(true);
        fileCacheConfiguration = CacheConfigurationBuilder.newCacheConfigurationBuilder(Integer.class, HashMap.class, ResourcePoolsBuilder.newResourcePoolsBuilder().disk(10L, MemoryUnit.GB)).withSizeOfMaxObjectGraph(1000000L).withSizeOfMaxObjectSize(10L, MemoryUnit.GB).build();
    }

}
package com.example.advanceevent;

import org.apache.poi.ooxml.util.SAXHelper;
import org.apache.poi.openxml4j.opc.OPCPackage;
import org.apache.poi.openxml4j.opc.PackagePart;
import org.apache.poi.ss.usermodel.RichTextString;
import org.apache.poi.util.Removal;
import org.apache.poi.xssf.model.SharedStrings;
import org.apache.poi.xssf.usermodel.XSSFRelation;
import org.apache.poi.xssf.usermodel.XSSFRichTextString;
import org.xml.sax.Attributes;
import org.xml.sax.InputSource;
import org.xml.sax.SAXException;
import org.xml.sax.XMLReader;
import org.xml.sax.helpers.DefaultHandler;

import javax.xml.parsers.ParserConfigurationException;
import java.io.IOException;
import java.io.InputStream;
import java.io.PushbackInputStream;
import java.util.ArrayList;
import java.util.List;

import static org.apache.poi.xssf.usermodel.XSSFRelation.NS_SPREADSHEETML;

public class ReadOnlySharedStringsTable extends DefaultHandler implements SharedStrings {

    protected final boolean includePhoneticRuns;

    /**
     * An integer representing the total count of strings in the workbook. This count does not
     * include any numbers, it counts only the total of text strings in the workbook.
     */
    protected int count;

    /**
     * An integer representing the total count of unique strings in the Shared String Table.
     * A string is unique even if it is a copy of another string, but has different formatting applied
     * at the character level.
     */
    protected int uniqueCount;

    /**
     * 緩存
     */
    ReadCache readCache = new ReadCache(100);

    private int counts;


    public ReadOnlySharedStringsTable(OPCPackage pkg)
            throws IOException, SAXException {
        this(pkg, true);
    }

    public ReadOnlySharedStringsTable(OPCPackage pkg, boolean includePhoneticRuns)
            throws IOException, SAXException {
        this.includePhoneticRuns = includePhoneticRuns;
        ArrayList<PackagePart> parts =
                pkg.getPartsByContentType(XSSFRelation.SHARED_STRINGS.getContentType());

        // Some workbooks have no shared strings table.
        if (parts.size() > 0) {
            PackagePart sstPart = parts.get(0);
            readFrom(sstPart.getInputStream());
        }
    }

    /**
     * Like POIXMLDocumentPart constructor
     *
     * Calls {@link #ReadOnlySharedStringsTable(PackagePart, boolean)}, with a
     * value of <code>true</code> to include phonetic runs.
     *
     * @since POI 3.14-Beta1
     */
    public ReadOnlySharedStringsTable(PackagePart part) throws IOException, SAXException {
        this(part, true);
    }

    /**
     * Like POIXMLDocumentPart constructor
     *
     * @since POI 3.14-Beta3
     */
    public ReadOnlySharedStringsTable(PackagePart part, boolean includePhoneticRuns)
        throws IOException, SAXException {
        this.includePhoneticRuns = includePhoneticRuns;
        readFrom(part.getInputStream());
    }
    
    /**
     * Read this shared strings table from an XML file.
     *
     * @param is The input stream containing the XML document.
     * @throws IOException if an error occurs while reading.
     * @throws SAXException if parsing the XML data fails.
     */
    public void readFrom(InputStream is) throws IOException, SAXException {
        // test if the file is empty, otherwise parse it
        PushbackInputStream pis = new PushbackInputStream(is, 1);
        int emptyTest = pis.read();
        if (emptyTest > -1) {
            pis.unread(emptyTest);
            InputSource sheetSource = new InputSource(pis);
            try {
                XMLReader sheetParser = SAXHelper.newXMLReader();
                sheetParser.setContentHandler(this);
                sheetParser.parse(sheetSource);
            } catch(ParserConfigurationException e) {
                throw new RuntimeException("SAX parser appears to be broken - " + e.getMessage());
            }
        }
    }

    /**
     * Return an integer representing the total count of strings in the workbook. This count does not
     * include any numbers, it counts only the total of text strings in the workbook.
     *
     * @return the total count of strings in the workbook
     */
    @Override
    public int getCount() {
        return this.count;
    }

    /**
     * Returns an integer representing the total count of unique strings in the Shared String Table.
     * A string is unique even if it is a copy of another string, but has different formatting applied
     * at the character level.
     *
     * @return the total count of unique strings in the workbook
     */
    @Override
    public int getUniqueCount() {
        return this.uniqueCount;
    }

    /**
     * Return the string at a given index.
     * Formatting is ignored.
     *
     * @param idx index of item to return.
     * @return the item at the specified position in this Shared String table.
     * @deprecated use <code>getItemAt</code> instead
     */
    @Removal(version = "4.2")
    @Deprecated
    public String getEntryAt(int idx) {
        /**
         * 這裏就是修改部分了,直接從按行存儲的臨時文件讀取需要的字符串
         */
        return readCache.get(idx);

    }

    /**
     * Returns all the strings.
     * Formatting is ignored.
     *
     * @return a list with all the strings
     * @deprecated use <code>getItemAt</code> instead
     */
    @Removal(version = "4.2")
    @Deprecated
    public List<String> getItems() {
        return null;
    }

    @Override
    public RichTextString getItemAt(int idx) {
        return new XSSFRichTextString(getEntryAt(idx));
    }

    //// ContentHandler methods ////

    private StringBuilder characters;
    private boolean tIsOpen;
    private boolean inRPh;

    @Override
    public void startElement(String uri, String localName, String name,
                             Attributes attributes) throws SAXException {
        if (uri != null && ! uri.equals(NS_SPREADSHEETML)) {
            return;
        }

        if ("sst".equals(localName)) {
            String count = attributes.getValue("count");
            if(count != null) this.count = Integer.parseInt(count);
            String uniqueCount = attributes.getValue("uniqueCount");
            if(uniqueCount != null) this.uniqueCount = Integer.parseInt(uniqueCount);
            //    this.strings = new ArrayList<>(this.uniqueCount);
            characters = new StringBuilder(64);
        } else if ("si".equals(localName)) {
            characters.setLength(0);
        } else if ("t".equals(localName)) {
            tIsOpen = true;
        } else if ("rPh".equals(localName)) {
            inRPh = true;
            //append space...this assumes that rPh always comes after regular <t>
            if (includePhoneticRuns && characters.length() > 0) {
                characters.append(" ");
            }
        }
    }

    @Override
    public void endElement(String uri, String localName, String name) throws SAXException {
        if (uri != null && ! uri.equals(NS_SPREADSHEETML)) {
            return;
        }

        if ("si".equals(localName)) {
         //   strings.add(characters.toString().intern());
            readCache.put(characters.toString());
            /**
             * 這裏就是修改的一部分,這裏直接把字符串按行存入臨時文件
             */
            counts ++;
            if(counts == this.uniqueCount) {
                readCache.putFinished();
            }
        } else if ("t".equals(localName)) {
            tIsOpen = false;
        } else if ("rPh".equals(localName)) {
            inRPh = false;
        }
    }

    /**
     * Captures characters only if a t(ext) element is open.
     */
    @Override
    public void characters(char[] ch, int start, int length) throws SAXException {
        if (tIsOpen) {
            if (inRPh && includePhoneticRuns) {
                characters.append(ch, start, length);
            } else if (! inRPh){
                characters.append(ch, start, length);
            }
        }
    }

}

  至此代碼效率有了相當大的提高,而且內存溢出問題也得到解決。詳細測試代碼:https://github.com/rongdi/poi-example.git


本站聲明:網站內容來源於博客園,如有侵權,請聯繫我們,我們將及時處理

【其他文章推薦】

台北網頁設計公司這麼多,該如何挑選?? 網頁設計報價省錢懶人包"嚨底家"

網頁設計公司推薦更多不同的設計風格,搶佔消費者視覺第一線

※想知道購買電動車哪裡補助最多?台中電動車補助資訊懶人包彙整

南投搬家費用,距離,噸數怎麼算?達人教你簡易估價知識!

MySQL InnoDB 事務

MySQL 原理篇

MySQL5.5 及以後版本的默認存儲引擎使用的是 InnoDB,接下來針對事務的講解都是基於 InnoDB 存儲引擎的。

事務的定義

事務:數據庫操作的最小工作單元,是作為單個邏輯工作單元執行的一系列操作; 事務是一組不可再分割的操作集合(工作邏輯單元)。

典型事務使用場景:轉賬

update user_account set balance = balance - 1000 where userID = 3;
update user_account set balance = balance + 1000 where userID = 1;

MySQL 開啟事務

/*
  BEGIN / START TRANSACTION        --手工
  COMMIT / ROLLBACK                --事務提交或回滾
  SET SESSION autocommit = ON/OFF  --設定會話級別事務是否自動開啟
*/

MySQL 默認是開啟事務的,通過 SHOW VARIABLES like 'autocommit'; 可以查看 MySQL 的事務開啟情況。

  • 在 autocommit = ON(自動提交事務)的情況下,可以執行 BEGIN; 或者 START TRANSACTION; 命令,改為手動提交事務,執行完 SQL 語句后,需要通過 COMMIT 命令提交事務,或者通過 ROLLBACK 命令回滾事務。
  • 在 autocommit = OFF(手動提交事務)的情況下,執行完 SQL 語句后,需要通過 COMMIT 命令提交事務,或者通過 ROLLBACK 命令回滾事務。

JDBC 編程

connection.setAutoCommit(boolean);

測試命令

SHOW VARIABLES like 'autocommit';

/* autocommit為ON */
update teacher set name ='seven' where id =1;
insert teacher (name,age) value ('james',22);
delete from teacher where name = 'james';

/* autocommit為ON如何開啟事務 */
BEGIN;
START TRANSACTION;

update teacher set name ='seven' where id =1;
insert teacher (name,age) value ('james',22);
delete from teacher where name = 'james';

COMMIT;
ROLLBACK;

/* 將autocommit改成OFF */
set session autocommit = OFF;
update teacher set name ='seven' where id =1;
insert teacher (name,age) value ('james',22);
delete from teacher where name = 'james';

COMMIT;
ROLLBACK;

事務 ACID 特性

原子性(Atomicity):最小的工作單元,整個工作單元要麼一起提交成功,要麼全部失敗回滾。

一致性(Consistency):事務中操作的數據及狀態改變是一致的,即寫入資料的結果必須完全符合預設的規則,不會因為出現系統意外等原因導致狀態的不一致。

隔離型(Isolation):一個事務所操作的數據在提交之前,對其他事務的可見性設定(一般設定為不可見)。

持久性(Durability):事務所做的修改就會永久保存,不會因為系統意外導致數據的丟失。

參考()這篇博文,講了一下原子性和一致性的區別。

事務併發帶來了哪些問題

臟讀

比如 user 表中有一條用戶數據,執行了如下操作:

  1. 事務B更新 id=1 的數據,age 更新為18,不提交事務
  2. 事務A查詢 id=1 的數據
  3. 事務B回滾剛才的更新操作

這個時候,事務A中查詢出的 id=1 的數據,age 的值是16還是18?

不可重複讀


比如 user 表中有一條用戶數據,執行了如下操作:

  1. 事務A查詢 id=1 的數據
  2. 事務B更新 id=1 的數據,age 更新為18,並提交事務
  3. 事務A再次查詢 id=1 的數據

這個時候,事務A兩次查詢出的 id=1 的數據,age 的值是16還是18?

幻讀

比如在 user 表中執行了如下操作:

  1. 事務A查詢 age>15 的數據
  2. 事務B新增一條數據,age=22,並提交事務
  3. 事務A再次查詢 age>15 的數據

這個時候,事務A兩次查詢出的數據,數量是1條還是2條?

事務四種隔離級別

SQL92 ANSI/ISO標準:http://www.contrib.andrew.cmu.edu/~shadow/sql/sql1992.txt

Read Uncommitted(未提交讀未解決併發問題

事務未提交對其他事務也是可見的,臟讀(dirty read)

Read Committed(提交讀)解決臟讀問題

一個事務開始之後,只能看到自己提交的事務所做的修改,不可重複讀(non repeatable read)

Repeatable Read(可重複讀解決不可重複讀問題

在同一個事務中多次讀取同樣的數據結果是一樣的,這種隔離級別未定義解決幻讀的問題

Serializable(串行化)解決所有問題

最高的隔離級別,通過強制事務的串行執行

InnoDB 引擎對隔離級別的支持程度

事務隔離級別

臟讀

不可重複讀

幻讀

未提交讀(Read Uncommitted)

可能

可能

可能

已提交讀(Read Committed)

不可能

可能

可能

可重複讀(Repeatable Read)

不可能

不可能

對 InnoDB 不可能

串行化(Serializable)

不可能

不可能

不可能

事務隔離級別的併發能力:未提交讀 > 已提交讀 > 可重複讀 > 串行化

InnDB 引擎默認的事務隔離級別是可重複讀(Repeatable Read),在該級別中它把幻讀的問題也解決了。InnDB 中事務隔離級別通過鎖、MVCC 實現。

通過如下語句查看 InnoDB 的默認事務隔離級別:

/* 全局、當前會話的隔離級別 */
SELECT @@global.tx_isolation, @@tx_isolation;

通過如下語句設置 InnoDB 的事務隔離級別:

/* 設置全局隔離級別 */
set global transaction isolation level read committed;
/* 設置當前會話的隔離級別 */
set session transaction isolation level read committed;

接下來我們來測試一下 InnoDB 的默認事務隔離級別(Repeatable Read)是否解決了臟讀、不可重複讀、幻讀的問題。

數據準備:

CREATE TABLE `user` (
  `id` int(11) NOT NULL,
  `name` varchar(32) NOT NULL,
  `age` int(11) NOT NULL,
  PRIMARY KEY (`id`)
) ENGINE=InnoDB DEFAULT CHARSET=utf8mb4;

insert into `user` (`id`, `name`, `age`) values('1','Ada','16');

是否解決了臟讀的問題?

開啟兩個 MySQL 客戶端,模擬事務A和事務B的操作,執行步驟如下:

  1. 事務B開啟手動事務,更新 id=1 的數據,age 更新為18,不提交事務
  2. 事務A查詢 id=1 的數據
  3. 事務B回滾剛才的更新操作

圖中的数字是執行步驟,通過下圖可以看出事務A的執行結果是16,InnDB 的默認事務隔離級別完美的解決了臟讀的問題。

是否解決了不可重複讀的問題?

開啟兩個 MySQL 客戶端,模擬事務A和事務B的操作,執行步驟如下:

  1. 事務A開啟手動事務,查詢 id=1 的數據
  2. 事務B更新 id=1 的數據,age 更新為18,並提交事務
  3. 事務A再次查詢 id=1 的數據

圖中的数字是執行步驟,通過下圖可以看出事務A兩次的執行結果都是16,沒有受事務B更新操作的影響,InnDB 的默認事務隔離級別完美的解決了不可重複讀的問題。

是否解決了幻讀的問題?

開啟兩個 MySQL 客戶端,模擬事務A和事務B的操作,執行步驟如下:

  1. 事務A開啟手動事務,查詢 age>15 的數據
  2. 事務B新增一條數據,age=22,並提交事務
  3. 事務A再次查詢 age>15 的數據

圖中的数字是執行步驟,通過下圖可以看出事務A兩次的執行結果都是一條數據,沒有受事務B新增操作的影響,InnDB 的默認事務隔離級別完美的解決了幻讀的問題。

本站聲明:網站內容來源於博客園,如有侵權,請聯繫我們,我們將及時處理

【其他文章推薦】

※想知道網站建置網站改版該如何進行嗎?將由專業工程師為您規劃客製化網頁設計後台網頁設計

※不管是台北網頁設計公司台中網頁設計公司,全省皆有專員為您服務

※Google地圖已可更新顯示潭子電動車充電站設置地點!!

※帶您來看台北網站建置台北網頁設計,各種案例分享

python機器學習——邏輯回歸

我們知道感知器算法對於不能完全線性分割的數據是無能為力的,在這一篇將會介紹另一種非常有效的二分類模型——邏輯回歸。在分類任務中,它被廣泛使用

邏輯回歸是一個分類模型,在實現之前我們先介紹幾個概念:

幾率(odds ratio):
\[ \frac {p}{(1-p)} \]
其中p表示樣本為正例的概率,當然是我們來定義正例是什麼,比如我們要預測某種疾病的發生概率,那麼我們將患病的樣本記為正例,不患病的樣本記為負例。為了解釋清楚邏輯回歸的原理,我們先介紹幾個概念。

我們定義對數幾率函數(logit function)為:
\[ logit(p) = log \frac {p}{(1-p)} \]
對數幾率函數的自變量p取值範圍為0-1,通過函數將其轉化到整個實數範圍中,我們使用它來定義一個特徵值和對數幾率之間的線性關係為:
\[ logit(p(y=1|x)) = w_0x_0+w_1x_1+…+w_mx_m = \sum_i^nw_ix_i=w^Tx \]
在這裏,p(y=1|x)是某個樣本屬於類別1的條件概率。我們關心的是某個樣本屬於某個類別的概率,剛好是對數幾率函數的反函數,我們稱這個反函數為邏輯函數(logistics function),有時簡寫為sigmoid函數:
\[ \phi(z) = \frac{1}{1+e^{-z}} \]
其中z是權重向量w和輸入向量x的線性組合:
\[ z = w^Tx=w_0+w_1x_1+…+w_mx_m \]
現在我們畫出這個函數圖像:

import matplotlib.pyplot as plt
import numpy as np
def sigmoid(z):
    return 1.0 / (1.0 + np.exp(-z))
z = np.arange(-7, 7, 0.1)
phi_z = sigmoid(z)
plt.plot(z, phi_z)
plt.axvline(0.0, color='k')
plt.axhspan(0.0, 1.0, facecolor='1.0', alpha=1.0, ls='dotted')
plt.yticks([0.0, 0.5, 1.0])
plt.ylim(-0.1, 1.1)
plt.xlabel('z')
plt.ylabel('$\phi (z)$')
plt.show()

可以看出當z接近於正無窮大時,函數值接近1,同樣當z接近於負無窮大時,函數值接近0。所以我們知道sigmoid函數將一個實數輸入轉化為一個範圍為0-1的一個輸出。

我們將邏輯函數將我們之前學過的Adaline聯繫起來,在Adaline中,我們的激活函數的函數值與輸入值相同,而在邏輯函數中,激活函數為sigmoid函數。

sigmoid函數的輸出被解釋為某個樣本屬於類別1的概率,用公式表示為:
\[ \hat y=\begin{cases}1,\quad \phi(z)\ge 0.5 \\\\0,\quad otherwise\end{cases} \]
也就是當函數值大於0.5時,表示某個樣本屬於類別1的概率大於0.5,於是我們就將此樣本預測為類別1,否則為類別0。我們仔細觀察上面的sigmoid函數圖像,上式也等價於:
\[ \hat y=\begin{cases}1,\quad z\ge 0.0 \\\\0,\quad otherwise\end{cases} \]
邏輯回歸的受歡迎之處就在於它可以預測發生某件事的概率,而不是預測這件事情是否發生。

我們已經介紹了邏輯回歸如何預測類別概率,接下來我們來看看邏輯回歸如何更新權重參數w

對於Adaline,我們的損失函數為:
\[ J(w) = \sum_i\frac12(\phi(z^{(i)})-y^{(i)})^2 \]
我們通過最小化這個損失函數來更新權重w。為了解釋我們如何得到邏輯回歸的損失函數,在構建邏輯回歸模型時我們要最大化似然L(假設數據集中的所有樣本都是互相獨立的):
\[ L(w)=P(y|x,w)=\prod^n_{i=1}P(y^{(i)}|x^{(i)};w)=\prod^n_{i=1}(\phi(z^{(i)}))^{y^{(i)}}(1-\phi(z^{(i)}))^{1-y^{(i)}} \]
通常我們會最大化L的log形式,我們稱之為對數似然函數
\[ l(w)=logL(w)=\sum_{i=1}^n\left[y^{(i)}log(\phi(z^{(i)})+(1-y^{(i)})log(1-\phi(z^{(i)}))\right] \]
這樣做有兩個好處,一是當似然很小時,取對數減小了数字下溢的可能性,二是取對數后將乘法轉化為了加法,可以更容易的得到函數的導數。現在我們可以使用一個梯度下降法來最大化對數似然函數,我們將上面的對數似然函數轉化為求最小值的損失函數J:
\[ J(w)=\sum_{i=1}^n\left[-y^{(i)}log(\phi(z^{(i)}))-(1-y^{(i)})log(1-\phi(z^{(i)}))\right] \]
為了更清晰的理解上式,我們假設對一個樣本計算它的損失函數:
\[ J(\phi(z),y;w)=-ylog(\phi(z))-(1-y)log(1-\phi(z)) \]
可以看出,當y=0時,式子的第一部分為0,當y=1時,式子的第二部分為0,也就是:
\[ J(\phi(z),y;w)=\begin{cases}-log(\phi(z)),\quad if\ y=1 \\\\-log(1-\phi(z)),\quad if \ y=0\end{cases} \]

可以看出,當我們預測樣本所屬於的類別時,當預測類別是樣本真實類別的概率越大時,損失越接近0,而當預測類別是真實類別的概率越小時,損失越接近無窮大。

作為舉例,我們這裏對權重向量w中的一個分量進行更新,首先我們求此分量的偏導數:
\[ \frac{\partial }{\partial w_j}l(w) = \left(y\frac{1}{\phi(z)}-(1-y)\frac{1}{1-\phi(z)}\right)\frac{\partial }{\partial w_j}\phi(z) \]
在繼續下去之前,我們先計算一下sigmoid函數的偏導數:
\[ \frac{\partial }{\partial z}\phi(z) = \frac{\partial }{\partial z}\frac{1}{1+e^{-z}}=\frac{1}{(1+e^{-z})^2}e^{-z}=\frac{1}{1+e^{-z}}(1-\frac{1}{1+e^{-z}})\\=\phi(z)(1-\phi(z)) \]
現在我們繼續:
\[ \left(y\frac{1}{\phi(z)}-(1-y)\frac{1}{1-\phi(z)}\right)\frac{\partial }{\partial w_j}\phi(z)\\=\left(y\frac{1}{\phi(z)}-(1-y)\frac{1}{1-\phi(z)}\right)\phi(z)(1-\phi(z))\frac{\partial }{\partial w_j}z\\=\left(y(1-\phi(z))-(1-y)\phi(z)\right)x_j\\=(y-\phi(z))x_j \]
所以我們的更新規則為:
\[ w_j = w_j + \eta\sum^n_{i=1}\left(y^{(i)}-\phi(z^{(i)})\right)x_j^{(i)} \]
因為我們要同時更新權重向量w的所有分量,所以我們更新規則為(此處w為向量):
\[ w = w+\Delta w\\\Delta w = \eta\nabla l(w) \]
因為最大化對數似然函數也就等價於最小化損失函數J,於是梯度下降更新規則為:
\[ \Delta w_j=-\eta\frac{\partial J}{\partial w_j}=\eta\sum^n_{i=1}\left(y^{(i)}-\phi(z^{(i)})\right)x^{(i)}_j\\w=w+\Delta w,\Delta w=-\eta \nabla J(w) \]

本站聲明:網站內容來源於博客園,如有侵權,請聯繫我們,我們將及時處理

【其他文章推薦】

網頁設計公司推薦更多不同的設計風格,搶佔消費者視覺第一線

※廣告預算用在刀口上,網站設計公司幫您達到更多曝光效益

※自行創業 缺乏曝光? 下一步"網站設計"幫您第一時間規劃公司的門面形象

南投搬家前需注意的眉眉角角,別等搬了再說!

什麼情況用ArrayList or LinkedList呢?

ArrayList 和 LinkedList 是 Java 集合框架中用來存儲對象引用列表的兩個類。ArrayList 和 LinkedList 都實現 List 接口。先對List做一個簡單的了解:

列表(list)是元素的有序集合,也稱為序列。它提供了基於元素位置的操作,有助於快速訪問、添加和刪除列表中特定索引位置的元素。List 接口實現了 Collection 和 Iterable 作為父接口。它允許存儲重複值和空值,支持通過索引訪問元素。


讀完這篇文章要搞清楚的問題:ArrayList和LinkedList有什麼不同之處?什麼時候應該用ArrayList什麼時候又該用LinkedList呢?


下面以增加和刪除元素為例比較ArrayList和LinkedList的不同之處

增加元素到列表尾端:

在ArrayList中增加元素到隊列尾端的代碼如下:

public boolean add(E e){
   ensureCapacity(size+1);//確保內部數組有足夠的空間
   elementData[size++]=e;//將元素加入到數組的末尾,完成添加
   return true;      
} 


ArrayList中add()方法的性能決定於ensureCapacity()方法。ensureCapacity()的實現如下:

public vod ensureCapacity(int minCapacity){
  modCount++;
  int oldCapacity=elementData.length;
  if(minCapacity>oldCapacity){    //如果數組容量不足,進行擴容
      Object[] oldData=elementData;
      int newCapacity=(oldCapacity*3)/2+1;  //擴容到原始容量的1.5倍
      if(newCapacitty<minCapacity)   //如果新容量小於最小需要的容量,則使用最小
                                                    //需要的容量大小
         newCapacity=minCapacity ;  //進行擴容的數組複製
         elementData=Arrays.copyof(elementData,newCapacity);
  }
}


可以看到,只要ArrayList的當前容量足夠大,add()操作的效率非常高的。只有當ArrayList對容量的需求超出當前數組大小時,才需要進行擴容。擴容的過程中,會進行大量的數組複製操作。而數組複製時,最終將調用System.arraycopy()方法,因此add()操作的效率還是相當高的。

LinkedList 的add()操作實現如下,它也將任意元素增加到隊列的尾端:

public boolean add(E e){
   addBefore(e,header);//將元素增加到header的前面
   return true;
}


其中addBefore()的方法實現如下:

private Entry<E> addBefore(E e,Entry<E> entry){
     Entry<E> newEntry = new Entry<E>(e,entry,entry.previous);
     newEntry.provious.next=newEntry;
     newEntry.next.previous=newEntry;
     size++;
     modCount++;
     return newEntry;
}


可見,LinkeList由於使用了鏈表的結構,因此不需要維護容量的大小。從這點上說,它比ArrayList有一定的性能優勢,然而,每次的元素增加都需要新建一個Entry對象,並進行更多的賦值操作。在頻繁的系統調用中,對性能會產生一定的影響。

增加元素到列表任意位置

除了提供元素到List的尾端,List接口還提供了在任意位置插入元素的方法:void add(int index,E element);

由於實現的不同,ArrayList和LinkedList在這個方法上存在一定的性能差異,由於ArrayList是基於數組實現的,而數組是一塊連續的內存空間,如果在數組的任意位置插入元素,必然導致在該位置后的所有元素需要重新排列,因此,其效率相對會比較低。

以下代碼是ArrayList中的實現:

public void add(int index,E element){
   if(index>size||index<0)
      throw new IndexOutOfBoundsException(
        "Index:"+index+",size: "+size);
         ensureCapacity(size+1);
         System.arraycopy(elementData,index,elementData,index+1,size-index);
         elementData[index] = element;
         size++;
}


可以看到每次插入操作,都會進行一次數組複製。而這個操作在增加元素到List尾端的時候是不存在的,大量的數組重組操作會導致系統性能低下。並且插入元素在List中的位置越是靠前,數組重組的開銷也越大。

而LinkedList此時显示了優勢:

public void add(int index,E element){
   addBefore(element,(index==size?header:entry(index)));
}


可見,對LinkedList來說,在List的尾端插入數據與在任意位置插入數據是一樣的,不會因為插入的位置靠前而導致插入的方法性能降低。

刪除任意位置元素

對於元素的刪除,List接口提供了在任意位置刪除元素的方法:

public E remove(int index);


對ArrayList來說,remove()方法和add()方法是雷同的。在任意位置移除元素后,都要進行數組的重組。ArrayList的實現如下:

public E remove(int index){
   RangeCheck(index);
   modCount++;
   E oldValue=(E) elementData[index];
  int numMoved=size-index-1;
  if(numMoved>0)
     System.arraycopy(elementData,index+1,elementData,index,numMoved);
     elementData[--size]=null;
     return oldValue;
}


可以看到,在ArrayList的每一次有效的元素刪除操作后,都要進行數組的重組。並且刪除的位置越靠前,數組重組時的開銷越大。

public E remove(int index){
  return remove(entry(index));         
}
private Entry<E> entry(int index){
  if(index<0 || index>=size)
      throw new IndexOutBoundsException("Index:"+index+",size:"+size);
      Entry<E> e= header;
      if(index<(size>>1)){//要刪除的元素位於前半段
         for(int i=0;i<=index;i++)
             e=e.next;
     }else{
         for(int i=size;i>index;i--)
             e=e.previous;
     }
         return e;
}


在LinkedList的實現中,首先要通過循環找到要刪除的元素。如果要刪除的位置處於List的前半段,則從前往後找;若其位置處於後半段,則從后往前找。因此無論要刪除較為靠前或者靠後的元素都是非常高效的;但要移除List中間的元素卻幾乎要遍歷完半個List,在List擁有大量元素的情況下,效率很低。

容量參數

容量參數是ArrayList和Vector等基於數組的List的特有性能參數。它表示初始化的數組大小。當ArrayList所存儲的元素數量超過其已有大小時。它便會進行擴容,數組的擴容會導致整個數組進行一次內存複製。因此合理的數組大小有助於減少數組擴容的次數,從而提高系統性能。

public  ArrayList(){
  this(10);  
}
public ArrayList (int initialCapacity){
   super();
   if(initialCapacity<0)
       throw new IllegalArgumentException("Illegal Capacity:"+initialCapacity)
      this.elementData=new Object[initialCapacity];
}


ArrayList提供了一個可以制定初始數組大小的構造函數:

public ArrayList(int initialCapacity) 


現以構造一個擁有100萬元素的List為例,當使用默認初始化大小時,其消耗的相對時間為125ms左右,當直接制定數組大小為100萬時,構造相同的ArrayList僅相對耗時16ms。

遍歷列表

遍歷列表操作是最常用的列表操作之一,在JDK1.5之後,至少有3中常用的列表遍歷方式:


  • forEach操作

  • 迭代器

  • for循環。


String tmp;
long start=System.currentTimeMills();    //ForEach 
for(String s:list){
    tmp=s;
}
System.out.println("foreach spend:"+(System.currentTimeMills()-start));
start = System.currentTimeMills();
for(Iterator<String> it=list.iterator();it.hasNext();){    
   tmp=it.next();
}
System.out.println("Iterator spend;"+(System.currentTimeMills()-start));
start=System.currentTimeMills();
int size=;list.size();
for(int i=0;i<size;i++){                     
    tmp=list.get(i);
}
System.out.println("for spend;"+(System.currentTimeMills()-start));


構造一個擁有100萬數據的ArrayList和等價的LinkedList,使用以上代碼進行測試,測試結果:

可以看到,最簡便的ForEach循環並沒有很好的性能表現,綜合性能不如普通的迭代器,而是用for循環通過隨機訪問遍歷列表時,ArrayList表項很好,但是LinkedList的表現卻無法讓人接受,甚至沒有辦法等待程序的結束。這是因為對LinkedList進行隨機訪問時,總會進行一次列表的遍歷操作。性能非常差,應避免使用。

總結

ArrayList和LinkedList在性能上各有優缺點,都有各自所適用的地方,總的說來可以描述如下:


1.對ArrayList和LinkedList而言,在列表末尾增加一個元素所花的開銷都是固定的。


對ArrayList而言,主要是在內部數組中增加一項,指向所添加的元素,偶爾可能會導致對數組重新進行分配;


而對LinkedList而言,這個開銷是統一的,分配一個內部Entry對象。

2.在ArrayList的中間插入或刪除一個元素意味着這個列表中剩餘的元素都會被移動;而在LinkedList的中間插入或刪除一個元素的開銷是固定的。

3.LinkedList不支持高效的隨機元素訪問。

4.ArrayList的空間浪費主要體現在在list列表的結尾預留一定的容量空間,而LinkedList的空間花費則體現在它的每一個元素都需要消耗相當的空間


可以這樣說:當操作是在一列數據的後面添加數據而不是在前面或中間,並且需要隨機地訪問其中的元素時,使用ArrayList會有更好的性能;當操作是在一列數據的前面或中間添加或刪除數據,並且按照順序訪問其中的元素時,就應該使用LinkedList了。

本站聲明:網站內容來源於博客園,如有侵權,請聯繫我們,我們將及時處理

【其他文章推薦】

※如何讓商品強力曝光呢? 網頁設計公司幫您建置最吸引人的網站,提高曝光率!!

網頁設計一頭霧水??該從何著手呢? 找到專業技術的網頁設計公司,幫您輕鬆架站!

※想知道最厲害的台北網頁設計公司推薦台中網頁設計公司推薦專業設計師”嚨底家”!!

英國投入4000萬英鎊大力推廣電動車

據報導,英國將率先在倫敦和諾丁漢等城市推廣電動車,並投入4000萬英鎊,以實現改善空氣品質、創造就業和普及低排放交通工具等目標。

資金由英國政府超低排放項目提供並將在上述城市中建立電動車基礎設施,其中包括建設未來社區,給予超低排放汽車以優先行駛以及停放權,建立電動汽車體驗中心,為公眾提供超低排放汽車知識的普及和服務,以及出臺超低排放汽車購置短期貸款服務和汽車租賃計畫,建設超低排放汽車優惠停放點,建設充電樁以及太陽能停車換乘系統等等。

據瞭解,這一項目只是英國政府發展低排放交通工具總體規劃的一部分。英國計畫到2020年總計投入6億英鎊,發展低排放交通工具,其中包括對電動車銷售進行補貼,推廣低排放公車和計程車,資助新一代車身材料和車用電池技術的研發等等。

此外,凡是在英國買電動車的人,都可以得到最高5000英鎊的補助金,英國政府也承諾,未來會繼續發電動車補貼,根據駕駛的車型決定發補助金的數量,從2500-5500英鎊之間不等。英國還將開放電動車上公交專用道,未來開電動車的人,可能不會在塞車時段卡在車陣當中。

本站聲明:網站內容來源於EnergyTrend https://www.energytrend.com.tw/ev/,如有侵權,請聯繫我們,我們將及時處理

【其他文章推薦】

※帶您來了解什麼是 USB CONNECTOR  ?

※自行創業 缺乏曝光? 下一步”網站設計“幫您第一時間規劃公司的門面形象

※如何讓商品強力曝光呢? 網頁設計公司幫您建置最吸引人的網站,提高曝光率!!

※綠能、環保無空污,成為電動車最新代名詞,目前市場使用率逐漸普及化

※廣告預算用在刀口上,網站設計公司幫您達到更多曝光效益

※試算大陸海運運費!

中國財政部2月1日起檢查新能源汽車騙補

中國財政部2月1日召開新能源汽車推廣應用補助資金專項檢查佈置視訊會議,此舉標誌著財政部組織的新能源汽車推廣應用補助資金專項檢查正式開始。

這次檢查財政部將組織全國35個專員辦檢查北京、上海、江蘇等25個省市,覆蓋2013—2015年度獲得中央財政補助資金支援的全部90家新能源汽車生產企業,延伸部分購買使用新能源汽車的企事業單位以及地方政府相關部門。

此次檢查不僅針對中央財政補助資金,對省、市、縣三級提供的新能源補助資金也一併檢查,發現問題一併處理、一併追究責任。檢查工作2016年2月1日正式啟動,至3月下旬結束。

此次檢查以檢查「騙補」為重點,突出重點地區、重點企業、重點車型。檢查組要緊緊圍繞新能源汽車生產、銷售、運營各個環節,逐一排查有無造假騙補的問題。

此外,財政部去年已明確,2017年至2018年新能源汽車補貼標準,將在2016年基礎上下調20%,2019年至2020年下降40%,2020年以後補貼政策將退出。

本站聲明:網站內容來源於EnergyTrend https://www.energytrend.com.tw/ev/,如有侵權,請聯繫我們,我們將及時處理

【其他文章推薦】

※為什麼 USB CONNECTOR 是電子產業重要的元件?

網頁設計一頭霧水??該從何著手呢? 找到專業技術的網頁設計公司,幫您輕鬆架站!

※想要讓你的商品成為最夯、最多人討論的話題?網頁設計公司讓你強力曝光

※想知道最厲害的台北網頁設計公司推薦台中網頁設計公司推薦專業設計師”嚨底家”!!

※專營大陸快遞台灣服務

台灣快遞大陸的貨運公司有哪些呢?

微型電動車或納入摩托車管理範疇 政策或將2016年出臺

據瞭解,工信部、發改委、公安部、環境部等部委已經對微型電動汽車進行調研,通過高標準放行一小部分產品後,其他微型電動車或將納入新的摩托車管理範疇。

中國電動汽車百人會微型電動車課題組組長介紹,通過多次微型電動車發展問題的調研與討論,並形成了相關的政策管理建議方案。他表示,馬凱總理對微型電動車的發展已有批示,要納入正常的機動車管理。

這是一個積極正面的信號,而不是否認微型電動車的存在價值。

在具體的管理標準上,一位從事新能源汽車研究的相關人士告訴記者,目前政策傾向于按照類似歐盟的摩托車歸類管理微型電動車。同時,在歐盟標準之上,按照中國不同城市特色區分管理,比如,在北上廣深等一線城市禁止微型電動車上路,但遠郊區可放開,三四線及以下的城市也可以上路,這就規避了實際管理中的很多矛盾。
 

本站聲明:網站內容來源於EnergyTrend https://www.energytrend.com.tw/ev/,如有侵權,請聯繫我們,我們將及時處理

【其他文章推薦】

USB CONNECTOR掌控什麼技術要點? 帶您認識其相關發展及效能

※評比前十大台北網頁設計台北網站設計公司知名案例作品心得分享

※智慧手機時代的來臨,RWD網頁設計已成為網頁設計推薦首選

台灣海運大陸貨務運送流程

兩岸物流進出口一站式服務

東風雷諾武漢工廠正式開張 將投產多款SUV和電動車

2月1日,雷諾汽車宣佈在華合資企業東風雷諾武漢工廠正式開張,該廠耗資8.7億歐元(約合9.42億美元)。

新工廠首款產品將是雷諾科雷嘉緊湊SUV,2016年內還將增添一款規格更大的SUV,預計是和上一代日產奇駿同平臺的車型,2017年則將投產風朗電動車。

東風雷諾武漢工廠年產能為15萬輛,雷諾高管預計未來可能增加一到兩倍。

本站聲明:網站內容來源於EnergyTrend https://www.energytrend.com.tw/ev/,如有侵權,請聯繫我們,我們將及時處理

【其他文章推薦】

台北網頁設計公司這麼多,該如何挑選?? 網頁設計報價省錢懶人包”嚨底家”

網頁設計公司推薦更多不同的設計風格,搶佔消費者視覺第一線

※想知道購買電動車哪裡補助最多?台中電動車補助資訊懶人包彙整

小三通海運與一般國際貿易有何不同?

小三通快遞通關作業有哪些?

瑞典設立百萬美元獎項 尋求永續糧食解決方案

摘錄自2020年2月21日中央社報導

德國與瑞典籌辦人士表示,由於氣候變遷威脅世界糧食供給,增長中的人口需要可永續糧食系統,瑞典已創立兩個100萬美元獎項,尋求餵飽數十億人口的解決方案。

德國波茨坦氣候影響研究中心(Potsdam Institute for Climate Change Impact Research)主任羅克斯特倫(Johan Rockstrom)在聲明中表示:「我們需要糧食系統革命,否則可能破壞我們星球的穩定。新的糧食星球獎(Food Planet Prize)旨在為此目標做出貢獻。」

瑞典科特伯格福斯基金會(Curt Bergfors Foundation)則指出,每年將頒發兩項糧食星球獎,第一項是獎勵「現有的可擴大永續糧食解決方案」,第二項則是獎勵「可能改變全球糧食產業的創新計畫」。科特伯格福斯基金會表示,將於2020年底首次頒發這些獎項。

本站聲明:網站內容來源環境資訊中心https://e-info.org.tw/,如有侵權,請聯繫我們,我們將及時處理

【其他文章推薦】

※帶您來了解什麼是 USB CONNECTOR  ?

※自行創業 缺乏曝光? 下一步”網站設計“幫您第一時間規劃公司的門面形象

※如何讓商品強力曝光呢? 網頁設計公司幫您建置最吸引人的網站,提高曝光率!!

※綠能、環保無空污,成為電動車最新代名詞,目前市場使用率逐漸普及化

※廣告預算用在刀口上,網站設計公司幫您達到更多曝光效益

※試算大陸海運運費!