※智慧手機時代的來臨,RWD網頁設計為架站首選
網動結合了許多網際網路業界的菁英共同研發簡單易操作的架站工具,及時性的更新,為客戶創造出更多的網路商機。
NestedScrollView 是用於替代 ScrollView 來解決嵌套滑動過程中的滑動事件的衝突。作為開發者,你會發現很多地方會用到嵌套滑動的邏輯,比如下拉刷新頁面,京東或者淘寶的各種商品頁面。
那為什麼要去了解 NestedScrollView 的源碼呢?那是因為 NestedScrollView 是嵌套滑動實現的模板範例,通過研讀它的源碼,能夠讓你知道如何實現嵌套滑動,然後如果需求上 NestedScrollView 無法滿足的時候,你可以自定義。
嵌套滑動
說到嵌套滑動,就得說說這兩個類了:NestedScrollingParent3 和 NestedScrollingChild3 ,當然同時也存在後面不帶数字的類。之所以後面帶数字了,是為了解決之前的版本遺留的問題:fling 的時候涉及嵌套滑動,無法透傳到另一個View 上繼續 fling,導致滑動效果大打折扣 。
其實 NestedScrollingParent2 相比 NestedScrollingParent 在方法調用上多了一個參數 type,用於標記這個滑動是如何產生的。type 的取值如下:
    /**
     * Indicates that the input type for the gesture is from a user touching the screen. 觸摸產生的滑動
     */
    public static final int TYPE_TOUCH = 0;

    /**
     * Indicates that the input type for the gesture is caused by something which is not a user
     * touching a screen. This is usually from a fling which is settling.  簡單理解就是fling
     */
    public static final int TYPE_NON_TOUCH = 1;
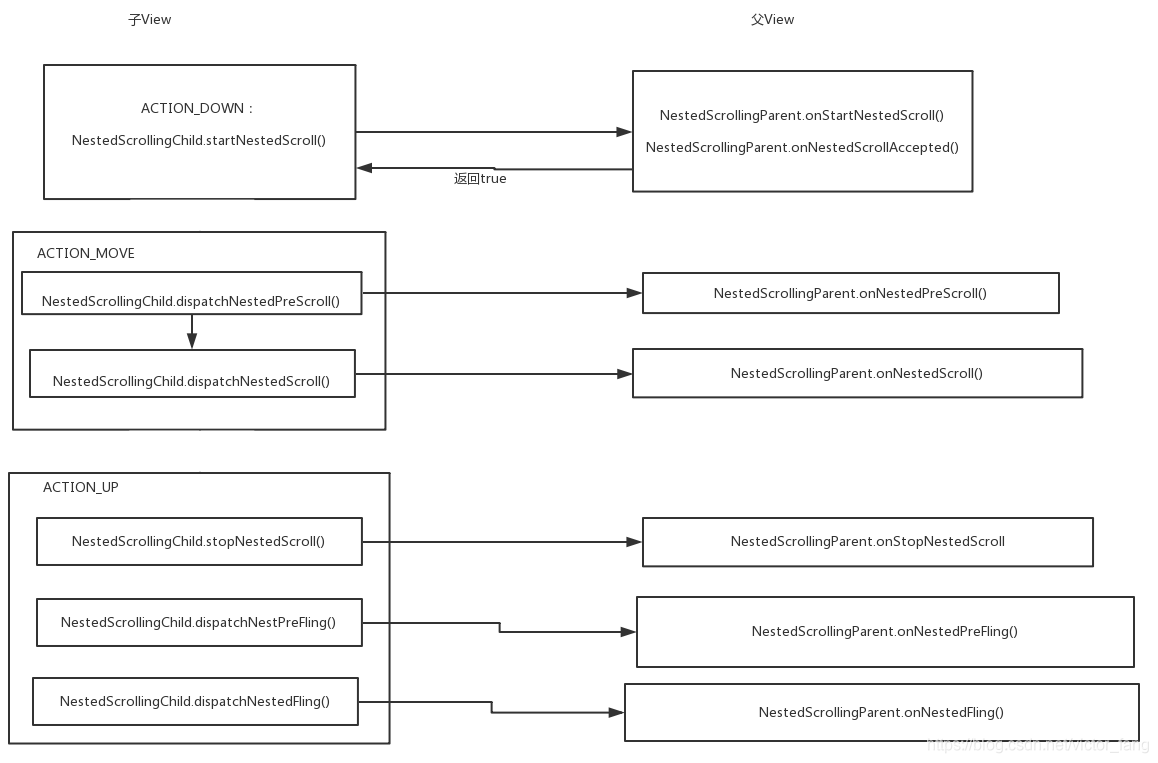
嵌套滑動,說得通俗點就是子 view 和 父 view 在滑動過程中,互相通信決定某個滑動是子view 處理合適,還是 父view 來處理。所以, Parent 和 Child 之間存在相互調用,遵循下面的調用關係:
上圖可以這麼理解:
- ACTION_DOWN 的時候子 view 就要調用 startNestedScroll( ) 方法來告訴父 view 自己要開始滑動了(實質上是尋找能夠配合 child 進行嵌套滾動的 parent),parent 也會繼續向上尋找能夠配合自己滑動的 parent,可以理解為在做一些準備工作 。
- 父 view 會收到 onStartNestedScroll 回調從而決定是不是要配合子 view 做出響應。如果需要配合,此方法會返回 true。繼而 onStartNestedScroll()回調會被調用。
-
在滑動事件產生但是子 view 還沒處理前可以調用 dispatchNestedPreScroll(0,dy,consumed,offsetInWindow) 這個方法把事件傳給父 view,這樣父 view 就能在onNestedPreScroll 方法裏面收到子 view 的滑動信息,然後做出相應的處理把處理完后的結果通過 consumed 傳給子 view。
-
dispatchNestedPreScroll()之後,child可以進行自己的滾動操作。
-
如果父 view 需要在子 view 滑動后處理相關事件的話可以在子 view 的事件處理完成之後調用 dispatchNestedScroll 然後父 view 會在 onNestedScroll 收到回調。
-
最後,滑動結束,調用 onStopNestedScroll() 表示本次處理結束。
-
但是,如果滑動速度比較大,會觸發 fling, fling 也分為 preFling 和 fling 兩個階段,處理過程和 scroll 基本差不多。
NestedScrollView
首先是看類的名字
 class NestedScrollView extends FrameLayout implements NestedScrollingParent3,
 NestedScrollingChild3, ScrollingView {
可以發現它繼承了 FrameLayout,相當於它就是一個 ViewGroup,可以添加子 view , 但是需要注意的事,它只接受一個子 view,否則會報錯。
    @Override
    public void addView(View child) {
        if (getChildCount() > 0) {
            throw new IllegalStateException("ScrollView can host only one direct child");
        }

        super.addView(child);
    }

    @Override
    public void addView(View child, int index) {
        if (getChildCount() > 0) {
            throw new IllegalStateException("ScrollView can host only one direct child");
        }

        super.addView(child, index);
    }

    @Override
    public void addView(View child, ViewGroup.LayoutParams params) {
        if (getChildCount() > 0) {
            throw new IllegalStateException("ScrollView can host only one direct child");
        }

        super.addView(child, params);
    }

    @Override
    public void addView(View child, int index, ViewGroup.LayoutParams params) {
        if (getChildCount() > 0) {
            throw new IllegalStateException("ScrollView can host only one direct child");
        }

        super.addView(child, index, params);
    }
add view
對於 NestedScrollingParent3,NestedScrollingChild3 的作用,前文已經說了,如果還是不理解,後面再對源碼的分析過程中也會分析到。
其實這裏還可以提一下 RecyclerView:
public class RecyclerView extends ViewGroup implements ScrollingView,
        NestedScrollingChild2, NestedScrollingChild3 {
這裏沒有繼承 NestedScrollingParent3 是因為開發者覺得 RecyclerView 適合做一個子類。並且它的功能作為一個列表去展示,也就是不適合再 RecyclerView 內部去做一些複雜的嵌套滑動之類的。這樣 RecycylerView 外層就可以再嵌套一個 NestedScrollView 進行嵌套滑動了。後面再分析嵌套滑動的時候,也會把 RecycylerView 當作子類來進行分析,這樣能更好的理解源碼。
內部有個接口,使用者需要對滑動變化進行監聽的,可以添加這個回調:
    public interface OnScrollChangeListener {
        /**
         * Called when the scroll position of a view changes.
         *
         * @param v The view whose scroll position has changed.
         * @param scrollX Current horizontal scroll origin.
         * @param scrollY Current vertical scroll origin.
         * @param oldScrollX Previous horizontal scroll origin.
         * @param oldScrollY Previous vertical scroll origin.
         */
        void onScrollChange(NestedScrollView v, int scrollX, int scrollY,
                int oldScrollX, int oldScrollY);
    }
構造函數
下面來看下構造函數:
    public NestedScrollView(@NonNull Context context, @Nullable AttributeSet attrs,
            int defStyleAttr) {
        super(context, attrs, defStyleAttr);
        initScrollView();

        final TypedArray a = context.obtainStyledAttributes(
                attrs, SCROLLVIEW_STYLEABLE, defStyleAttr, 0);
        // 是否要鋪滿全屏
        setFillViewport(a.getBoolean(0, false));

        a.recycle();
        // 即是子類,又是父類
        mParentHelper = new NestedScrollingParentHelper(this);
        mChildHelper = new NestedScrollingChildHelper(this);

        // ...because why else would you be using this widget? 默認是滾動,不然你使用它就沒有意義了
        setNestedScrollingEnabled(true);

        ViewCompat.setAccessibilityDelegate(this, ACCESSIBILITY_DELEGATE);
    }
這裏我們用了兩個輔助類來幫忙處理嵌套滾動時候的一些邏輯處理,NestedScrollingParentHelper,NestedScrollingChildHelper。這個是和前面的你實現的接口 NestedScrollingParent3,NestedScrollingChild3 相對應的。
下面看下 initScrollView 方法里的具體邏輯:
    private void initScrollView() {
        mScroller = new OverScroller(getContext());
        setFocusable(true);
        setDescendantFocusability(FOCUS_AFTER_DESCENDANTS);
     // 會調用 ViewGroup 的 onDraw         setWillNotDraw(false);
        // 獲取 ViewConfiguration 中一些配置,包括滑動距離,最大最小速率等等
        final ViewConfiguration configuration = ViewConfiguration.get(getContext());
        mTouchSlop = configuration.getScaledTouchSlop();
        mMinimumVelocity = configuration.getScaledMinimumFlingVelocity();
        mMaximumVelocity = configuration.getScaledMaximumFlingVelocity();
    }
setFillViewport
在構造函數中,有這麼一個設定:
setFillViewport(a.getBoolean(0, false));
與 setFillViewport 對應的屬性是 android:fillViewport=”true”。如果不設置這個屬性為 true,可能會出現如下圖一樣的問題:
xml 布局:
<?xml version="1.0" encoding="utf-8"?>
<NestedScrollView xmlns:android="http://schemas.android.com/apk/res/android"
    android:id="@+id/activity_main"
    android:layout_width="match_parent"
    android:layout_height="match_parent"
    >

    <LinearLayout
        android:layout_width="match_parent"
        android:layout_height="match_parent"
        android:orientation="vertical"
        android:background="#fff000">
        <Button
            android:layout_width="match_parent"
            android:layout_height="match_parent" />
    </LinearLayout>
</NestedScrollView>
效果:
可以發現這個沒有鋪滿全屏,可是 xml 明明已經設置了 match_parent 了。這是什麼原因呢?
那為啥設置 true 就可以了呢?下面來看下它的 onMeasure 方法:
    @Override
    protected void onMeasure(int widthMeasureSpec, int heightMeasureSpec) {
        super.onMeasure(widthMeasureSpec, heightMeasureSpec);
        // false 直接返回
        if (!mFillViewport) {
            return;
        }

        final int heightMode = MeasureSpec.getMode(heightMeasureSpec);
        if (heightMode == MeasureSpec.UNSPECIFIED) {
            return;
        }

        if (getChildCount() > 0) {
            View child = getChildAt(0);
            final NestedScrollView.LayoutParams lp = (LayoutParams) child.getLayoutParams();

            int childSize = child.getMeasuredHeight();
            int parentSpace = getMeasuredHeight()
                    - getPaddingTop()
                    - getPaddingBottom()
                    - lp.topMargin
                    - lp.bottomMargin;
            // 如果子 view 高度小於 父 view 高度,那麼需要重新設定高度
            if (childSize < parentSpace) {
                int childWidthMeasureSpec = getChildMeasureSpec(widthMeasureSpec,
                        getPaddingLeft() + getPaddingRight() + lp.leftMargin + lp.rightMargin,
                        lp.width);
                // 這裏生成 MeasureSpec 傳入的是 parentSpace,並且用的是 MeasureSpec.EXACTLY
                int childHeightMeasureSpec =
                        MeasureSpec.makeMeasureSpec(parentSpace, MeasureSpec.EXACTLY);
                child.measure(childWidthMeasureSpec, childHeightMeasureSpec);
            }
        }
    }
當你將 mFillViewport 設置為 true 后,就會把父 View 高度給予子 view 。可是這個解釋了設置 mFillViewport 可以解決不能鋪滿屏幕的問題,可是沒有解決為啥 match_parent 無效的問題。
在回到類的繼承關係上,NestedScrollView 繼承的是 FrameLayout,也就是說,FrameLayout 應該和 NestedScrollView 擁有一樣的問題。可是當你把 xml 中的布局換成 FrameLayout 后,你發現竟然沒有問題。那麼這是為啥呢?
原因是 NestedScrollView 又重寫了 measureChildWithMargins 。子view 的 childHeightMeasureSpec 中的 mode 是 MeasureSpec.UNSPECIFIED 。當被設置為這個以後,子 view 的高度就完全是由自身的高度決定了。
    @Override
    protected void measureChildWithMargins(View child, int parentWidthMeasureSpec, int widthUsed,
            int parentHeightMeasureSpec, int heightUsed) {
        final MarginLayoutParams lp = (MarginLayoutParams) child.getLayoutParams();

        final int childWidthMeasureSpec = getChildMeasureSpec(parentWidthMeasureSpec,
                getPaddingLeft() + getPaddingRight() + lp.leftMargin + lp.rightMargin
                        + widthUsed, lp.width);
        // 在生成子 view 的 MeasureSpec 時候,傳入的是 MeasureSpec.UNSPECIFIED
        final int childHeightMeasureSpec = MeasureSpec.makeMeasureSpec(
                lp.topMargin + lp.bottomMargin, MeasureSpec.UNSPECIFIED);

        child.measure(childWidthMeasureSpec, childHeightMeasureSpec);
    }
比如子 view 是 LinearLayout ,這時候,它的高度就是子 view 的高度之和。而且,這個 MeasureSpec.UNSPECIFIED 會一直影響着後面的子子孫孫 view 。
我猜這麼設計的目的是因為你既然使用了 NestedScrollView,就沒必要在把子 View 搞得跟屏幕一樣大了,它該多大就多大,不然你滑動的時候,看見一大片空白體驗也不好啊。
而 ViewGroup 中,measureChildWithMargins 的方法是這樣的:
    protected void measureChildWithMargins(View child,
            int parentWidthMeasureSpec, int widthUsed,
            int parentHeightMeasureSpec, int heightUsed) {
        final MarginLayoutParams lp = (MarginLayoutParams) child.getLayoutParams();

        final int childWidthMeasureSpec = getChildMeasureSpec(parentWidthMeasureSpec,
                mPaddingLeft + mPaddingRight + lp.leftMargin + lp.rightMargin
                        + widthUsed, lp.width);
        final int childHeightMeasureSpec = getChildMeasureSpec(parentHeightMeasureSpec,
                mPaddingTop + mPaddingBottom + lp.topMargin + lp.bottomMargin
                        + heightUsed, lp.height);

        child.measure(childWidthMeasureSpec, childHeightMeasureSpec);
    }
由於一般使用 NestedScrollView 的時候,都是會超過屏幕高度的,所以不設置這個屬性為 true 也沒有關係。
※回頭車貨運收費標準
宇安交通關係企業,自成立迄今,即秉持著「以誠待人」、「以實處事」的企業信念
繪製
既然前面已經把 onMeasure 講完了,那索引把繪製這塊都講了把。下面是 draw 方法,這裏主要是繪製邊界的陰影:
    @Override
    public void draw(Canvas canvas) {
        super.draw(canvas);
        if (mEdgeGlowTop != null) {
            final int scrollY = getScrollY();
       // 上邊界陰影繪製 if (!mEdgeGlowTop.isFinished()) {
                final int restoreCount = canvas.save();
                int width = getWidth();
                int height = getHeight();
                int xTranslation = 0;
                int yTranslation = Math.min(0, scrollY);
                if (Build.VERSION.SDK_INT < Build.VERSION_CODES.LOLLIPOP || getClipToPadding()) {
                    width -= getPaddingLeft() + getPaddingRight();
                    xTranslation += getPaddingLeft();
                }
                if (Build.VERSION.SDK_INT >= Build.VERSION_CODES.LOLLIPOP && getClipToPadding()) {
                    height -= getPaddingTop() + getPaddingBottom();
                    yTranslation += getPaddingTop();
                }
                canvas.translate(xTranslation, yTranslation);
                mEdgeGlowTop.setSize(width, height);
                if (mEdgeGlowTop.draw(canvas)) {
                    ViewCompat.postInvalidateOnAnimation(this);
                }
                canvas.restoreToCount(restoreCount);
            }
       // 底部邊界陰影繪製 if (!mEdgeGlowBottom.isFinished()) {
                final int restoreCount = canvas.save();
                int width = getWidth();
                int height = getHeight();
                int xTranslation = 0;
                int yTranslation = Math.max(getScrollRange(), scrollY) + height;
                if (Build.VERSION.SDK_INT < Build.VERSION_CODES.LOLLIPOP || getClipToPadding()) {
                    width -= getPaddingLeft() + getPaddingRight();
                    xTranslation += getPaddingLeft();
                }
                if (Build.VERSION.SDK_INT >= Build.VERSION_CODES.LOLLIPOP && getClipToPadding()) {
                    height -= getPaddingTop() + getPaddingBottom();
                    yTranslation -= getPaddingBottom();
                }
                canvas.translate(xTranslation - width, yTranslation);
                canvas.rotate(180, width, 0);
                mEdgeGlowBottom.setSize(width, height);
                if (mEdgeGlowBottom.draw(canvas)) {
                    ViewCompat.postInvalidateOnAnimation(this);
                }
                canvas.restoreToCount(restoreCount);
            }
        }
    }
onDraw 是直接用了父類的,這個沒啥好講的,下面看看 onLayout:
    @Override
    protected void onLayout(boolean changed, int l, int t, int r, int b) {
        super.onLayout(changed, l, t, r, b);
        mIsLayoutDirty = false;
        // Give a child focus if it needs it
        if (mChildToScrollTo != null && isViewDescendantOf(mChildToScrollTo, this)) {
            scrollToChild(mChildToScrollTo);
        }
        mChildToScrollTo = null;

        if (!mIsLaidOut) { // 是否是第一次調用onLayout // If there is a saved state, scroll to the position saved in that state.
            if (mSavedState != null) {
                scrollTo(getScrollX(), mSavedState.scrollPosition);
                mSavedState = null;
            } // mScrollY default value is "0"

            // Make sure current scrollY position falls into the scroll range.  If it doesn't,
            // scroll such that it does.
            int childSize = 0;
            if (getChildCount() > 0) {
                View child = getChildAt(0);
                NestedScrollView.LayoutParams lp = (LayoutParams) child.getLayoutParams();
                childSize = child.getMeasuredHeight() + lp.topMargin + lp.bottomMargin;
            }
            int parentSpace = b - t - getPaddingTop() - getPaddingBottom();
            int currentScrollY = getScrollY();
            int newScrollY = clamp(currentScrollY, parentSpace, childSize);
            if (newScrollY != currentScrollY) {
                scrollTo(getScrollX(), newScrollY);
            }
        }

        // Calling this with the present values causes it to re-claim them
        scrollTo(getScrollX(), getScrollY());
        mIsLaidOut = true;
    }
onLayout 方法也沒什麼說的,基本上是用了父類 FrameLayout 的布局方法,加入了一些 scrollTo 操作滑動到指定位置。
嵌套滑動分析
如果對滑動事件不是很清楚的小夥伴可以先看看這篇文章:Android View 的事件分發原理解析。
在分析之前,先做一個假設,比如 RecyclerView 就是 NestedScrollView 的子類,這樣去分析嵌套滑動更容易理解。這時候,用戶點擊 RecyclerView 觸發滑動。需要分析整個滑動過程的事件傳遞。
dispatchTouchEvent
這裏,NestedScrollView 用的是父類的處理,並沒有添加自己的邏輯。
onInterceptTouchEvent
當事件進行分發前,ViewGroup 首先會調用 onInterceptTouchEvent 詢問自己要不要進行攔截,不攔截,就會分發傳遞給子 view。一般來說,對於 ACTION_DOWN 都不會攔截,這樣子類有機會獲取事件,只有子類不處理,才會再次傳給父 View 來處理。下面來看看其具體代碼邏輯:
    @Override
    public boolean onInterceptTouchEvent(MotionEvent ev) {
        /*
         * This method JUST determines whether we want to intercept the motion.
         * If we return true, onMotionEvent will be called and we do the actual
         * scrolling there.
         */

        /*
        * Shortcut the most recurring case: the user is in the dragging
        * state and he is moving his finger.  We want to intercept this
        * motion.
        */
        final int action = ev.getAction();
     // 如果已經在拖動了,說明已經在滑動了,直接返回 true if ((action == MotionEvent.ACTION_MOVE) && (mIsBeingDragged)) {
            return true;
        }

        switch (action & MotionEvent.ACTION_MASK) {
            case MotionEvent.ACTION_MOVE: {
                /*
                 * mIsBeingDragged == false, otherwise the shortcut would have caught it. Check
                 * whether the user has moved far enough from his original down touch.
                 */

                /*
                * Locally do absolute value. mLastMotionY is set to the y value
                * of the down event.
                */
                final int activePointerId = mActivePointerId;
                if (activePointerId == INVALID_POINTER) {
                    // If we don't have a valid id, the touch down wasn't on content. 不是一個有效的id
                    break;
                }

                final int pointerIndex = ev.findPointerIndex(activePointerId);
                if (pointerIndex == -1) {
                    Log.e(TAG, "Invalid pointerId=" + activePointerId
                            + " in onInterceptTouchEvent");
                    break;
                }

                final int y = (int) ev.getY(pointerIndex);
          // 計算垂直方向上滑動的距離 final int yDiff = Math.abs(y - mLastMotionY);
          // 確定可以產生滾動了 if (yDiff > mTouchSlop
                        && (getNestedScrollAxes() & ViewCompat.SCROLL_AXIS_VERTICAL) == 0) {
                    mIsBeingDragged = true;
                    mLastMotionY = y;
                    initVelocityTrackerIfNotExists();
            // 可以獲取滑動速率                     mVelocityTracker.addMovement(ev);
                    mNestedYOffset = 0;
                    final ViewParent parent = getParent();
                    if (parent != null) {
               // 讓父 view 不要攔截,這裏應該是為了保險起見,因為既然已經走進來了,只要你返回 true,父 view 就不會攔截了。                         parent.requestDisallowInterceptTouchEvent(true);
                    }
                }
                break;
            }

            case MotionEvent.ACTION_DOWN: {
                final int y = (int) ev.getY();
          // 如果點擊的範圍不在子 view 上,直接break,比如自己設置了很大的 margin,此時用戶點擊這裏,這個範圍理論上是不參与滑動的 if (!inChild((int) ev.getX(), y)) {
                    mIsBeingDragged = false;
                    recycleVelocityTracker();
                    break;
                }

                /*
                 * Remember location of down touch.
                 * ACTION_DOWN always refers to pointer index 0.
                 */
                mLastMotionY = y;
                mActivePointerId = ev.getPointerId(0);
          // 在收到 DOWN 事件的時候,做一些初始化的工作                 initOrResetVelocityTracker();
                mVelocityTracker.addMovement(ev);
                /*
                 * If being flinged and user touches the screen, initiate drag;
                 * otherwise don't. mScroller.isFinished should be false when
                 * being flinged. We need to call computeScrollOffset() first so that
                 * isFinished() is correct.
                */
                mScroller.computeScrollOffset();
          // 如果此時正在fling, isFinished 會返回 flase                 mIsBeingDragged = !mScroller.isFinished();
          // 開始滑動                 startNestedScroll(ViewCompat.SCROLL_AXIS_VERTICAL, ViewCompat.TYPE_TOUCH);
                break;
            }

            case MotionEvent.ACTION_CANCEL:
            case MotionEvent.ACTION_UP:
                /* Release the drag */
                mIsBeingDragged = false;
                mActivePointerId = INVALID_POINTER;
                recycleVelocityTracker();
                if (mScroller.springBack(getScrollX(), getScrollY(), 0, 0, 0, getScrollRange())) {
                    ViewCompat.postInvalidateOnAnimation(this);
                }
          // 手抬起后,停止滑動                 stopNestedScroll(ViewCompat.TYPE_TOUCH);
                break;
            case MotionEvent.ACTION_POINTER_UP:
                onSecondaryPointerUp(ev);
                break;
        }

        /*
        * The only time we want to intercept motion events is if we are in the
        * drag mode.
        */
        return mIsBeingDragged;
    }
onInterceptTouchEvent 事件就是做一件事,決定事件是不是要繼續交給自己的 onTouchEvent 處理。這裏需要注意的一點是,如果子 view 在 dispatchTouchEvent 中調用了:
parent.requestDisallowInterceptTouchEvent(true)
那麼,其實就不會再調用 onInterceptTouchEvent 方法。也就是說上面的邏輯就不會走了。但是可以發現,down 事件,一般是不會攔截的。但是如果正在 fling,此時就會返回 true,直接把事件全部攔截。
那看下 RecyclerView 的 dispatchTouchEvent 是父類的,沒啥好分析的。而且它的 onInterceptTouchEvent 也是做了一些初始化的一些工作,和 NestedScrollView 一樣沒啥可說的。
onTouchEvent
再說 NestedScrollView 的 onTouchEvent。
對於 onTouchEvent 得分兩類進行討論,如果其子 view 不是 ViewGroup ,且是不可點擊的,就會把事件直接交給 NestedScrollView 來處理。
但是如果點擊的子 view 是 RecyclerView 的 ViewGroup 。當 down 事件來的時候,ViewGroup 的子 view 沒有處理,那麼就會交給 ViewGroup 來處理,你會發現ViewGroup 的 onTouchEvent 是默認返回 true 的。也就是說事件都是由 RecyclerView 來處理的。
這時候來看下 NestedScrollView 的 onTouchEvent 代碼:
 public boolean onTouchEvent(MotionEvent ev) {
        initVelocityTrackerIfNotExists();

        MotionEvent vtev = MotionEvent.obtain(ev);

        final int actionMasked = ev.getActionMasked();

        if (actionMasked == MotionEvent.ACTION_DOWN) {
            mNestedYOffset = 0;
        }
        vtev.offsetLocation(0, mNestedYOffset);

        switch (actionMasked) {
            case MotionEvent.ACTION_DOWN: {
          // 需要有一個子類才可以進行滑動 if (getChildCount() == 0) {
                    return false;
                }
          // 前面提到如果用戶在 fling 的時候,觸碰,此時是直接攔截返回 true,自己來處理事件。 if ((mIsBeingDragged = !mScroller.isFinished())) {
                    final ViewParent parent = getParent();
                    if (parent != null) {
                        parent.requestDisallowInterceptTouchEvent(true);
                    }
                }

                /*
                 * If being flinged and user touches, stop the fling. isFinished
                 * will be false if being flinged.處理結果就是停止 fling
                 */
                if (!mScroller.isFinished()) {
                    mScroller.abortAnimation();
                }

                // Remember where the motion event started
                mLastMotionY = (int) ev.getY();
                mActivePointerId = ev.getPointerId(0);
         // 尋找嵌套父View,告訴它準備在垂直方向上進行 TOUCH 類型的滑動                 startNestedScroll(ViewCompat.SCROLL_AXIS_VERTICAL, ViewCompat.TYPE_TOUCH);
                break;
            }
            case MotionEvent.ACTION_MOVE:
                final int activePointerIndex = ev.findPointerIndex(mActivePointerId);
                if (activePointerIndex == -1) {
                    Log.e(TAG, "Invalid pointerId=" + mActivePointerId + " in onTouchEvent");
                    break;
                }

                final int y = (int) ev.getY(activePointerIndex);
                int deltaY = mLastMotionY - y;
          // 滑動前先把移動距離告訴嵌套父View,看看它要不要消耗,返回 true 代表消耗了部分距離 if (dispatchNestedPreScroll(0, deltaY, mScrollConsumed, mScrollOffset,
                        ViewCompat.TYPE_TOUCH)) {
                    deltaY -= mScrollConsumed[1];
                    vtev.offsetLocation(0, mScrollOffset[1]);
                    mNestedYOffset += mScrollOffset[1];
                }
          // 滑動距離大於最大最小觸發距離 if (!mIsBeingDragged && Math.abs(deltaY) > mTouchSlop) {
                    final ViewParent parent = getParent();
                    if (parent != null) {
                        parent.requestDisallowInterceptTouchEvent(true);
                    }
            // 觸發滑動                     mIsBeingDragged = true;
                    if (deltaY > 0) {
                        deltaY -= mTouchSlop;
                    } else {
                        deltaY += mTouchSlop;
                    }
                }
                if (mIsBeingDragged) {
                    // Scroll to follow the motion event
                    mLastMotionY = y - mScrollOffset[1];

                    final int oldY = getScrollY();
                    final int range = getScrollRange();
                    final int overscrollMode = getOverScrollMode();
                    boolean canOverscroll = overscrollMode == View.OVER_SCROLL_ALWAYS
                            || (overscrollMode == View.OVER_SCROLL_IF_CONTENT_SCROLLS && range > 0);

                    // Calling overScrollByCompat will call onOverScrolled, which
                    // calls onScrollChanged if applicable.
            // 該方法會觸發自身內容的滾動
                    if (overScrollByCompat(0, deltaY, 0, getScrollY(), 0, range, 0,
                            0, true) && !hasNestedScrollingParent(ViewCompat.TYPE_TOUCH)) {
                        // Break our velocity if we hit a scroll barrier.
                        mVelocityTracker.clear();
                    }

                    final int scrolledDeltaY = getScrollY() - oldY;
                    final int unconsumedY = deltaY - scrolledDeltaY;
            // 通知嵌套的父 View 我已經處理完滾動了,該你來處理了 if (dispatchNestedScroll(0, scrolledDeltaY, 0, unconsumedY, mScrollOffset,
                            ViewCompat.TYPE_TOUCH)) {
              // 如果嵌套父View 消耗了滑動,那麼需要更新                         mLastMotionY -= mScrollOffset[1];
                        vtev.offsetLocation(0, mScrollOffset[1]);
                        mNestedYOffset += mScrollOffset[1];
                    } else if (canOverscroll) {
                        ensureGlows();
                        final int pulledToY = oldY + deltaY;
               // 觸發邊緣的陰影效果 if (pulledToY < 0) {
                            EdgeEffectCompat.onPull(mEdgeGlowTop, (float) deltaY / getHeight(),
                                    ev.getX(activePointerIndex) / getWidth());
                            if (!mEdgeGlowBottom.isFinished()) {
                                mEdgeGlowBottom.onRelease();
                            }
                        } else if (pulledToY > range) {
                            EdgeEffectCompat.onPull(mEdgeGlowBottom, (float) deltaY / getHeight(),
                                    1.f - ev.getX(activePointerIndex)
                                            / getWidth());
                            if (!mEdgeGlowTop.isFinished()) {
                                mEdgeGlowTop.onRelease();
                            }
                        }
                        if (mEdgeGlowTop != null
                                && (!mEdgeGlowTop.isFinished() || !mEdgeGlowBottom.isFinished())) {
                            ViewCompat.postInvalidateOnAnimation(this);
                        }
                    }
                }
                break;
            case MotionEvent.ACTION_UP:
                final VelocityTracker velocityTracker = mVelocityTracker;
                velocityTracker.computeCurrentVelocity(1000, mMaximumVelocity);
          // 計算滑動速率 int initialVelocity = (int) velocityTracker.getYVelocity(mActivePointerId);
          // 大於最小的設定的速率,觸發fling if ((Math.abs(initialVelocity) > mMinimumVelocity)) {
                    flingWithNestedDispatch(-initialVelocity);
                } else if (mScroller.springBack(getScrollX(), getScrollY(), 0, 0, 0,
                        getScrollRange())) {
                    ViewCompat.postInvalidateOnAnimation(this);
                }
                mActivePointerId = INVALID_POINTER;
                endDrag();
                break;
            case MotionEvent.ACTION_CANCEL:
                if (mIsBeingDragged && getChildCount() > 0) {
                    if (mScroller.springBack(getScrollX(), getScrollY(), 0, 0, 0,
                            getScrollRange())) {
                        ViewCompat.postInvalidateOnAnimation(this);
                    }
                }
                mActivePointerId = INVALID_POINTER;
                endDrag();
                break;
            case MotionEvent.ACTION_POINTER_DOWN: {
                final int index = ev.getActionIndex();
                mLastMotionY = (int) ev.getY(index);
                mActivePointerId = ev.getPointerId(index);
                break;
            }
            case MotionEvent.ACTION_POINTER_UP:
                onSecondaryPointerUp(ev);
                mLastMotionY = (int) ev.getY(ev.findPointerIndex(mActivePointerId));
                break;
        }

        if (mVelocityTracker != null) {
            mVelocityTracker.addMovement(vtev);
        }
        vtev.recycle();
        return true;
    }
ACTION_DOWN
先看 down 事件,如果處於 fling 期間,那麼直接停止 fling, 接着會調用 startNestedScroll,會讓 NestedScrollView 作為子 view 去 通知嵌套父 view,那麼就需要找到有沒有可以嵌套滑動的父 view 。
    public boolean startNestedScroll(int axes, int type) {
        // 交給 mChildHelper 代理來處理相關邏輯
        return mChildHelper.startNestedScroll(axes, type);
    }


    public boolean startNestedScroll(@ScrollAxis int axes, @NestedScrollType int type) {
        // 找到嵌套父 view 了,就直接返回
        if (hasNestedScrollingParent(type)) {
            // Already in progress
            return true;
        }
        // 是否支持嵌套滾動
        if (isNestedScrollingEnabled()) {
            ViewParent p = mView.getParent();
            View child = mView;
            while (p != null) {  // while 循環,將支持嵌套滑動的父 View 找出來。
                if (ViewParentCompat.onStartNestedScroll(p, child, mView, axes, type)) {
                    // 把父 view 設置進去
                    setNestedScrollingParentForType(type, p);
                    // 找到后,通過該方法可以做一些初始化操作
                    ViewParentCompat.onNestedScrollAccepted(p, child, mView, axes, type);
                    return true;
                }
                if (p instanceof View) {
                    child = (View) p;
                }
                p = p.getParent();
            }
        }
        return false;
    }
可以看到,這時候主要就是為了找到嵌套父 view。當 ViewParentCompat.onStartNestedScroll 返回 true,就表示已經找到嵌套滾動的父 View 了 。下面來看下這個方法的具體邏輯:
    // ViewParentCompat
    public static boolean onStartNestedScroll(ViewParent parent, View child, View target,
            int nestedScrollAxes, int type) {
        if (parent instanceof NestedScrollingParent2) {
            // First try the NestedScrollingParent2 API
            return ((NestedScrollingParent2) parent).onStartNestedScroll(child, target,
                    nestedScrollAxes, type);
        } else if (type == ViewCompat.TYPE_TOUCH) {
            // Else if the type is the default (touch), try the NestedScrollingParent API
            if (Build.VERSION.SDK_INT >= 21) {
                try {
                    return parent.onStartNestedScroll(child, target, nestedScrollAxes);
                } catch (AbstractMethodError e) {
                    Log.e(TAG, "ViewParent " + parent + " does not implement interface "
                            + "method onStartNestedScroll", e);
                }
            } else if (parent instanceof NestedScrollingParent) {
                return ((NestedScrollingParent) parent).onStartNestedScroll(child, target,
                        nestedScrollAxes);
            }
        }
        return false;
    }
這裏其實沒啥好分析,就是告訴父類當前是什麼類型的滾動,以及滾動方向。其實這裏可以直接看下 NestedScrollView 的 onStartNestedScroll 的邏輯。
//  NestedScrollView
    public boolean onStartNestedScroll(@NonNull View child, @NonNull View target, int axes,
            int type) {
     // 確保觸發的是垂直方向的滾動 return (axes & ViewCompat.SCROLL_AXIS_VERTICAL) != 0;
    }
當確定了嵌套父 View 以後,又會調用父 view 的 onNestedScrollAccepted 方法,在這裏可以做一些準備工作和配置。下面我們看到的 是 Ns 裏面的方法,注意不是父 view 的,只是當作參考。
public void onNestedScrollAccepted(@NonNull View child, @NonNull View target, int axes, int type) {
    mParentHelper.onNestedScrollAccepted(child, target, axes, type);
   // 這裏 Ns 作為子 view 調用 該方法去尋找嵌套父 view。注意這個方法會被調用是 NS 作為父 view 收到的。這樣就     startNestedScroll(ViewCompat.SCROLL_AXIS_VERTICAL, type);
}
到這裏,down 的作用就講完了。
ACTION_MOVE
首先是會調用 dispatchNestedPreScroll,講當前的滑動距離告訴嵌套父 View。
  public boolean dispatchNestedPreScroll(int dx, int dy, int[] consumed, int[] offsetInWindow,
            int type) {
     // Ns 作為子 view 去通知父View return mChildHelper.dispatchNestedPreScroll(dx, dy, consumed, offsetInWindow, type);
    }
下面看下 mChildHelper 的代碼邏輯:
    /**
     * Dispatch one step of a nested pre-scrolling operation to the current nested scrolling parent.
     *
     * <p>This is a delegate method. Call it from your {@link android.view.View View} subclass
     * method/{@link androidx.core.view.NestedScrollingChild2} interface method with the same
     * signature to implement the standard policy.</p>
     *
     * @return true if the parent consumed any of the nested scroll
     */
    public boolean dispatchNestedPreScroll(int dx, int dy, @Nullable int[] consumed,
            @Nullable int[] offsetInWindow, @NestedScrollType int type) {
        if (isNestedScrollingEnabled()) {
       // 獲取之前找到的嵌套滾動的父 View final ViewParent parent = getNestedScrollingParentForType(type);
            if (parent == null) {
                return false;
            }
       // 滑動距離肯定不為0 才有意義 if (dx != 0 || dy != 0) {
                int startX = 0;
                int startY = 0;
                if (offsetInWindow != null) {
                    mView.getLocationInWindow(offsetInWindow);
                    startX = offsetInWindow[0];
                    startY = offsetInWindow[1];
                }

                if (consumed == null) {
                    if (mTempNestedScrollConsumed == null) {
                        mTempNestedScrollConsumed = new int[2];
                    }
                    consumed = mTempNestedScrollConsumed;
                }
                consumed[0] = 0;
                consumed[1] = 0;
          // 調用嵌套父 View 的對應的回調                 ViewParentCompat.onNestedPreScroll(parent, mView, dx, dy, consumed, type);

                if (offsetInWindow != null) {
                    mView.getLocationInWindow(offsetInWindow);
                    offsetInWindow[0] -= startX;
                    offsetInWindow[1] -= startY;
                }
                return consumed[0] != 0 || consumed[1] != 0;
            } else if (offsetInWindow != null) {
                offsetInWindow[0] = 0;
                offsetInWindow[1] = 0;
            }
        }
        return false;
    }
這裏主要是將滑動距離告訴 父 view,有消耗就會返回 true 。
    // ViewParentCompat
    public static void onNestedPreScroll(ViewParent parent, View target, int dx, int dy,
            int[] consumed) {
        onNestedPreScroll(parent, target, dx, dy, consumed, ViewCompat.TYPE_TOUCH);
    }
其實下面的 onNestedPreScroll 跟前面的 onStartNestedScroll 邏輯很像,就是層層傳遞。
    public static void onNestedPreScroll(ViewParent parent, View target, int dx, int dy,
            int[] consumed, int type) {
        if (parent instanceof NestedScrollingParent2) {
            // First try the NestedScrollingParent2 API
            ((NestedScrollingParent2) parent).onNestedPreScroll(target, dx, dy, consumed, type);
        } else if (type == ViewCompat.TYPE_TOUCH) {
            // Else if the type is the default (touch), try the NestedScrollingParent API
            if (Build.VERSION.SDK_INT >= 21) {
                try {
                    parent.onNestedPreScroll(target, dx, dy, consumed);
                } catch (AbstractMethodError e) {
                    Log.e(TAG, "ViewParent " + parent + " does not implement interface "
                            + "method onNestedPreScroll", e);
                }
            } else if (parent instanceof NestedScrollingParent) {
                ((NestedScrollingParent) parent).onNestedPreScroll(target, dx, dy, consumed);
            }
        }
    }
下面為了方便,沒法查看 NS 的嵌套父 View 的邏輯。直接看 Ns 中對應的方法。
    public void onNestedPreScroll(@NonNull View target, int dx, int dy, @NonNull int[] consumed,
            int type) {
     // 最終也是 Ns 再傳給其嵌套父 View         dispatchNestedPreScroll(dx, dy, consumed, null, type);
    }
傳遞完了之後,就會調用 overScrollByCompat 來實現滾動。
    boolean overScrollByCompat(int deltaX, int deltaY,
            int scrollX, int scrollY,
            int scrollRangeX, int scrollRangeY,
            int maxOverScrollX, int maxOverScrollY,
            boolean isTouchEvent) {
        final int overScrollMode = getOverScrollMode();
        final boolean canScrollHorizontal =
                computeHorizontalScrollRange() > computeHorizontalScrollExtent();
        final boolean canScrollVertical =
                computeVerticalScrollRange() > computeVerticalScrollExtent();
        final boolean overScrollHorizontal = overScrollMode == View.OVER_SCROLL_ALWAYS
                || (overScrollMode == View.OVER_SCROLL_IF_CONTENT_SCROLLS && canScrollHorizontal);
        final boolean overScrollVertical = overScrollMode == View.OVER_SCROLL_ALWAYS
                || (overScrollMode == View.OVER_SCROLL_IF_CONTENT_SCROLLS && canScrollVertical);

        int newScrollX = scrollX + deltaX;
        if (!overScrollHorizontal) {
            maxOverScrollX = 0;
        }

        int newScrollY = scrollY + deltaY;
        if (!overScrollVertical) {
            maxOverScrollY = 0;
        }

        // Clamp values if at the limits and record
        final int left = -maxOverScrollX;
        final int right = maxOverScrollX + scrollRangeX;
        final int top = -maxOverScrollY;
        final int bottom = maxOverScrollY + scrollRangeY;

        boolean clampedX = false;
        if (newScrollX > right) {
            newScrollX = right;
            clampedX = true;
        } else if (newScrollX < left) {
            newScrollX = left;
            clampedX = true;
        }

        boolean clampedY = false;
        if (newScrollY > bottom) {
            newScrollY = bottom;
            clampedY = true;
        } else if (newScrollY < top) {
            newScrollY = top;
            clampedY = true;
        }

        if (clampedY && !hasNestedScrollingParent(ViewCompat.TYPE_NON_TOUCH)) {
            mScroller.springBack(newScrollX, newScrollY, 0, 0, 0, getScrollRange());
        }

        onOverScrolled(newScrollX, newScrollY, clampedX, clampedY);

        return clampedX || clampedY;
    }
整塊邏輯其實沒啥好說的,然後主要是看 onOverScrolled 這個方法:
   protected void onOverScrolled(int scrollX, int scrollY,
            boolean clampedX, boolean clampedY) {
        super.scrollTo(scrollX, scrollY);
    }
最終是調用 scrollTo 方法來實現了滾動。
當滾動完了后,會調用 dispatchNestedScroll 告訴父 view 當前還剩多少沒消耗,如果是 0,那麼就不會上傳,如果沒消耗完,就會傳給父 View 。
如果是子 View 傳給 NS 的,是會通過 scrollBy 來進行消耗的,然後繼續向上層傳遞。
    public void onNestedScroll(View target, int dxConsumed, int dyConsumed, int dxUnconsumed,
            int dyUnconsumed, int type) {
        final int oldScrollY = getScrollY();
        scrollBy(0, dyUnconsumed);
        final int myConsumed = getScrollY() - oldScrollY;
        final int myUnconsumed = dyUnconsumed - myConsumed;
        dispatchNestedScroll(0, myConsumed, 0, myUnconsumed, null,
                type);
    }
假設當前已經滑動到頂部了,此時繼續滑動的話,就會觸發邊緣的陰影效果。
ACTION_UP
當用戶手指離開后,如果滑動速率超過最小的滑動速率,就會調用 flingWithNestedDispatch(-initialVelocity) ,下面來看看這個方法的具體邏輯:
    private void flingWithNestedDispatch(int velocityY) {
        final int scrollY = getScrollY();
        final boolean canFling = (scrollY > 0 || velocityY > 0)
                && (scrollY < getScrollRange() || velocityY < 0);
     // fling 前問問父View 要不要 fling, 一般是返回 false if (!dispatchNestedPreFling(0, velocityY)) {
       // 這裏主要是告訴父類打算自己消耗了             dispatchNestedFling(0, velocityY, canFling);
       // 自己處理             fling(velocityY);
        }
    }
下面繼續看 fling 的實現。
    public void fling(int velocityY) {
        if (getChildCount() > 0) {

            mScroller.fling(getScrollX(), getScrollY(), // start
                    0, velocityY, // velocities
                    0, 0, // x
                    Integer.MIN_VALUE, Integer.MAX_VALUE, // y
                    0, 0); // overscroll
            runAnimatedScroll(true);
        }
    }

    private void runAnimatedScroll(boolean participateInNestedScrolling) {
        if (participateInNestedScrolling) {
            // fling 其實也是一種滾動,只不過是非接觸的
            startNestedScroll(ViewCompat.SCROLL_AXIS_VERTICAL, ViewCompat.TYPE_NON_TOUCH);
        } else {
            stopNestedScroll(ViewCompat.TYPE_NON_TOUCH);
        }
        mLastScrollerY = getScrollY();
        ViewCompat.postInvalidateOnAnimation(this);
    }
最終會觸發重繪操作,重繪過程中會調用 computeScroll,下面看下其內部的代碼邏輯。
    @Override
    public void computeScroll() {

        if (mScroller.isFinished()) {
            return;
        }

        mScroller.computeScrollOffset();
        final int y = mScroller.getCurrY();
        int unconsumed = y - mLastScrollerY;
        mLastScrollerY = y;

        // Nested Scrolling Pre Pass
        mScrollConsumed[1] = 0;
     // 滾動的時候,依然會把當前的未消耗的滾動距離傳給嵌套父View         dispatchNestedPreScroll(0, unconsumed, mScrollConsumed, null,
                ViewCompat.TYPE_NON_TOUCH);
        unconsumed -= mScrollConsumed[1];

        final int range = getScrollRange();

        if (unconsumed != 0) {
            // Internal Scroll
            final int oldScrollY = getScrollY();
       // 自己消耗             overScrollByCompat(0, unconsumed, getScrollX(), oldScrollY, 0, range, 0, 0, false);
            final int scrolledByMe = getScrollY() - oldScrollY;
            unconsumed -= scrolledByMe;

            // Nested Scrolling Post Pass
            mScrollConsumed[1] = 0;
        // 繼續上傳給父View             dispatchNestedScroll(0, scrolledByMe, 0, unconsumed, mScrollOffset,
                    ViewCompat.TYPE_NON_TOUCH, mScrollConsumed);
            unconsumed -= mScrollConsumed[1];
        }
     // 如果到這裡有未消耗的,說明已經滾動到邊緣了 if (unconsumed != 0) {
            final int mode = getOverScrollMode();
            final boolean canOverscroll = mode == OVER_SCROLL_ALWAYS
                    || (mode == OVER_SCROLL_IF_CONTENT_SCROLLS && range > 0);
            if (canOverscroll) {
                ensureGlows();
                if (unconsumed < 0) {
                    if (mEdgeGlowTop.isFinished()) {
                        mEdgeGlowTop.onAbsorb((int) mScroller.getCurrVelocity());
                    }
                } else {
                    if (mEdgeGlowBottom.isFinished()) {
                        mEdgeGlowBottom.onAbsorb((int) mScroller.getCurrVelocity());
                    }
                }
            }
       // 停止滾動               abortAnimatedScroll();
        }
     // 如果此時滾動還未結束,並且當前的滑動距離都被消耗了,那麼繼續刷新滾動,直到停止為止 if (!mScroller.isFinished()) {
            ViewCompat.postInvalidateOnAnimation(this);
        }
    }
到這裏,關於 Ns 的嵌套滑動就講完了。希望大家能夠對嵌套滑動有個理解。
閱讀 Ns 的源碼,可以讓你更好的理解嵌套滑動,以及事件分發的邏輯。
本站聲明:網站內容來源於博客園,如有侵權,請聯繫我們,我們將及時處理
※評比南投搬家公司費用收費行情懶人包大公開
搬家價格與搬家費用透明合理,不亂收費。本公司提供下列三種搬家計費方案,由資深專業組長到府估價,替客戶量身規劃選擇最經濟節省的計費方式